
Let’s get one thing straight immediately: napkins are not optional here. If you finish a plate of BBQ Chicken Wings and your face remains clean, you did it wrong. We are talking about sticky, caramelized, messy, finger-licking glory. You know that specific craving where nothing else hits the spot? It’s usually for wings.
But let’s face the harsh reality. We have all endured the disappointment of “soggy wing syndrome.” You order them at a bar, and they arrive sitting in a pool of lukewarm sauce, the skin flabby and sad. It’s a culinary tragedy.
I used to think the only way to get that shattering crunch was to own a commercial deep fryer. I was wrong. After years of testing (and eating way too many chickens), I found a better way. Today, I am sharing my method for making the absolute best BBQ wings in your own oven. We are going to achieve crispy skin that holds up to the sauce, juicy meat, and a flavor profile that will make you the hero of your next game day.
The Great Debate: To Fry or Not to Fry?
Most people assume deep frying creates the superior wing. I disagree. While I love a good piece of crispy fried chicken, BBQ wings present a unique challenge.
When you deep fry a wing and then toss it in a heavy, sugar-based BBQ sauce, the crust often turns to mush within minutes. The oil creates a barrier, but the sauce dissolves it. Plus, dealing with a gallon of hot oil on a Tuesday night? No thank you.
Why The Oven Wins
I prefer the oven for BBQ wings. Specifically, high-heat roasting. This method renders out the fat from the skin slowly, creating a cracker-like texture that stays crunchy even after you sauce it. You get the crispiness without the grease splatter. It keeps your kitchen clean and your arteries slightly happier.
The Prep: Don’t Skip Leg Day (or Wing Day)
If you buy whole wings, you have some work to do. Do not cook the whole wing intact unless you want it to cook unevenly. You need to separate the “flat” (the middle part with two bones) from the “drumette” (the mini leg).
Find the joint. Wiggle it. You will feel a soft spot where the bones connect. Slice through that cartilage. If you hit bone, stop and adjust. Your knife should glide through. Discard the wing tips or freeze them for stock.
The Drying Ritual
Here is the most critical rule of crispy skin: Moisture is the enemy. If you put wet chicken in the oven, you steam it. Steamed chicken is rubbery.
Grab a roll of paper towels. Pat the wings dry. Then, get fresh paper towels and do it again. You want the skin to feel tacky and dry to the touch. I sometimes even let them sit uncovered in the fridge for an hour to dry out further. It makes a massive difference.
The Science of Crisp: The Baking Powder Hack
Ready for the secret weapon? It’s baking powder.
Not baking soda. Do not use baking soda unless you want your wings to taste like metal soap. You want aluminum-free baking powder.
Why does this work? The baking powder raises the pH level of the chicken skin. This alkaline environment breaks down the peptide bonds in the skin, allowing it to get crisp and brown much faster than it would on its own. It essentially mimics the results of a deep fryer.
The Dry Rub Mix
I don’t just use baking powder; I season the meat heavily before cooking. I toss my wings in a blend of:
- Baking Powder: The crisping agent (use about 1 tablespoon per 2 pounds of wings).
- Kosher Salt: For deep seasoning.
- Smoked Paprika: To mimic the charcoal grill flavor.
- Garlic Powder & Onion Powder: The savory backbone.
- Black Pepper: For a subtle heat.
Toss the wings in a large bowl with this mixture until they look lightly dusted, like they played in the snow. You don’t want a thick batter, just a coating.
The Setup: Elevation is Key
You cannot throw these directly onto a baking sheet. If you do, the wings will sit in their own rendered fat. The bottoms will get soggy, and the tops will burn.
You must use a wire rack placed inside a baking sheet. This allows super-heated air to circulate 360 degrees around the wing. It cooks the bottom and the top simultaneously.
Pro Tip: Line the baking sheet under the rack with aluminum foil. This catches the dripping fat and saves you from scrubbing burnt grease later. Trust me on this one.
The Cook: High Heat, No Fear
Set your oven to 400°F (200°C). We need intense heat to render that fat and crisp the skin.
Arrange the wings on the rack. Give them personal space. If they touch, they create steam pockets. Place the tray in the oven and let them roast.
The Timeline
- 0-20 Minutes: The fat starts to render. They will look pale. Don’t panic.
- 20-40 Minutes: The browning begins.
- 40-50 Minutes: This is the sweet spot. The skin bubbles and turns a deep golden brown.
I usually flip them once halfway through, but honestly, with the wire rack, you don’t really have to. You know they are done when the skin feels hard when you tap it with tongs.
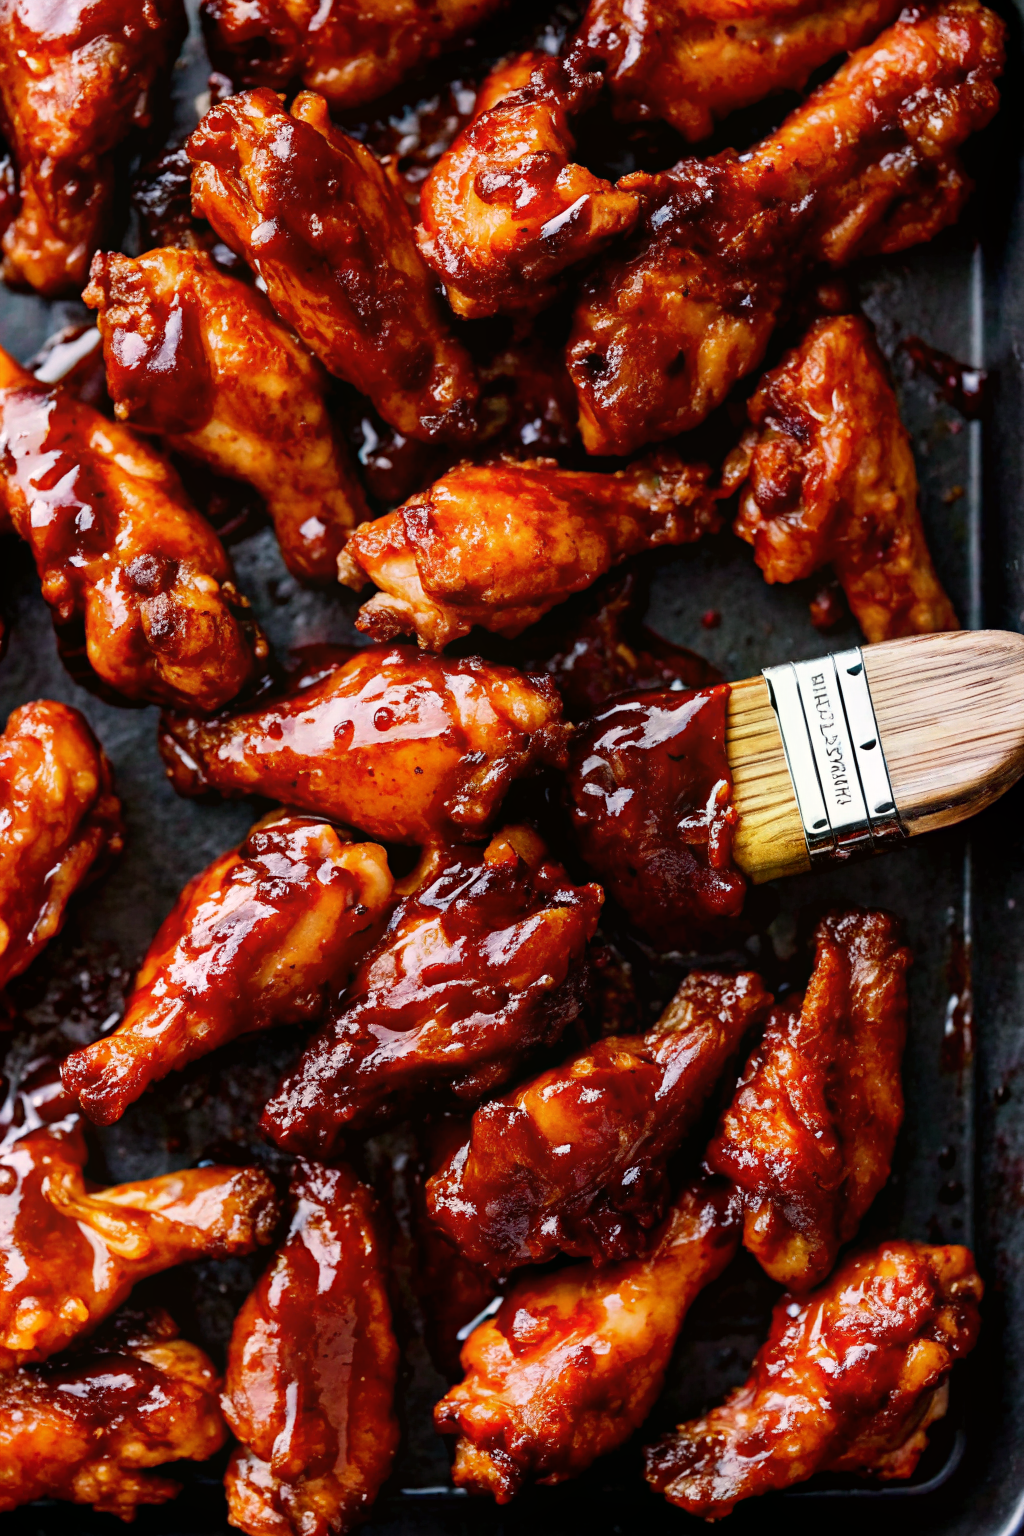
The Sauce: The Sticky Situation
While the wings bake, we talk sauce. You can buy a bottle, sure. But store-bought sauce often lacks that punchy brightness. It’s usually just corn syrup and smoke flavoring.
I recommend a “semi-homemade” approach if you are short on time. Buy a decent base BBQ sauce and doctor it up.
The Doctoring Technique
Pour a cup of bottled sauce into a small saucepan. Add:
- Apple Cider Vinegar: A splash cuts the heavy sweetness.
- Butter: whisk in a tablespoon of cold butter at the end. It gives the sauce a glossy, velvety sheen.
- Hot Sauce: Just a dash for complexity.
If you prefer scratch-made, simmer ketchup, brown sugar, molasses, vinegar, and spices until thick. The goal is a sauce that is thick enough to cling but thin enough to spread.
The Toss: Timing is Everything
Here is where people mess up. Do not sauce the wings and then put them back in the oven for a long time. BBQ sauce has a high sugar content. Sugar burns.
Take the crispy wings out of the oven. Transfer them immediately to a large metal bowl. Pour the warm sauce over them.
Now, execute the toss. Flick your wrist. Coat every crevice. The heat from the wings will “set” the sauce slightly, making it sticky rather than runny. If you really want that caramelized “baked-on” texture, you can put them back in the oven for 2 minutes—no more. Any longer and you risk burning the sugars.
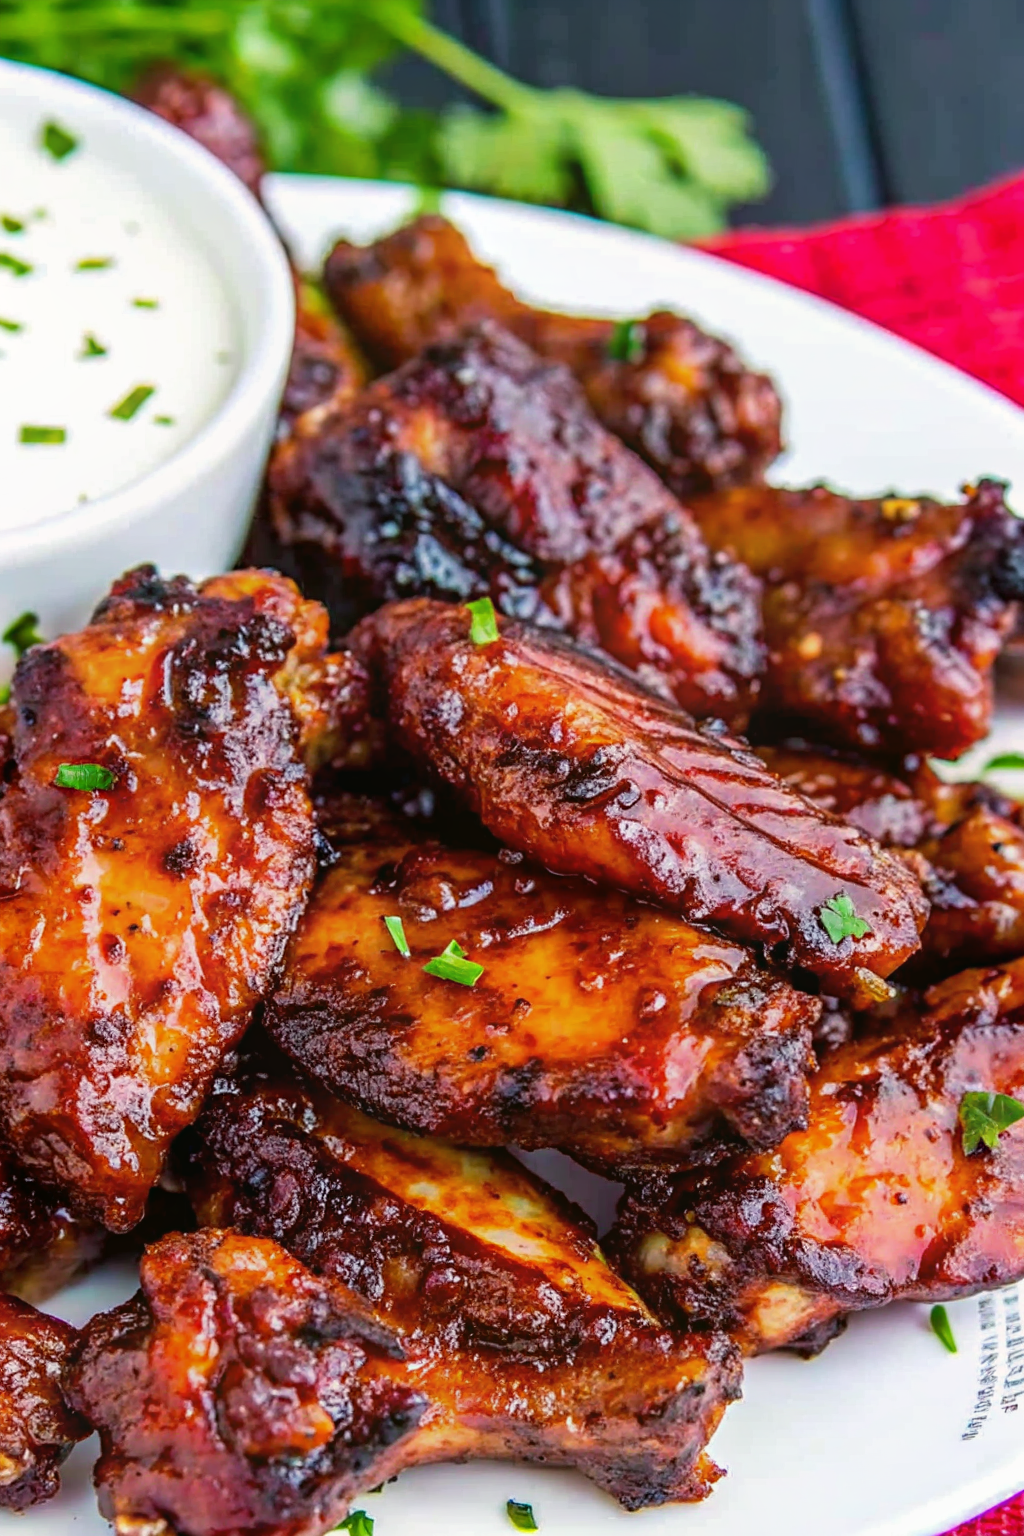
Serving: The Perfect Platter
Pile those beautiful, glistening BBQ Chicken Wings on a platter. I like to garnish them with chopped green onions or fresh cilantro. It adds a pop of color and a fresh bite that cuts through the rich, sugary sauce.
But what about sides? You need something to balance the meal.
The Cooling Factor
You need a crunch. Celery and carrots are non-negotiable IMO. They provide a watery crunch that cleanses the palate.
And for the dipping sauce? I am a Blue Cheese loyalist. The funk of the cheese pairs perfectly with the sweet BBQ sauce. However, if you are team Ranch, I won’t stop you.
If you want to turn this appetizer into a full dinner, you need carbs. I love serving a basket of garlic bread alongside wings. You can use the bread to mop up any extra sauce left on the plate. It’s a double win.
The Grill Option: Proceed with Caution
“But Donna,” you say, “It’s summer! I want to grill!”
Okay, I hear you. You can make these on the grill, but you have to be careful. Remember the sugar? If you put sauced wings over direct flame, you will make charcoal, not dinner.
The Two-Zone Method
Set up your grill for indirect heat. Pile the coals on one side. Cook the seasoned (but unsauced) wings on the cool side with the lid down. This mimics the oven.
Only when the wings are cooked through and crispy do you move them to the hot side. Sear them for a minute, then toss them in sauce. Do not grill sauced wings for 20 minutes unless you like the taste of burnt toast.
Troubleshooting: Why Are They Chewy?
Did your wings fail? Let’s figure out why.
- Soggy Skin: You crowded the pan or didn’t use baking powder. Airflow is king.
- Dry Meat: You overcooked them. Wings are forgiving because of the fat, but they have limits. Pull them when the skin is crisp.
- Salty: Did you use table salt instead of Kosher salt? Table salt is much denser. If you mix baking powder with fine table salt, you will oversalt the bird. Always use Kosher salt for cooking.
The “Flat vs. Drum” Debate
We need to address the elephant in the room. Which part of the wing is better?
I am strictly Team Flat. The meat between the two bones is more tender, silky, and absorbs more flavor. Plus, I enjoy the mechanics of pulling the bones apart. It slows down the eating process.
My friends who are Team Drum argue that it provides a more substantial bite of meat. They view the flat as “too much work.” I think they are just lazy eaters. 😉 But hey, that is the beauty of wings—there is something for everyone.
Why We Love This Dish
There is a social aspect to BBQ Chicken Wings. You can’t really eat them alone. Well, you can, but they taste better with noise, friends, and maybe a cold drink.
They break down social barriers. You can’t take yourself too seriously when you have sauce on your cheek. It encourages a relaxed, fun atmosphere. That is why they are the MVP of party food.
If you serve these at a party and want to keep the “finger food” theme going but want something a bit lighter to start, consider putting out a fresh Caesar salad. It allows your guests to pretend they are being healthy before destroying a dozen wings.
Variations on the Theme
Once you master the crispy skin technique, the world is your oyster. You don’t have to stick to BBQ.
- Classic Buffalo: Toss the crispy wings in melted butter and Frank’s RedHot.
- Garlic Parmesan: Toss in garlic butter and a mountain of grated cheese.
- Lemon Pepper: Skip the sauce and just hit them with lemon pepper seasoning right out of the oven.
The baking powder method works for all of these. It is the blank canvas for your culinary art.
Conclusion
Making restaurant-quality wings at home is not a mystery. It is science. By using the baking powder trick and managing your moisture, you unlock a level of crispiness that rivals the deep fryer.
You save money, you control the ingredients, and you avoid the grease smell that lingers in your house for three days.
So, go to the store. Buy the big pack of wings. Invite the crew over. Just make sure you have plenty of paper towels on standby. You are going to need them.
Now, stop reading and start preheating that oven!
For more on the history of barbecue and how it became a staple of American cuisine, check out this article on the history of barbecue. It’s a great read while you wait for your wings to crisp up.
Crispy Baked BBQ Wings
Author: Prep: 15 minutes Cook: 50 minutes Total: 1 hour 10 minutesEquipment
- Rimmed Baking Sheet
- Oven-safe wire rack (cooling rack)
- Paper towels
- Large mixing bowl
- Large mixing bowl
Ingredients
The Wings
- 2 lbs chicken wings party style, flats and drumettes separated
- 1 tablespoon aluminum-free baking powder NOT baking soda
- 1 teaspoon kosher salt
- ½ teaspoon black pepper
- 1 teaspoon smoked paprika
- 1 teaspoon garlic powder
- 1 teaspoon onion powder
- Cooking spray for the rack
The Sauce
- 1 cup BBQ sauce your favorite brand
- 1 tablespoon apple cider vinegar optional, for tang
- 1 pinch cayenne pepper optional, for heat
Garnish (Optional)
- Chopped green onions
- Ranch or Blue Cheese dressing for dipping
Instructions
- Preheat and Prep: Preheat your oven to 400°F (200°C). Line a rimmed baking sheet with aluminum foil for easy cleanup, then place a wire rack on top. Spray the rack generously with cooking spray to prevent sticking.
- Dry the Wings: Remove the wings from their packaging and pat them thoroughly dry with paper towels. Squeeze them firmly to remove as much surface moisture as possible—this is the most important step for crispy skin!
- Mix the Dry Rub: In a small bowl, whisk together the baking powder, salt, black pepper, smoked paprika, garlic powder, and onion powder.
- Coat the Chicken: Place the dried wings in a large bowl. Sprinkle the seasoning mixture over the wings and toss them until every piece is evenly coated in a light, dusty layer.
- Arrange: Place the wings on the prepared wire rack in a single layer. Make sure they are not touching each other so air can circulate freely.
- Bake: Place the baking sheet in the center of the oven. Bake for 25 minutes.
- Flip: Carefully flip each wing over using tongs. Bake for another 20 to 25 minutes, or until the skin is golden brown and crispy.
- Rest: Remove the wings from the oven and let them rest on the rack for 5 minutes. This allows the coating to set and harden slightly.
- Sauce: While the wings rest, mix your BBQ sauce with the vinegar and cayenne (if using) in a large bowl. Add the warm wings to the bowl and toss vigorously until they are coated in the sticky glaze.
- Serve: Plate your Crispy Baked BBQ Wings immediately with celery, carrots, and your favorite dipping sauce
Notes
- Baking Powder vs. Soda: Double-check your label! You must use baking powder. Baking soda will make the wings taste metallic and bitter.
- Don’t Skip the Rack: If you bake these directly on the foil or pan, they will steam in their own juices and turn out soggy. The wire rack is essential for air circulation.
- Saucing: Sauce the wings right before serving. If you let them sit in the sauce for too long, the skin will eventually soften.
- Make it Spicy: If you love heat, add a dash of hot sauce to the BBQ mixture, or swap the BBQ sauce entirely for a Buffalo sauce blend.
- Storage: These are best eaten fresh. However, you can reheat leftovers in an air fryer or oven at 350°F for 5 minutes to revive the crunch. Do not microwave
Nutrition


