
Let’s be honest. Most “roasted” potatoes are a lie. You know the ones I’m talking about. You order them at a diner or grab a scoop from a buffet, expecting a satisfying crunch. Instead, you bite into a sad, oily sponge that tastes like disappointment and old grease. It’s tragic. A potato deserves better than that.
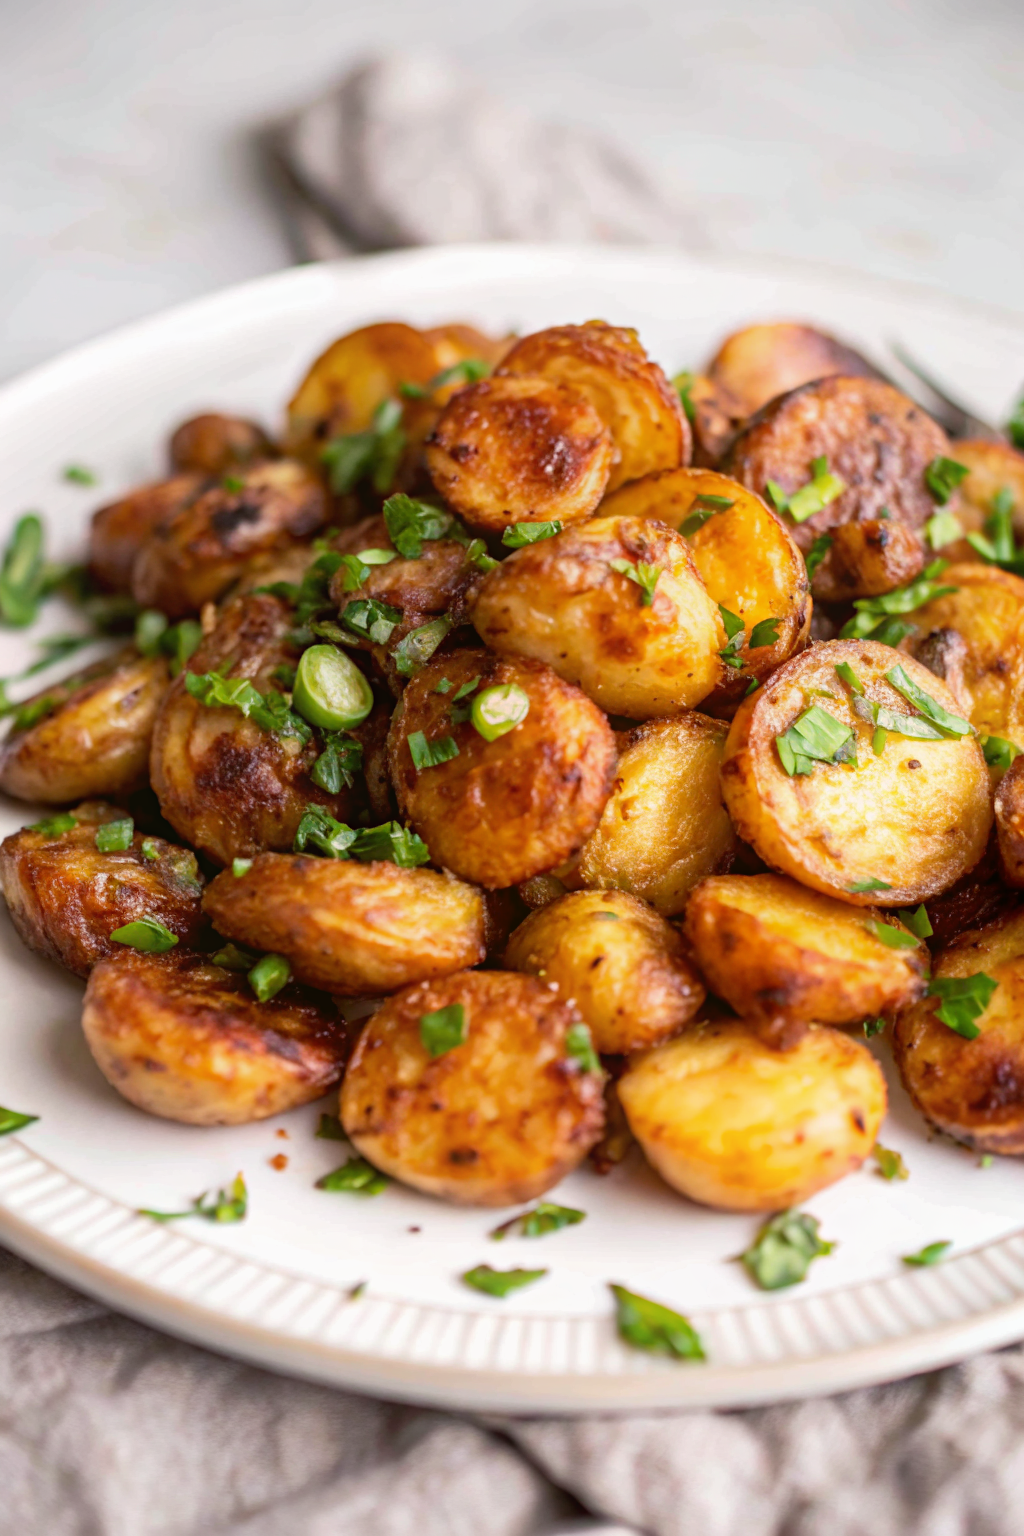
We are going to fix that right now. We are going to make garlic roasted potatoes that actually live up to the hype. I’m talking about potatoes with a crust so shattering and glass-like that you can hear it from the next room, surrounding a center so fluffy it practically melts on your tongue. And the garlic? It won’t be burnt and bitter. It will be golden, sticky, and sweet.
I spent years making mediocre tubers. I threw raw chunks on a baking sheet, drowned them in oil, and prayed. IMO, that is the wrong approach. Through trial, error, and a lot of burnt garlic, I found the method that works.
So, preheat your oven. We are about to ruin all other potatoes for you forever.
The Potato Personality Test
You cannot just grab any random spud and expect culinary greatness. Potatoes fall into two main camps: waxy and starchy.
Waxy Potatoes (Red, Fingerling):
These guys hold their shape. They are dense and smooth. While they make a great potato salad, they refuse to get fluffy. They just get… hot.
Starchy Potatoes (Russets):
These are the kings of fluff. They break down easily. However, they can sometimes fall apart too much if you look at them the wrong way.
The Golden Child: Yukon Gold
For the ultimate garlic roasted potatoes, I choose Yukon Golds every single time. They sit right in the middle of the spectrum. They have a naturally buttery flavor (even before you add butter), and they crisp up beautifully while maintaining a creamy interior. If you can’t find them, Russets work, but handle them with care.
The Fat: Choose Your Fighter
The fat you use transfers the heat from the pan to the potato. It also adds flavor. You have options here, and your choice defines the final dish.
- Olive Oil: The classic. It’s reliable and tasty. Just don’t use your expensive extra virgin stuff; the high heat will destroy the flavor nuances anyway.
- Duck Fat: If you want to feel like royalty, use duck fat. It has a high smoke point and adds a savory richness that vegetable oil just can’t match.
- Beef Tallow: This creates an incredibly crispy crust. It’s old school, but it works.
Personally, I use a mix of olive oil and butter. The oil prevents burning, and the butter adds those caramelized milk solids that taste like heaven.
The Secret Step: The Parboil
Here is where 90% of home cooks fail. They toss raw potatoes into the oven. Do not do this.
If you roast raw potatoes, the outside burns before the inside cooks through. You need to parboil them first. But we aren’t just boiling them in plain water. We are using science.
Add a half-teaspoon of baking soda to your boiling water.
Why baking soda?
It raises the pH level of the water (makes it alkaline). This breaks down the pectin on the surface of the potato much faster than the center. When you drain the potatoes and toss them, that broken-down exterior turns into a starchy slurry. That mushy paste creates the thick, crunchy crust we crave.
I learned this trick years ago, and frankly, I refuse to cook potatoes any other way now. It makes that much of a difference.
The “Roughing Up” Technique
Once your potatoes are fork-tender, drain them. Now, you must be aggressive. Keep them in the pot and shake it violently.
You want to bang the potatoes against the sides of the pot. You want them to look messy. You want fuzzy edges. Those rough, fuzzy bits will dehydrate in the oven and turn into crispy golden nuggets. If your potatoes look smooth after boiling, you failed the shake test. Shake them harder.
The Garlic Conundrum
We need to talk about garlic. I love garlic. You love garlic. But garlic contains sugar and water, and it burns rapidly at 400°F.
If you toss minced garlic onto your potatoes at the beginning of a 45-minute roast, you will end up with black, acrid specks that taste like charcoal. That is not delicious :/
You have two strategies here:
- The Infusion: Sauté your garlic in your oil/butter mixture on the stove for a few minutes, then strain the garlic out. Toss the potatoes in the garlic-infused oil. Save the cooked garlic bits and sprinkle them on at the very end.
- The Late Addition: Roast the potatoes for 30 minutes. Then, toss them with minced garlic for the final 10–15 minutes. This gives the garlic enough time to toast without burning.
I prefer the second method. I like the texture of the roasted garlic bits clinging to the potato.
The Roasting Process: High Heat Only
Your oven needs to be hot. We aren’t baking a cake; we are crisping vegetables. Preheat to 400°F (200°C) or even 425°F (220°C).
Space is crucial.
Spread the potatoes out on your baking sheet. If they touch, they steam each other. Steam creates soggy skins. We hate soggy skins. Give them room to breathe.
Flip them halfway through. You want every side to hit the hot pan. You will know they are ready when they look deep golden brown—not tan, not beige, but a rich, dark gold.
Flavor Variations to Keep It Fresh
While salt, pepper, and garlic are the holy trinity, you can easily pivot this recipe to match your main course.
The Rosemary Route:
Add fresh rosemary sprigs to the pan halfway through. The oil fries the herbs, making them crispy and aromatic. This pairs exceptionally well if you serve the potatoes alongside a roast goose for a holiday feast. The rich game meat demands a hearty, herbal side dish.
The Spicy Kick:
Toss the potatoes with smoked paprika and a pinch of cayenne pepper before roasting. This creates a “patatas bravas” vibe that works great for brunch.
The Cheesy Finish:
Grate fresh Parmesan cheese over the hot potatoes right when they come out of the oven. The cheese melts instantly and forms a salty, nutty crust.
Serving: The Final Touches
You just pulled the pan out of the oven. The kitchen smells incredible. But you aren’t done yet.
Potatoes soak up salt. Taste one (carefully, it’s hot). It probably needs another pinch of flakey sea salt. And don’t forget the acid. A tiny squeeze of fresh lemon juice or a splash of vinegar brightens the dish and cuts through the heavy starch.
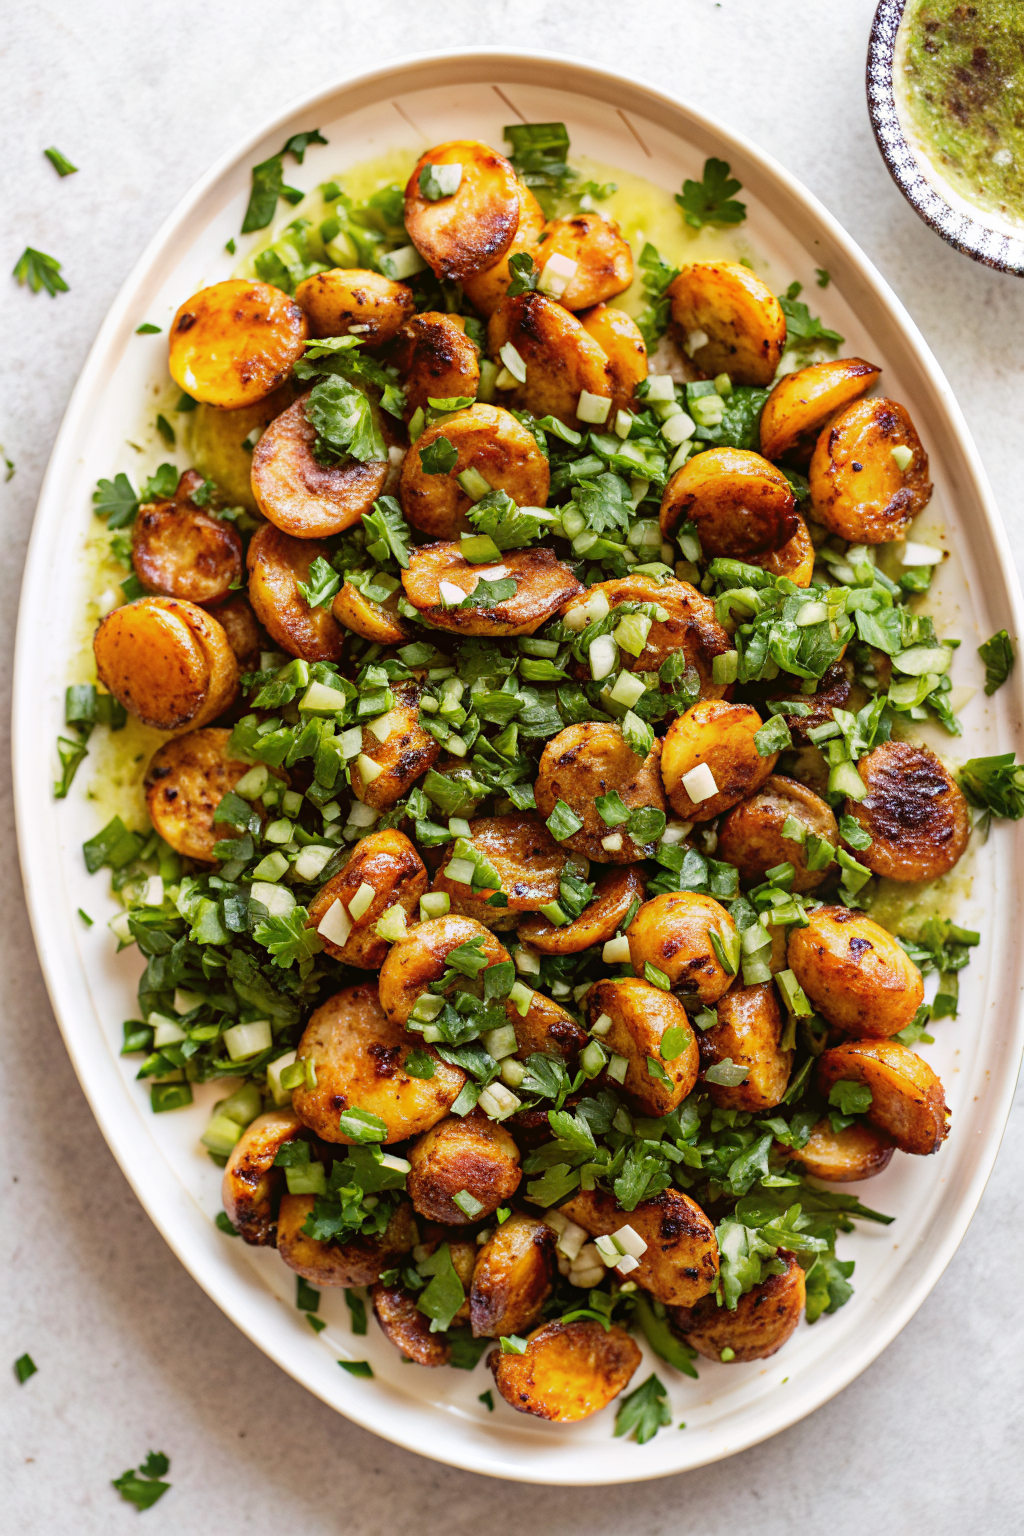
Fresh parsley or chives add a pop of color. Brown food tastes good, but it looks boring. A little green makes it photo-ready.
Troubleshooting Your Spuds
Even with the best intentions, things go wrong. Here is how to fix your potato disasters.
“They aren’t crispy!”
You overcrowded the pan, or your oven wasn’t hot enough. Crank the heat to 450°F (230°C) and move them to the top rack for 10 minutes. Or, pop them in an air fryer if you have one.
“They fell apart.”
You boiled them too long. Russets do this often. Next time, check them two minutes earlier. For now, just call them “smashed potatoes” and pretend you meant to do it.
“The garlic burned.”
You added it too early. Scrape off the burnt bits (it’s tedious, but worth it) and toss with fresh garlic butter right before serving.
Pairing Ideas
What do you eat with these garlic roasted potatoes? Honestly, I eat them straight off the baking sheet. But if you insist on a balanced meal, they are the ultimate sidekick.
They stand up perfectly to red meat. A steak or a roast beef dinner needs these potatoes. If you want to keep the meal appetizer-focused, serve them with some honey-glazed smoked sausages. The sweetness of the sausage glaze contrasts beautifully with the savory, salty garlic potatoes.
And let’s talk about sauce. These potatoes are perfect for dipping. Ketchup is fine, but why stop there? I love drowning them in a rich savory sauce. If you have drippings from a roast, whip up a quick batch of homemade gravy recipe. Dipping a crispy potato into hot gravy is a spiritual experience.
The Leftover Reality
Leftover roasted potatoes lose their crunch in the fridge. The moisture from the center migrates to the crust, turning it soft.
To revive them:
Do not use the microwave. The microwave creates a chewy, sad texture.
- Oven: Reheat at 400°F for 10 minutes.
- Pan: Fry them in a skillet with a little butter.
- Waffle Iron: Yes, really. Smash leftovers in a waffle iron for potato hash browns.
Why This Recipe Wins
You might think this sounds like a lot of work for a potato. You have to boil water, shake a pot, and time your garlic. Why not just toss them in the oven?
Because effort tastes good. The difference between a “baked potato wedge” and a garlic roasted potato with a glass-like crust is massive. Your guests will notice. You will notice.
According to the food science gurus at Serious Eats, that parboiling step with baking soda increases the surface area for crunch by a significant margin. It’s not just a superstition; it’s chemistry.
Final Thoughts
We often treat side dishes as filler. We spend hours on the main protein and five minutes chopping a vegetable. But the side dish is the support system. It elevates the meal.
These potatoes demand attention. They steal the show. When you set that bowl down on the table, listen to the sound they make. That hollow, crispy scratching sound against the ceramic? That is the sound of victory.
So, grab your Yukon Golds. Get that water boiling. Don’t fear the baking soda. You are about to make the best potatoes of your life. Just make sure you make a double batch, because I guarantee they will vanish before the main course even hits the table
Now, go scrub those spuds!
The Ultimate Crispy Garlic Roasted Potatoes
Author: Prep: 15 minutes Cook: 55 minutes Total: 1 hour 15 minutesEquipment
- Large pot (for boiling)
- Colander or strainer
- Large Rimmed Baking Sheet
- Spatula
Ingredients
The Potatoes
- 3 lbs Yukon Gold potatoes peeled and cut into 2-inch chunks
- 2 quarts Water
- 1 tbsp Kosher salt for the water
- 1/2 tsp Baking soda Crucial! Do not skip
The Fat & Flavor
- 5 tbsp Extra virgin olive oil or beef tallow/duck fat for extra luxury
- 1 tsp Fresh rosemary finely chopped
- 1 tsp Fresh thyme finely chopped
- 1/2 tsp Freshly cracked black pepper
The Garlic Finish
- 4 cloves Garlic minced
- 1 tbsp Fresh parsley chopped (for garnish)
- Flaky sea salt to taste
Instructions
- The Boiling Setup: Preheat your oven to 400°F (200°C). Bring a large pot of water to a boil. Add the tablespoon of salt and the baking soda.
- Parboil: Add the potato chunks to the boiling water. Reduce heat slightly to a simmer and cook for about 10 minutes, or until a knife meets little resistance when inserted into a potato.
- The “Rough Up”: Drain the potatoes in a colander and let them sit for a minute to steam dry. Transfer them back into the empty, dry pot.
- Create the Crust: Drizzle the olive oil (or fat of choice), rosemary, thyme, and black pepper over the potatoes. Now, shake the pot violently for about 10 seconds. You want to bruise the edges of the potatoes until they look fuzzy and mashed on the outside. This slurry creates the crunch!
- Roast: Spread the potatoes onto a large baking sheet. Give them space—do not let them crowd each other. Roast for 20 minutes without touching them.
- Flip: Carefully flip the potatoes. They should be starting to brown on the bottom. Roast for another 20–25 minutes until deep golden brown and crispy.
- The Garlic Finish: In the last 2–3 minutes of roasting, toss the minced garlic onto the pan with the potatoes. (Adding it earlier would burn it!). Let it toast just until fragrant.
- Serve: Remove from the oven. Sprinkle immediately with fresh parsley and a pinch of flaky sea salt. Serve hot!
Notes
- Why Baking Soda? It breaks down the potato’s pectin, creating a starchy paste on the surface that turns into that mega-crispy crust.
- Potato Choice: Yukon Golds are best for a creamy center. Russets get fluffier but fall apart easier—handle with care if using them.
- The Garlic Trick: Never add minced garlic at the start of a 45-minute roast. It will turn to charcoal. Add it at the very end or use garlic-infused oil.
- Reheating: To restore the crunch, reheat these in the oven or an air fryer. The microwave will make them sad and soggy.
Nutrition


