
Let’s face it: holiday baking often feels like an extreme sport. You start with grand ambitions of constructing a gingerbread mansion that rivals actual architecture, but three hours later, you find yourself crying over burnt sugar and a collapsed roof. I have been there. We all have. Sometimes, you just need a win. You need a treat that looks adorable, tastes like pure nostalgia, and requires zero oven time.
Enter the Marshmallow Snowball.
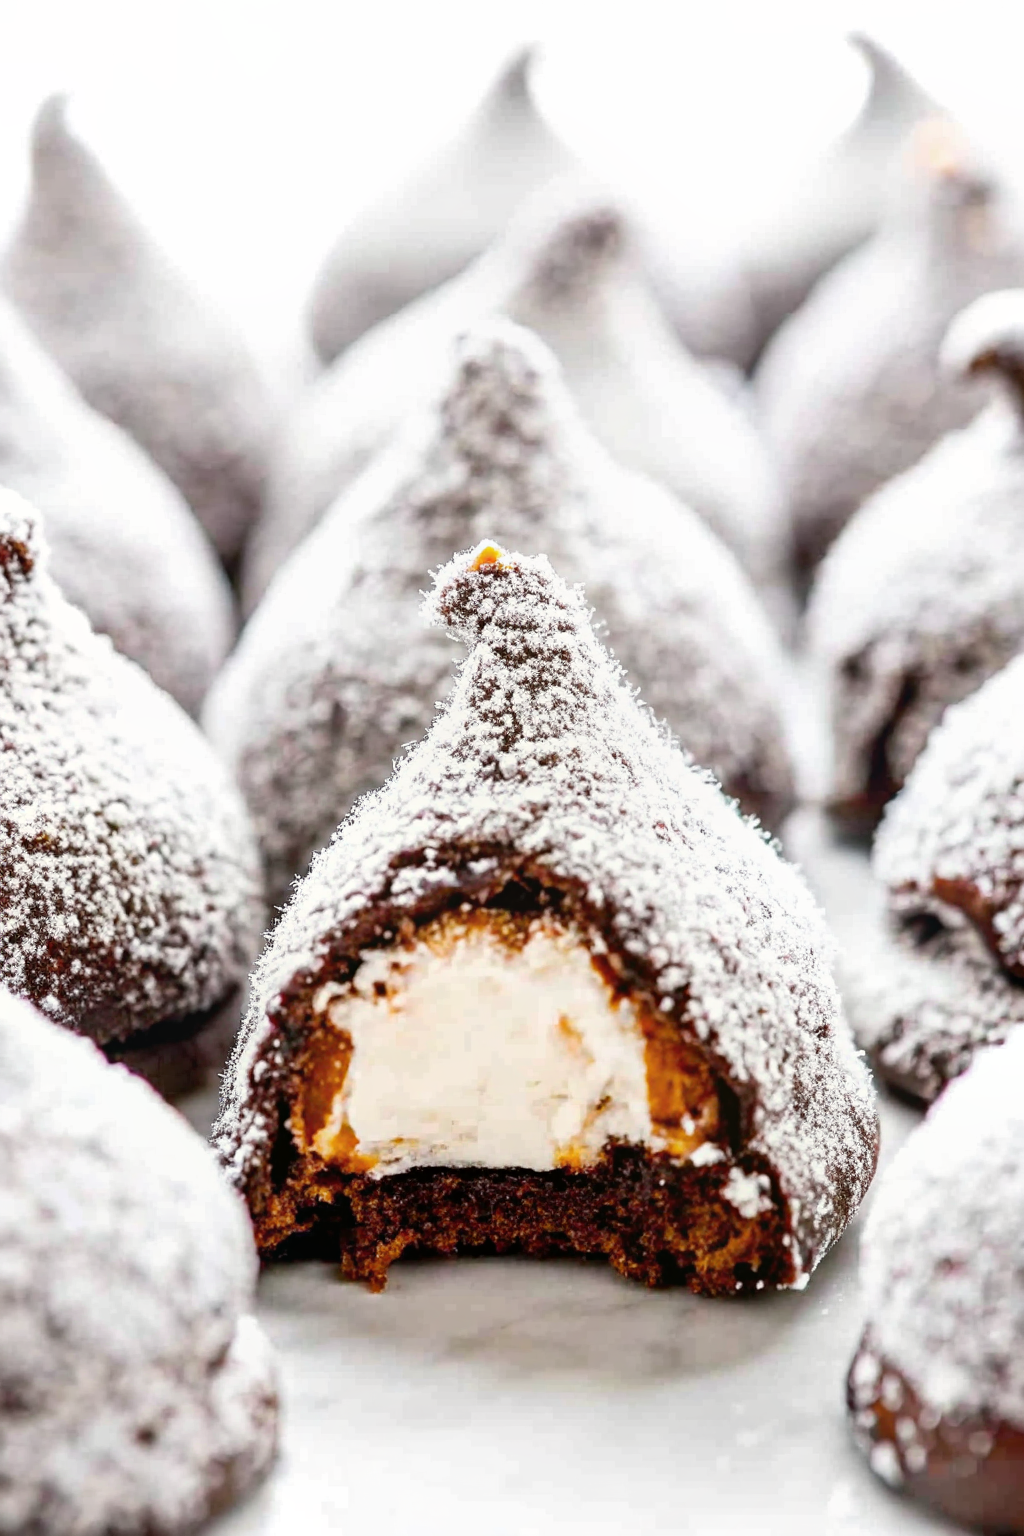
If you haven’t had the pleasure of meeting one, let me introduce you. It’s a fluffy marshmallow, coated in a sweet layer (usually white chocolate or a vanilla glaze), and rolled in coconut until it looks like a miniature snowball. That’s it. No flour, no eggs, and absolutely no stress. IMO, these little guys save Christmas every single year. They look festive on a cookie tray, they taste like a cloud, and they take about twenty minutes to make. So, put away the rolling pin and let’s make something that won’t make you lose your mind.
What Exactly Are Marshmallow Snowballs?
Depending on where you grew up, a “snowball” might mean something different. In Scotland, it’s a chocolate-covered meringue dome. In some parts of the US, it’s a pink snack cake found at gas stations. But today, we discuss the homemade hero: the marshmallow version.
The beauty of Marshmallow Snowballs lies in their texture. You get the soft, squishy bounce of the marshmallow, the snap of the chocolate shell, and the chewiness of the coconut. It’s a texture trifecta. Plus, they are naturally gluten-free (usually), which makes you look like a thoughtful host without even trying.
I remember the first time I made these for a school bake sale. I felt guilty because they were so easy compared to the triple-layer cakes other parents brought. Guess what sold out first? The snowballs. Kids love them because they are essentially pure sugar. Adults love them because they pair perfectly with a strong cup of coffee.
The Ingredient Lineup (Keep It Simple)
You do not need a long shopping list for this. In fact, you probably have half of this stuff in your pantry right now.
- Marshmallows: Buy the bag. Seriously. I know some overachievers will tell you to make homemade marshmallows. Homemade ones are delicious, sure, but they are also sticky, messy, and time-consuming. For this recipe, the structure of a store-bought marshmallow works better. It holds up to the warm coating without melting into a puddle.
- The Coating: You have two main choices here. You can use white chocolate (or white candy melts) or a simple powdered sugar glaze. I prefer white chocolate. It sets harder and protects the marshmallow from drying out. Plus, it tastes richer.
- The “Snow”: Coconut. You want desiccated coconut or finely shredded coconut. Sweetened flake coconut works, but the strands are often too long and make your snowball look like a shaggy dog rather than a neat sphere. :/
Preparing Your Station
Success with Marshmallow Snowballs depends entirely on your setup. If you try to wing this, you will end up with chocolate in your hair and coconut on the floor.
Create an assembly line.
- Station One: Your bag of marshmallows.
- Station Two: Your bowl of melted coating.
- Station Three: A shallow bowl filled with coconut.
- Station Four: A baking sheet lined with parchment paper.
Do not skip the parchment paper. If you place these directly on a plate to set, you will need a chisel to get them off later.
The Melting Game: White Chocolate Woes
White chocolate is temperamental. It burns if you look at it the wrong way. It seizes if a drop of water touches it. Unlike the robust nature of the cocoa in my chocolate chip cookies, white chocolate requires a gentle touch.
Microwave Method:
Place your chocolate chips or chopped bars in a microwave-safe bowl. Heat it in 30-second intervals, stirring vigorously between each blast. You might think it isn’t melting, but the residual heat does the work. Stop heating when there are still a few tiny lumps left and just stir until smooth.
The Glaze Alternative:
If white chocolate stresses you out, just make a thick glaze. Whisk powdered sugar, a splash of milk, and a teaspoon of vanilla extract until it resembles glue. It takes longer to dry, but it’s much cheaper and impossible to burn.
The Dip and Roll Technique
Now comes the fun (and messy) part. How do you coat the marshmallow without getting your fingers covered in sticky goo?
Use a fork.
Drop a marshmallow into the melted chocolate. Use a fork to roll it around until it’s fully coated. Lift the marshmallow out and tap the handle of the fork against the side of the bowl. This vibrates the fork and encourages the excess chocolate to drip off. If you leave too much chocolate on, it will pool at the bottom of your snowball and give it “feet.”
Once the excess drips off, toss the marshmallow immediately into the coconut bowl. Do not wait. If the chocolate sets even a little bit, the coconut won’t stick, and you’ll just have a bald marshmallow.
Use a spoon (or your clean hand) to toss coconut over the wet marshmallow. Gently roll it around to ensure full coverage. Then, transfer it to your parchment paper to set.
Variations on the Theme
Okay, the classic white version is elegant, but maybe you want to spice things up. Marshmallow Snowballs are incredibly versatile.
The Chocolate Bomb
Swap the white chocolate for semi-sweet or dark chocolate. The contrast between the dark exterior and the bright white interior looks striking. It’s like a Mounds bar, but fluffier.
The Holiday Festive
Dye your coconut! Put the coconut in a Ziploc bag with a drop of red or green food coloring and shake it like a Polaroid picture. Now you have red and green snowballs. It’s tacky, yes, but kids adore it.
The Flavor Injection
Why stick to vanilla? Add a drop of peppermint extract to your white chocolate. Now you have a peppermint snowball. Or, insert a toothpick into the marshmallow, dip it in caramel, let it set, and then do the chocolate and coconut routine. That is a next-level move.
Why This Beats Traditional Baking
Look, I love baking. I love the science of it. But sometimes, you just don’t have the mental bandwidth for precision. Unlike my pumpkin bread which requires precise measurements of baking soda and flour to rise correctly, this recipe relies on simple assembly.
You cannot “fail” a marshmallow snowball. Even if it looks lumpy, it still tastes like candy. It removes the performance anxiety from holiday treating. Plus, your oven stays off. If you live in a warm climate where Christmas involves shorts and sandals, not turning on the oven is a blessing.
Storage: The Gift That Keeps on Giving
One of the rhetorical questions I often ask myself is: “Why do we bake cookies that go stale in two days?” It makes no sense.
Marshmallow Snowballs last forever. Okay, not forever, but easily two weeks in an airtight container. The chocolate coating seals the marshmallow, keeping it soft. You can make these in early December, stash them in a Tupperware container (hide it from your family), and bring them out for a party weeks later.
Packaging Ideas:
These look fantastic in clear cellophane bags tied with a red ribbon. They stack well in tins without crumbling. Because they are sturdy, you can even mail them to relatives without worrying that they will arrive as a box of crumbs.
Troubleshooting: When Good Snowballs Go Bad
Even the simplest recipes have potential pitfalls. Let’s troubleshoot a few common disasters before they happen to you.
Problem: The chocolate is too thick.
If your melted chocolate feels like cement, add a teaspoon of coconut oil or vegetable shortening. Stir it in until it melts. This thins out the chocolate and gives the final coating a nice sheen.
Problem: The coconut falls off.
You waited too long to roll. The chocolate sets fast, especially if your kitchen is cool. Dip one, roll one. Do not dip twelve and then try to roll them all. Speed is key here.
Problem: The marshmallows are melting.
Your chocolate was too hot. Let the melted chocolate cool for a minute or two before you start dipping. You want it warm and fluid, not scorching hot.
Serving Suggestions
You might think you just put them on a plate and walk away. You could do that. But let’s elevate the presentation.
Arrange them in a pyramid on a cake stand. It looks like a pile of actual snowballs. Or, use them as a garnish. Imagine a slice of easy vanilla cake with a marshmallow snowball perched on the side. It adds texture and whimsy to a simple dessert.
They also work brilliantly as hot chocolate toppers. Drop a snowball into a mug of hot cocoa. The chocolate shell melts, the coconut adds flavor, and the marshmallow does its thing. It’s an interactive drink experience.
The Coconut Controversy
I need to address the elephant in the room. Some people hate coconut. I don’t understand these people, but I acknowledge they exist.
If you want to make these for a coconut-hater, you can swap the coating.
- Sprinkles: Roll the chocolate-coated marshmallow in festive sprinkles (jimmies).
- Crushed Nuts: Finely chopped pecans or pistachios work beautifully.
- Crushed Cookies: Roll them in crushed graham crackers for a S’mores vibe.
Just don’t call them “snowballs” if they aren’t white. Call them “Marshmallow Truffles” and sound fancy. 🙂
A Note on Quality
Since there are only three ingredients, the quality of each one impacts the final taste. If you use waxy, cheap white chocolate (the kind that says “white coating” instead of “chocolate”), it will leave a greasy film in your mouth.
Look for chocolate that lists cocoa butter in the ingredients. For a deep dive into why real white chocolate makes a difference in texture and melt-ability, check out this guide from Bon Appétit. It explains the science of cocoa butter versus vegetable oils far better than I can.
Getting Kids Involved
This is the ultimate kid activity. It doesn’t involve knives or ovens. Set up a station for your kids. Let them handle the rolling part. Yes, coconut will end up in places you didn’t know existed in your kitchen. But the joy on their faces when they create their own treats is worth the vacuuming session later.
FYI, this is also a great way to teach hand-eye coordination. Just prepare yourself for the inevitable sugar rush that follows.
Final Thoughts
We put so much pressure on ourselves during the holidays to create Michelin-star desserts. But often, people just want something sweet and simple. Marshmallow Snowballs remind us that treating ourselves doesn’t have to be hard work.
They are sweet, chewy, and nostalgic. They look beautiful on a platter. And best of all, they leave you with enough energy to actually enjoy the party.
So, go grab a bag of marshmallows. Melt some chocolate. Make a mess with some coconut. You might just find that these simple little spheres become your new favorite tradition.
Now, if you’ll excuse me, I have a batch to “quality test” before my guests arrive.

Easy Marshmallow Snowballs
Author: Prep: 20 minutes Cook: 5 minutes Total: 55 minutesEquipment
- Microwave-Safe Bowl
- Baking sheet
- Parchment Paper (Wax paper works too)
- Fork (for dipping)
- Shallow Bowl (for the coconut)
Ingredients
The Basics
- 1 bag Large Marshmallows approx. 10-12 oz / 300g
- 300 g White Chocolate Chips or white candy melts
- 200 g Desiccated Coconut or finely shredded sweetened coconut
- 1 tsp Coconut Oil or Vegetable Shortening optional, to thin the chocolate
Instructions
- Setup Your Station: Line a baking sheet with parchment paper. Pour the coconut into a shallow bowl. Have your marshmallows ready. Trust me, you want everything within arm's reach before you start!
- Melt the Chocolate: Place the white chocolate chips (and coconut oil, if using) in a microwave-safe bowl. Microwave in 30-second intervals, stirring vigorously in between, until completely smooth and glossy. Be careful not to overheat it, or the chocolate will seize.
- The Dip: Drop a marshmallow into the melted chocolate. Use a fork to roll it around until it is fully coated. Lift it out and tap the handle of the fork against the side of the bowl to shake off the excess chocolate.
- The Roll: Immediately toss the chocolate-coated marshmallow into the bowl of coconut. Use a spoon or your hand to gently roll it until it looks like a fluffy Marshmallow Snowball.
- Set: Place the finished snowball on the parchment-lined baking sheet. Repeat with the remaining marshmallows.
- Cool: Let them sit at room temperature for about 30 minutes until the chocolate shell hardens. If you are in a rush, pop the tray in the fridge for 10 minutes.
Notes
- Storage: Store your Marshmallow Snowballs in an airtight container at room temperature. They stay fresh for up to 2 weeks (if you don’t eat them all first!).
- Coconut Tip: If you can only find long strands of sweetened coconut, pulse them in a blender or food processor for a few seconds. Finely shredded coconut sticks better and looks more “snow-like.”
- Chocolate Trouble: If your white chocolate is too thick and clumpy, add a teaspoon of coconut oil or shortening to thin it out for a smoother dip.
- Festive Twist: Want to add some color? Shake your coconut in a ziplock bag with a drop of red or green food coloring before rolling
Nutrition


