
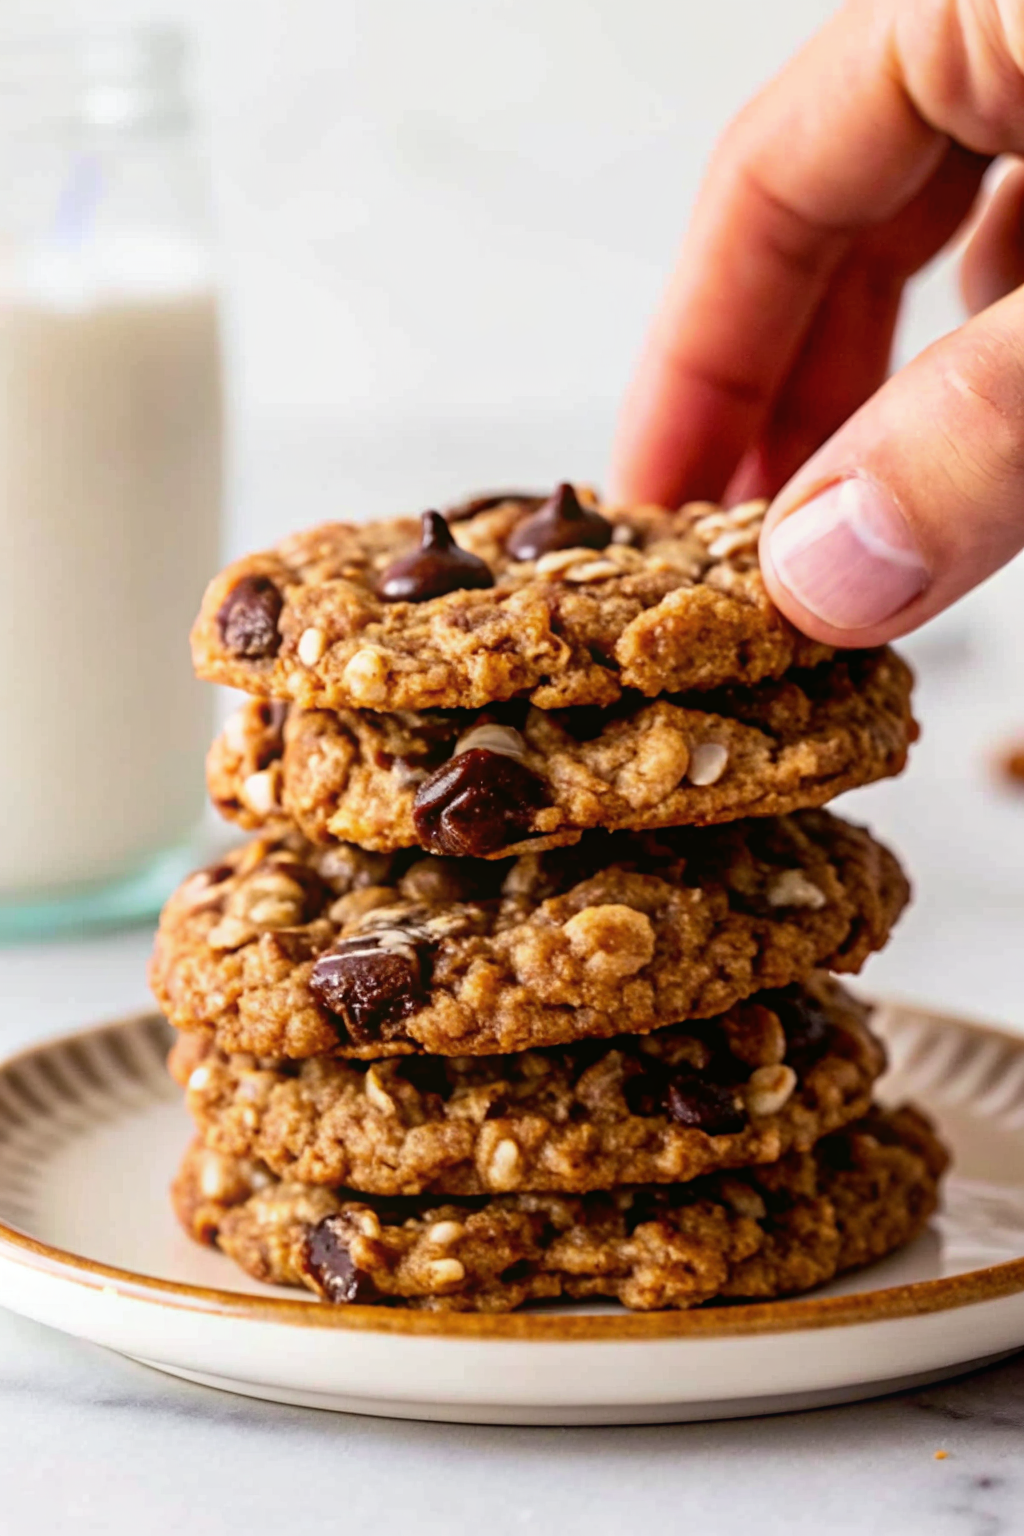
Let’s settle a debate right now. Are Oatmeal Cookies the unsung hero of the dessert world, or are they just chocolate chip cookies that went on a health kick and failed? I say they are the hero. In fact, I’ll go a step further: a perfectly chewy, cinnamon-spiced oatmeal cookie beats a chocolate chip cookie any day of the week.
I remember my grandmother making these when I was a kid. Her kitchen always smelled like brown sugar and toasted oats. Back then, I was suspicious of anything that looked “healthy” (a.k.a. contained visible grains), but one bite changed my mind. They weren’t dry or bland; they were buttery, soft, and had this incredible texture that you just don’t get with plain flour.
Today, we are reclaiming the reputation of the oatmeal cookie. We aren’t making sad, rock-hard hockey pucks. We are making thick, chewy, golden-edged masterpieces. Whether you stand firmly on Team Raisin or Team Chocolate Chip, this base recipe will work for you. Let’s get baking.
Why Texture Is Everything
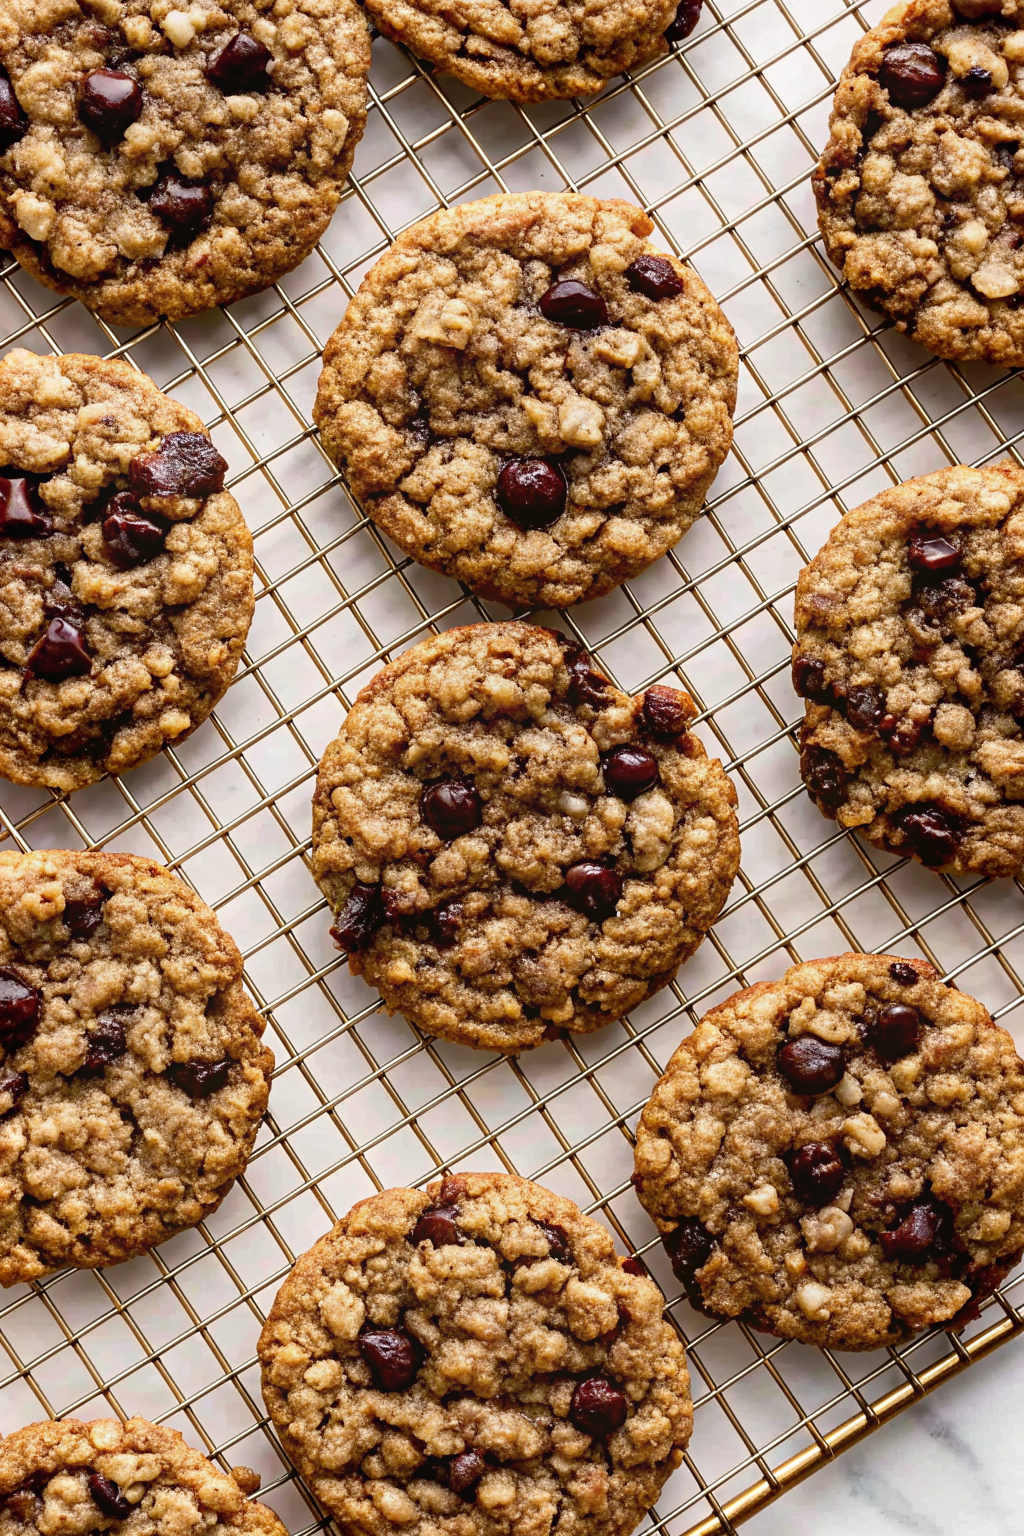
The difference between a good oatmeal cookie and a bad one comes down to one thing: texture. A bad one crumbles into dust when you look at it. A good one bends before it breaks. It has a slightly crisp edge and a dense, chewy center.
How do we achieve this? It’s all about the oats and the sugar ratio.
Old-Fashioned vs. Quick Oats
This is the most critical decision you will make.
- Old-Fashioned (Rolled) Oats: These are whole oats that have been steamed and flattened. They provide a chewy texture and visible oat pieces.
- Quick (Instant) Oats: These are cut into smaller pieces. They disappear into the dough and make the cookie softer but less “oaty.”
My Advice: Use Old-Fashioned Oats. They give the cookie structure. Quick oats tend to make the dough gummy. Plus, if I’m eating an oatmeal cookie, I want to actually see the oats.
The Sugar Science: Brown vs. White
If you use 100% white sugar, your cookies will spread thin and turn crispy. If you use 100% brown sugar, they will stay thick and soft but might taste a little too much like molasses.
The magic ratio is mostly brown sugar with a splash of white.
The molasses in brown sugar attracts moisture (a fancy science term called hygroscopy). This keeps the cookie soft for days. White sugar helps the edges crisp up, giving you that satisfying crunch on the first bite.
Raisins vs. Chocolate Chips: The Great War
This topic ruins friendships. I have seen legitimate arguments break out over this.
Team Raisin:
If you love raisins, you are a traditionalist. I respect that. To make them better, soak your raisins in hot water (or rum, if you’re feeling wild) for 10 minutes before adding them. This plumps them up so they don’t steal moisture from the cookie dough.
Team Chocolate Chip:
This is the crowd-pleaser option. Semi-sweet chips pair beautifully with the caramel notes of the brown sugar.
The Chaos Option:
Why choose? I sometimes split the dough in half. I put raisins in one bowl and chocolate chips in the other. Everyone is happy, and I get to eat two cookies. 🙂
The Secret Ingredient: Cinnamon & Spice
An oatmeal cookie without spices is just porridge in solid form. You need flavor depth to balance the sweetness.
Cinnamon is non-negotiable.
But don’t stop there. I add a tiny pinch of nutmeg. It adds a warmth that people can’t quite identify but absolutely love.
Also, salt. Please, for the love of baking, do not forget the salt. It isn’t there to make the cookies salty; it’s there to make the sugar taste sweeter. I sprinkle a little flaky sea salt on top right before baking. It looks fancy and tastes incredible.
Preparation: Room Temperature Matters
I know you want to start baking immediately. But if your butter is rock hard from the fridge, you are doomed.
Soft Butter is Key.
You need room-temperature butter to cream properly with the sugar. This creates air pockets in the dough, which leads to a lighter cookie. If you melt the butter (because you got impatient and used the microwave), your cookies will spread into giant, greasy puddles.
The Egg Factor.
Cold eggs can shock the butter and curdle the batter. If you forgot to take the eggs out, sit them in a bowl of warm water for 5 minutes. It’s a lifesaver.
Making the Dough: Don’t Overmix
This is where people mess up. You cream the butter and sugar until fluffy. You beat in the egg and vanilla. But once you add the dry ingredients (flour, oats, baking soda, spices), you need to slow down.
Mix until just combined.
If you beat the flour like it owes you money, you develop gluten. Gluten makes bread chewy (good) but makes cookies tough (bad). Stir the oats in by hand with a spatula if you have to. Treat the dough gently.
FYI, if you have the oven on anyway and want to prep a savory snack for later, you could easily slide in a tray of crispy oven-roasted sweet potatoes. The roasting temp is usually higher than cookies, but they make for a great sweet-and-savory kitchen day.
Chilling the Dough: The Patience Test
Do you have to chill the dough? Technically, no. But should you? Absolutely.
Chilling the dough for just 30 minutes does two things:
- Controls Spread: The fat solidifies, meaning the cookies spread slower in the oven. This creates a thicker cookie.
- Deepens Flavor: The flour absorbs the liquid, concentrating the sugar and spice flavors.
If you are in a rush, bake a few immediately and chill the rest for the next batch. You will notice the difference. The chilled ones always win.
Baking: The Fine Line
Preheat your oven to 350°F (175°C). Line your baking sheets with parchment paper. Do not grease the pan directly; it promotes spreading.
Scoop the dough into balls. I use a standard cookie scoop so they all bake evenly.
Give them space! Oatmeal cookies spread. Leave 2 inches between them.
The Timing:
Bake for 10–12 minutes.
Pull them out early.
This is the secret. They should look golden on the edges but slightly undercooked and soft in the middle. They continue cooking on the hot baking sheet for a few minutes after you take them out. If they look completely done in the oven, they will be hard as rocks once they cool.
Cooling and Storing
Let them cool on the baking sheet for 5 minutes before moving them to a wire rack. If you try to move them immediately, they will fall apart, and you will be sad.
Storage Tips:
- Room Temp: Store in an airtight container for up to 5 days.
- The Bread Trick: If they start getting hard after a few days, throw a slice of white bread into the container. The cookies absorb the moisture from the bread and become soft again. It sounds like magic, but it’s science.
Freezing:
Baked cookies freeze well, but frozen dough is even better. Freeze the dough balls in a zipper bag. When you want a cookie, just bake a frozen ball for an extra 2 minutes. Fresh cookies on demand? Yes, please.
Variations to Try
Once you master the classic Oatmeal Cookies, get creative.
The Trail Mix Cookie:
Add chopped nuts (walnuts or pecans), dried cranberries, and white chocolate chips. It’s hearty and perfect for hiking (or watching TV).
The Coconut Twist:
Add shredded coconut to the batter. It adds a chewiness that mimics a macaroon.
The Breakfast Cookie:
Reduce the sugar, add seeds (chia, flax), and maybe some protein powder. Suddenly, eating cookies for breakfast feels justified. Actually, I sometimes pair a less-sweet version of these with my morning coffee, right alongside a slice of tear-and-share Camembert tree bread when I’m hosting a brunch. It’s all about balance.
Troubleshooting Common Disasters
“My cookies are flat!”
Your butter was too warm, or you didn’t add enough flour. Next time, chill the dough longer or add a tablespoon more flour.
“My cookies are hard!”
You overbaked them. Remember, they firm up as they cool. Trust the underbake.
“They taste bland.”
You forgot the salt or the vanilla. These ingredients are flavor enhancers. Without them, you just taste flour and oats.
Why Oatmeal Cookies Beat the Rest
I stand by my opening statement. Oatmeal cookies offer a complexity that other cookies lack. The nuttiness of the oats, the warmth of the cinnamon, and the chewiness of the texture create a perfect bite.
They also feel slightly more substantial. Eat two chocolate chip cookies, and you feel a sugar crash coming. Eat two oatmeal cookies, and you feel… well, still full of sugar, but also somewhat satisfied by the fiber? Let’s go with that.
They are nostalgic. They remind us of home kitchens and simpler times. And in a world of over-the-top desserts covered in glitter and fondant, a classic, rugged oatmeal cookie is a comforting constant.
Final Thoughts
Making Oatmeal Cookies is a low-stress, high-reward activity. You don’t need fancy equipment. You don’t need to separate eggs. You just need a bowl, a spoon, and an appetite.
So, check your pantry. I bet you have oats sitting there right now, waiting for their moment of glory. Go mix up a batch. Your kitchen will smell amazing, and you’ll have the perfect snack for the week.
And hey, if you end up eating three of them straight off the cooling rack while they’re still warm? No judgment here. I’ve definitely done it.
Now, go preheat that oven!
FYI, if you are looking for a savory main to serve before diving into these cookies for dessert, you can’t go wrong with a classic holiday chicken pot pie. It brings the same level of comfort and warmth to the dinner table that these cookies bring to dessert.
Chewy Oatmeal Cookies
Author: Prep: 15 minutes Cook: 10 minutes Total: 35 minutesEquipment
- Stand mixer or hand mixer
- Large Baking Sheets
- Parchment paper
- Cookie Scoop (medium)
- Wire Cooling Rack
Ingredients
The Wet Ingredients
- 1 cup Unsalted butter softened to room temperature (2 sticks)
- 1 cup Light brown sugar packed
- 1/2 cup Granulated white sugar
- 2 large Eggs room temperature
- 1 tbsp Vanilla extract
The Dry Ingredients
- 1 1/2 cups All-purpose flour
- 1 tsp Baking soda
- 1 tsp Ground cinnamon
- 1/4 tsp Ground nutmeg
- 1/2 tsp Salt use sea salt for better flavor
The Mix-Ins
- 3 cups Old-fashioned rolled oats NOT quick oats
- 1 cup Raisins chocolate chips, or dried cranberries
Instructions
- Prep: Preheat your oven to 350°F (175°C). Line two large baking sheets with parchment paper. (Do not grease the pans, or the cookies will spread too much!).
- Cream the Butter: In a large bowl or stand mixer, beat the softened butter, brown sugar, and white sugar together on medium-high speed for about 2–3 minutes. You want the mixture to be light, fluffy, and pale.
- Add Wet Ingredients: Add the eggs one at a time, beating well after each addition. Stir in the vanilla extract. Scrape down the sides of the bowl to ensure everything is incorporated.
- Combine Dry Ingredients: In a separate medium bowl, whisk together the flour, baking soda, cinnamon, nutmeg, and salt.
- Mix the Dough: Gradually add the flour mixture to the wet ingredients. Mix on low speed just until combined. Stop mixing as soon as the flour streaks disappear—overmixing makes tough cookies!
- Fold in Oats: Using a spatula or wooden spoon, fold in the old-fashioned oats and your choice of mix-ins (raisins or chocolate chips) until evenly distributed.
- Chill (Optional but Recommended): If you have time, chill the dough in the fridge for 30 minutes. This helps the flavors deepen and prevents the cookies from spreading too thin.
- Scoop: Use a cookie scoop to drop rounded tablespoons of dough onto the prepared baking sheets. Space them about 2 inches apart.
- Bake: Bake for 10–12 minutes. The edges should be golden brown, but the centers should still look slightly soft and underbaked. Trust me, pull them out now! They will firm up as they cool.
- Cool: Let the Oatmeal Cookies rest on the baking sheet for 5 minutes before transferring them to a wire rack to cool completely.
Notes
- Oats Matter: Stick to Old-Fashioned Rolled Oats for that classic chewy texture. Quick oats will make the cookies softer and less textured.
- Raisin Tip: If using raisins, soak them in hot water for 10 minutes and pat them dry before adding to the dough. This keeps them plump and juicy!
- Don’t Overbake: The secret to a chewy cookie is taking them out while they still look a little raw in the middle. The residual heat on the pan finishes the cooking process.
- Storage: Store in an airtight container for up to 5 days. If they start to get hard, toss a slice of white bread in the container to soften them up again
Nutrition


