
Let’s be real for a minute. Is there anything more unreasonably expensive than buying chocolate-covered strawberries from a fancy shop? You walk in, see a box of six berries sitting there looking pretty, and then you see the price tag. Fifty bucks? For six strawberries? You have got to be kidding me. I love a romantic gesture as much as the next person, but I draw the line at paying a premium for someone else to dip fruit in melted chocolate.
The good news involves a simple truth: you can make them at home. Better yet, you can make them taste infinitely superior to the store-bought versions that have been sitting in a display case for two days. We are going to tackle the art of making the perfect chocolate-covered strawberries. I promise you, this process is easier than boiling pasta. Plus, when you make them yourself, you control the quality of the chocolate. No waxy, cheap coating allowed here.
Why You Should Master This Skill
You might think I’m exaggerating about the difficulty level. I’m not. Making these treats at home gives you total control. You pick the biggest, ripest berries. You choose high-quality chocolate that actually melts in your mouth. And let’s not forget the bragging rights. Showing up to a dinner party or a date night with a box of homemade confections makes you look like a pastry chef.
Consider the cost difference too. You can buy a pound of massive strawberries and two bars of premium chocolate for less than twenty dollars. That yields you about twenty glorious berries. Compare that to the boutique price, and the math speaks for itself. IMO, this is the smartest “fancy” dessert hack in existence.
The Ingredients: Quality Matters
Since this recipe only requires two main ingredients, they both need to be stars. You cannot hide bad chocolate behind sugar and flour here.
Choosing the Strawberries
Look for bright red berries with fresh, green leaves. Avoid the ones with white shoulders near the stem; they aren’t fully ripe and will taste sour against the sweet chocolate. Size also matters. You want medium-to-large berries. Tiny ones are a nightmare to dip because your fingers get too close to the hot chocolate.
The Chocolate Dilemma: Chips vs. Bars
Here is where most people mess up. Do not use chocolate chips. I repeat, put the bag of toll house chips back in the pantry. Chocolate chips contain stabilizers that help them hold their shape in cookies. You don’t want them to hold their shape; you want them to melt into a silky, glossy pool.
Buy baking bars or couverture chocolate instead. These contain a higher percentage of cocoa butter, which ensures a smooth melt and a nice “snap” when you bite into the finished product. If you want to get fancy, you can mix semi-sweet and bittersweet chocolate for a deeper flavor profile.
The Prep Work: Water is the Enemy
I learned this lesson the hard way, so you don’t have to. I once washed my strawberries, gave them a quick shake, and immediately dipped them. The chocolate seized up instantly, turning into a gritty, clumpy mess. It was a disaster. :/
Water is the arch-nemesis of melted chocolate. Even a single drop can cause the chocolate to seize (harden and clump). You must wash your strawberries and then dry them thoroughly.
The Drying Process
- Rinse the strawberries in cold water.
- Lay them out on a clean kitchen towel or layers of paper towels.
- Gently pat each one dry.
- Let them sit on the counter for at least 30 minutes to air dry completely.
You want them bone-dry before they even look at the chocolate. This step demands patience, but it guarantees success.
Melting the Chocolate: Two Methods
You have two main ways to melt your chocolate: the microwave or the double boiler. Both work, but they offer different levels of control.
The Microwave Method (The Quick Way)
This method is fast, but it carries a risk. If you overheat chocolate, it burns. And let me tell you, burnt chocolate smells like sadness.
- Chop your chocolate bar into small, even pieces.
- Place them in a microwave-safe bowl.
- Microwave at 50% power for 30 seconds.
- Stir.
- Repeat in 15-second intervals, stirring vigorously after each one.
- Stop when there are still a few small lumps; the residual heat will melt the rest as you stir.
The Double Boiler Method (The Pro Way)
I prefer this method because it offers better temperature control. You simply set a heat-proof bowl over a pot of simmering water. Ensure the bottom of the bowl does not touch the water. The steam heats the bowl gently. Stir the chocolate constantly until it’s smooth and glossy. This method minimizes the risk of scorching your precious ingredients.
The Dipping Technique
Now comes the fun part. Line a baking sheet with parchment paper or wax paper. Do not skip this, or your berries will stick to the pan, and you’ll destroy them trying to pry them off.
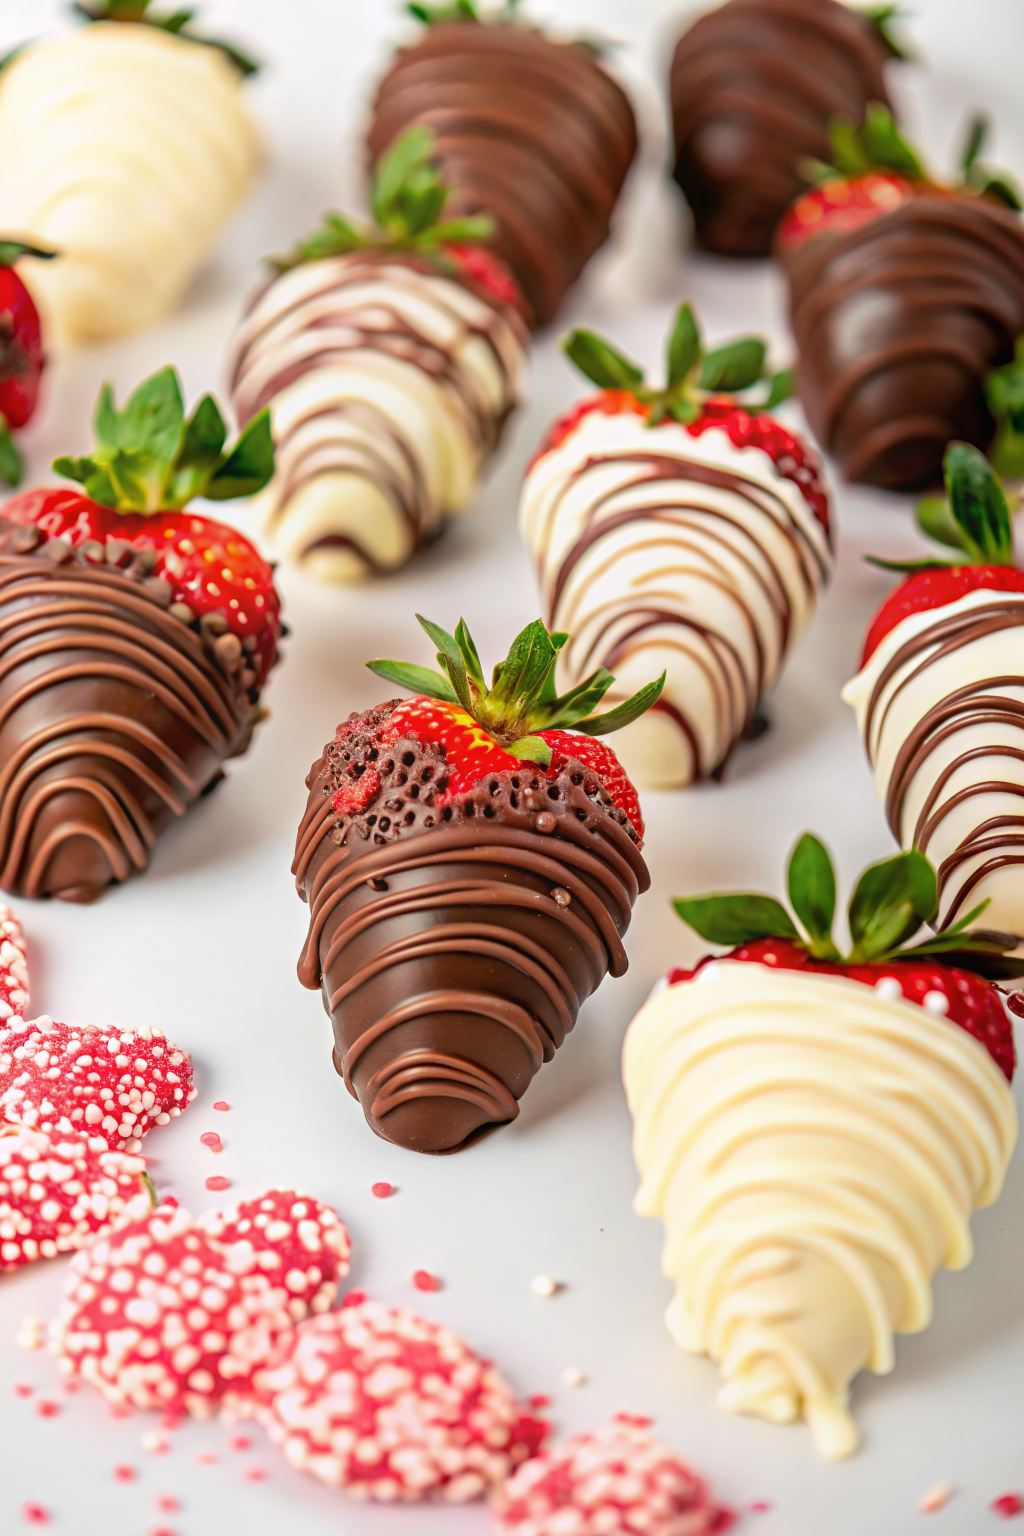
Grab a strawberry by the stem or the leaves. If the leaves are loose, just hold the very top of the berry flesh. Dip it into the chocolate, swirling it gently to coat. I like to leave a little bit of red showing at the top near the leaves. It just looks prettier that way.
Lift the berry out and give it a little shake to let the excess chocolate drip off. If you skip this, you end up with a huge “foot” of chocolate at the bottom of the berry. While extra chocolate sounds great, it looks messy. Scrape the bottom of the berry lightly against the rim of the bowl to remove the drip, then place it onto the parchment paper.
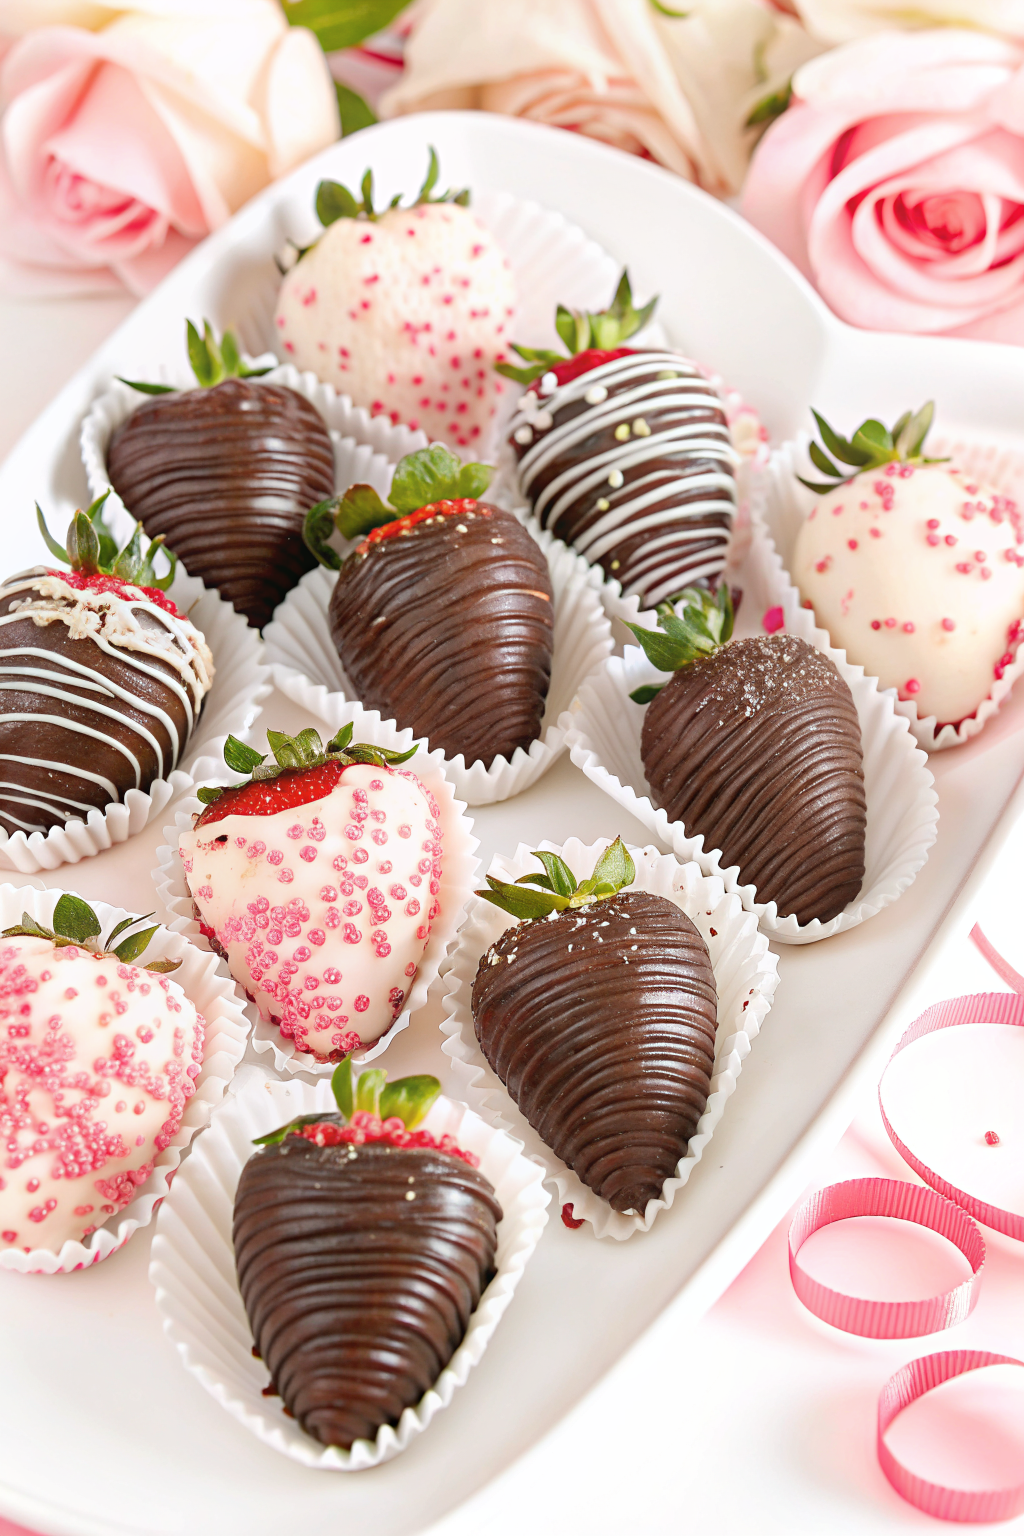
Getting Creative with Toppings
Plain chocolate is classic, but textures add excitement. You must apply toppings immediately after dipping, while the chocolate is still wet. Once it sets, nothing will stick.
- Chopped Nuts: Pistachios, toasted almonds, or hazelnuts add a fantastic crunch.
- Coconut: Shredded coconut gives a nice tropical vibe.
- Sprinkles: Perfect for themed holidays or birthdays.
- Cookie Crumbs: Crushed Oreos or graham crackers work wonders here.
If you want to create a visually stunning dessert platter, try pairing these berries with other treats. Imagine serving a slice of rich cake topped with a chocolate berry. You could even use them to decorate a classic cheesecake recipe to add height and color to the presentation. The contrast between the creamy cheesecake and the crisp chocolate shell is unmatched.
The White Chocolate Drizzle
You know those fancy berries with the contrasting zig-zag lines? You can do that in thirty seconds. Melt a small amount of white chocolate. Pour it into a small Ziploc bag and snip a tiny—and I mean tiny—piece off the corner.
Move your hand back and forth quickly over the set dark chocolate berries. Speed is key. If you move too slowly, the lines look squiggly and unsure. Move with confidence! This simple addition elevates the look from “homemade” to “professional bakery.”
For a unique flavor twist, you could even zest some lemon or orange into the white chocolate drizzle. It brings a citrusy brightness that reminds me of the tangy notes in a passion fruit cheesecake. The acidity cuts through the richness beautifully.
Storing Your Masterpieces
This section addresses the most common question I get: “How long do they last?”
Honestly, chocolate-covered strawberries are best eaten the same day you make them. Strawberries are full of water. Over time, that water seeps out, causing the berry to get mushy and the chocolate to “sweat.”
If you must make them ahead of time, store them in the refrigerator, but leave them uncovered. Covering them traps moisture, which leads to condensation. Place a paper towel in the container to absorb any excess humidity. Even with these precautions, I wouldn’t push it past 24 hours. After that, they start to leak juice, and the texture gets weird.
Troubleshooting Common Disasters
Things happen. Maybe your chocolate looks gray, or your toppings fell off. Let’s fix it.
Why is my chocolate dull or gray?
This is called “bloom.” It happens when the cocoa butter separates or when moisture effects the sugar. It usually means the chocolate got too hot or cooled down too slowly. It still tastes fine, but it lacks that satisfying snap.
The chocolate slid off the berry!
This means your strawberries were still wet or too cold. If the berry is ice-cold from the fridge, condensation forms immediately when it hits the warm chocolate. This water layer acts like a slip-n-slide for the coating. Always use room temperature, dry berries.
The chocolate is too thick.
If your melted chocolate feels like sludge, you can thin it out. Stir in a teaspoon of coconut oil or vegetable oil. This thins the consistency and adds a nice gloss. Just don’t add water! Remember, water is the enemy.
Serving Ideas
These berries stand alone perfectly, but they also play well with others. I love arranging them on a tiered stand for parties. They bring a pop of color that brightens up any table.
During the holidays, I often serve them alongside heavier desserts. For example, after a heavy meal featuring a pumpkin cheesecake delight, a chocolate-covered strawberry feels like a lighter, fresher way to end the night. It provides that sweet fix without the heaviness of another slice of pie.
You can also skewer them. Put a dipped strawberry on a stick with marshmallows and brownie bites for a dessert kabob. Kids go crazy for this, and frankly, so do the adults.
Final Thoughts
There is absolutely no reason to fear making chocolate-covered strawberries. The process demands respect for the ingredients—specifically keeping the water away—but it doesn’t require a culinary degree. You save money, you get a fresher product, and you get to lick the spoon. That sounds like a win to me.
So, next time you see those overpriced boxes at the store, just walk on by. Head to the produce aisle, grab the biggest berries you can find, and treat yourself to a homemade version that puts the expensive ones to shame. You’ve got this!
Go melt some chocolate (carefully) and enjoy the process. Your wallet and your taste buds will thank you.
Perfect Homemade Chocolate-Covered Strawberries
Author: Prep: 35 minutes Cook: 5 minutes Total: 1 hourEquipment
- Baking sheet
- Parchment Paper or Wax Paper
- Microwave-Safe Glass Bowl (or Double Boiler)
- Paper towels
- Small Ziploc Bag (for drizzling)
Ingredients
The Essentials:
- 1 lb fresh strawberries look for large berries with bright green leaves
- 10-12 oz semi-sweet or dark chocolate baking bars high quality, NOT chocolate chips
- 1 tsp coconut oil or vegetable oil optional, for shine
The Drizzle (Optional):
- 2 oz white chocolate bar chopped
Optional Toppings:
- Chopped nuts pistachios, almonds, hazelnuts
- Shredded coconut
- Sprinkles
- Crushed Oreos or graham crackers
Instructions
- Wash and Dry (Crucial Step): Gently rinse your strawberries in cold water. Lay them out on a clean kitchen towel or paper towels and pat them dry. Let them sit on the counter for at least 30 minutes. Do not skip this! Even a drop of water can seize your chocolate.
- Prepare Your Station: Line a baking sheet with parchment paper. If you are using toppings, pour them into small bowls so they are ready to go.
- Melt the Chocolate: Chop your chocolate baking bars into small, even pieces. Place them in a microwave-safe bowl. Microwave at 50% power for 30 seconds, then stir. Repeat in 15-second intervals, stirring vigorously each time, until the chocolate is smooth and glossy.
- Dip: Grab a strawberry by the stem or leaves. Dip it into the melted chocolate, swirling it to coat evenly. Leave a little red showing at the top for a pretty contrast.
- Shake and Scrape: Lift the berry up and gently shake off the excess chocolate. Lightly scrape the bottom of the berry against the rim of the bowl to prevent a “chocolate foot” from forming.
- Top Immediately: Place the strawberry on the parchment paper. If you are using nuts, sprinkles, or crumbs, sprinkle them on now while the chocolate is still wet.
- Drizzle (Optional): Melt the white chocolate in a small bowl. Transfer it to a small Ziploc bag and snip a tiny corner off. Quickly drizzle back and forth over the set chocolate-covered strawberries for a professional look.
- Set: Let the berries sit at room temperature until the chocolate hardens (about 15–20 minutes). You can pop them in the fridge for 10 minutes to speed this up, but don’t leave them in too long!
- Serve: Serve immediately for the best flavor and texture.
Notes
- No Chocolate Chips: Avoid using chocolate chips if possible. They contain stabilizers that prevent them from melting smoothly. Use high-quality baking bars or couverture chocolate for the best snap.
- Avoid Water: Water is the enemy of melted chocolate. Ensure your bowl and spoon are completely dry before you start.
- Storage: These chocolate-covered strawberries are best eaten the same day they are made (within 12–24 hours). If you must store them, keep them in the fridge uncovered or loosely covered with a paper towel to absorb moisture. Airtight containers will make them sweat and get mushy.
- Topping Tip: If your toppings aren’t sticking, you waited too long! You have to add them immediately after dipping.
- Thick Chocolate? If your melted chocolate feels too thick or sludge-like, stir in 1 teaspoon of coconut oil or vegetable oil to thin it out and add a nice shine.
Nutrition


