
Let’s be honest for a moment: nobody goes to an Italian chain restaurant for the pasta. We go for the basket of warm, salty, buttery carbs they place in the center of the table. You know exactly which ones I’m talking about. We fill up on them before the salad even arrives, and we regret nothing.
But here is the good news: making garlic parmesan bread sticks at home is shockingly easy. In fact, I’ll go out on a limb and say the homemade version tastes better. Why? Because you control the butter-to-bread ratio, and you don’t have to wait for a server to bring you refills.
Bread gets a bad rap these days. Everyone is scared of gluten or carbs. But sometimes, you just need a soft, fluffy stick of dough covered in garlic and cheese to make a bad day better. It’s soul food.
So, put on your apron (or don’t, I’m not your boss), and let’s talk about how to make your kitchen smell like an Italian grandmother’s house.
The Foundation: Dough Matters
You have two choices here. You can make the dough from scratch, or you can cheat.
I am a huge advocate for making your own dough. It sounds intimidating, but yeast is not the enemy. It just wants to eat sugar and burp carbon dioxide. That’s it. If you can mix water, flour, yeast, and salt, you can make bread.
However, I get it. Sometimes you get home from work, and the idea of kneading dough for ten minutes sounds like torture.
The Store-Bought Hack
If you need these ready in 20 minutes, buy a tube of refrigerated pizza dough. Unroll it, slice it into strips, and twist them. Does it taste exactly like scratch-made? No. Does it still taste delicious when drowned in garlic butter? Absolutely.
The Scratch-Made Route
If you have the time, make a simple yeast dough. This allows you to control the texture. You want a dough that is slightly softer than what you would use for a crispy crust. If you have ever mastered homemade pizza dough, you already possess the skills needed here. The process is nearly identical, but we treat the baking stage differently to keep them soft.
The Holy Trinity: Butter, Garlic, Cheese
This is not the time for olive oil. I love olive oil, but a classic bread stick demands butter. Salted butter, specifically. We want that rich, dairy flavor that coats your lips and makes you reach for a second napkin.
Fresh Garlic vs. Garlic Powder
This is a heated debate in the baking world.
- Fresh Garlic: It offers a punchy, spicy kick. However, fresh garlic burns easily in a hot oven. Burnt garlic tastes bitter and ruins the whole vibe :/
- Garlic Powder: It provides that savory, nostalgic flavor we associate with takeout pizza. It coats the bread evenly and doesn’t burn as quickly.
- The Solution: Use both. I mix garlic powder into the dough itself and infuse the butter with fresh minced garlic. Best of both worlds.
The Cheese Factor
We are talking about Parmesan here. But which kind?
You have the stuff in the green plastic shaker can, and you have the real block of Parmigiano-Reggiano.
For garlic parmesan bread sticks, I actually prefer a mix. The powdery stuff from the can adds a specific salty texture that feels authentic to the American-Italian restaurant style. However, freshly grated parmesan melts beautifully and adds a nutty complexity.
My recommendation: Grate your own cheese. The pre-shredded bags contain anti-caking agents (like potato starch) that prevent the cheese from melting properly. Grab a block and a microplane. It takes thirty seconds.
Shaping Your Sticks
You can shape these however you want, but the shape dictates the texture.
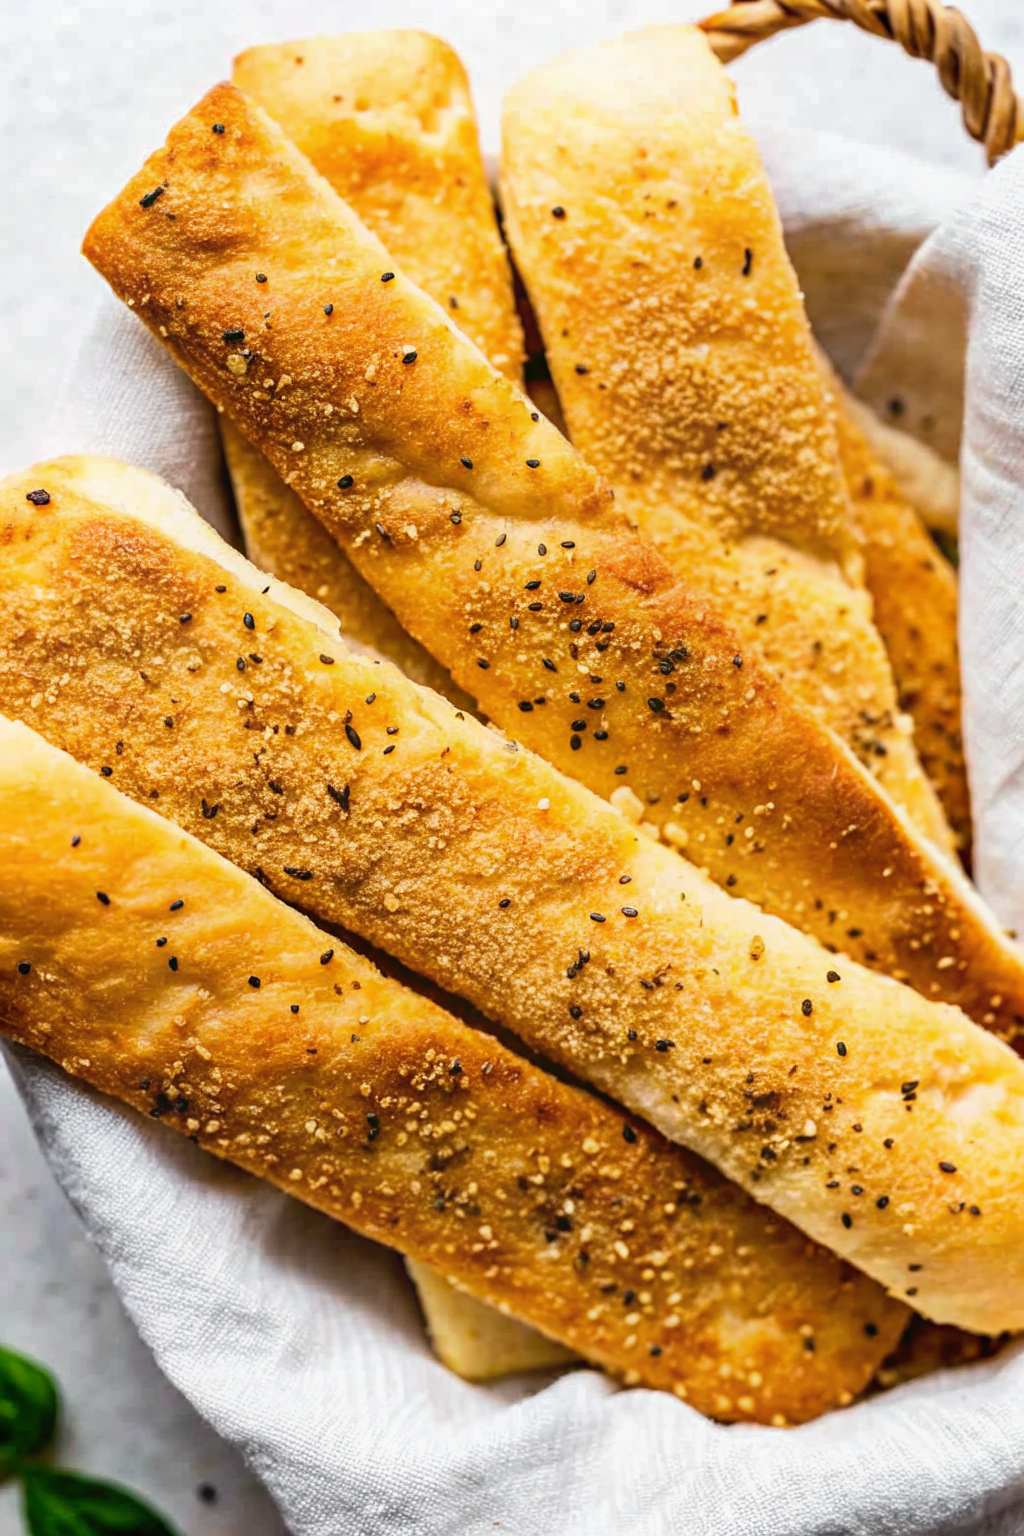
- The Log: This is the standard. Roll the dough into snakes about an inch thick. These bake up fluffy in the middle and crusty on the outside.
- The Twist: Fold the strip of dough in half and twist it. This creates crevices that trap the butter and cheese. This is my personal favorite because I believe every bite should hold maximum flavor.
- The Knots: Tie the dough into a simple knot. These look fancy and are great for parties, but they take a little longer to bake through the center.
Whatever shape you choose, make sure they are roughly the same size. If you bake a skinny stick next to a fat log, one will burn while the other is still raw in the middle.
The Baking Strategy
Preheat your oven to 400°F (200°C). We want a blast of heat to help the yeast spring up quickly, creating that airy interior.
Line your baking sheet with parchment paper. If you don’t use parchment paper, the cheese will melt onto the pan, burn, and you will spend your evening scrubbing metal instead of eating bread. Trust me on this.
The Double Butter Method
Here is the secret to restaurant-quality breadsticks: Butter them twice.
- Before Baking: Brush the raw dough with a little melted butter. This helps the crust turn golden brown.
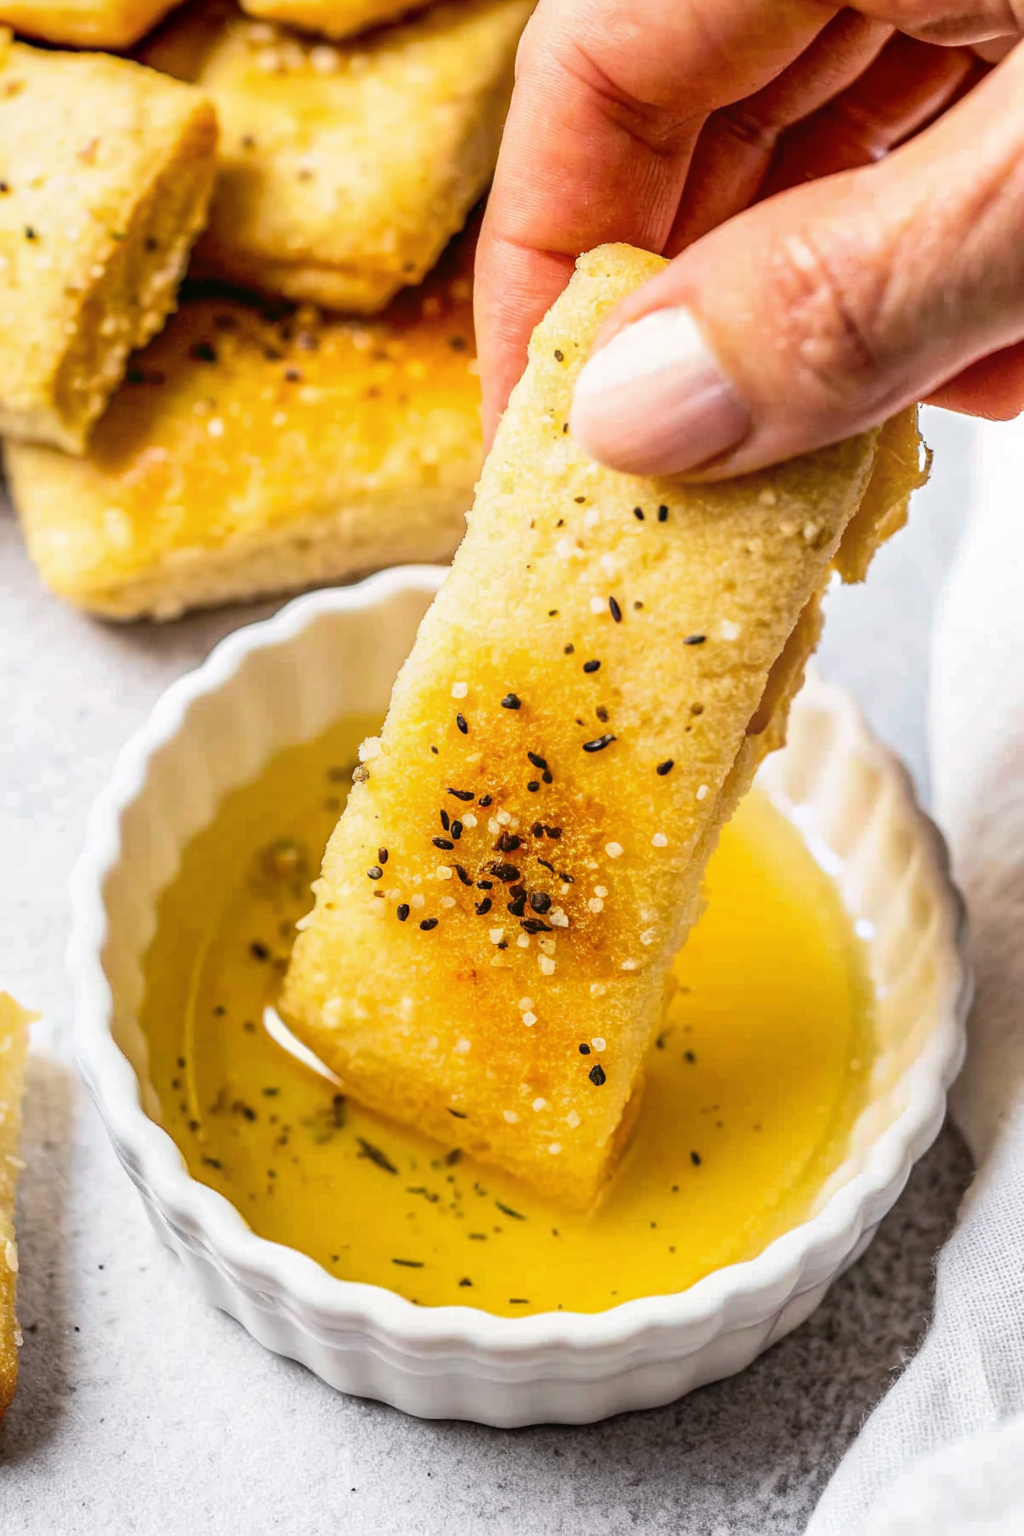
- After Baking: As soon as they come out of the oven—while they are scorching hot—drown them in the garlic butter mixture. The heat from the bread sucks the butter into the crumb. This is non-negotiable.
The Topping Mixture
While your breadsticks bake, prepare the liquid gold.
Melt 4 tablespoons of butter. Stir in:
- 2 minced garlic cloves.
- 1 teaspoon of garlic powder.
- A pinch of salt (if using unsalted butter).
- 1 tablespoon of chopped fresh parsley (for color, so we can pretend it’s a salad).
Once you pull the breadsticks from the oven, brush this mixture over them aggressively. Then, immediately shower them with your grated Parmesan cheese. The residual heat melts the cheese just enough to make it stick.
Dipping Sauces: The Controversy
Some people eat garlic parmesan bread sticks plain. These people are purists. I, however, am a dipper. The breadstick is merely a vessel for sauce.
- Marinara: The classic choice. A tangy tomato sauce cuts through the richness of the butter.
- Alfredo: If you want to double down on dairy, this is the way to go.
- Ranch: Don’t look at me like that. Ranch and pizza crust belong together. It’s a Midwest thing, and it’s delicious.
- Cheese Dip: If you really want to upset your cardiologist (but make your tastebuds happy), you could even dunk these in a cheesy jalapeno popper dip. The spice from the peppers plays incredibly well against the garlic.
TroubleshootingYour Bread
Sometimes, things go wrong. Yeast is a living organism, and sometimes it has an attitude problem.“My breadsticks are hard as rocks.”
You likely added too much flour or overbaked them. Dough should be tacky, not dry. Also, check your oven temperature. If it’s too low, they dry out before they brown.
“They didn’t rise.”
Your yeast might be dead. If your water was too hot when you mixed the dough, you killed the yeast. If the water was too cold, the yeast just took a nap. Aim for bathwater temperature (around 110°F).
“They taste bland.”
You didn’t use enough salt. Salt controls the yeast, but it also provides flavor. Bread without salt tastes like cardboard. IMO, you should always sprinkle a little coarse sea salt on top right after baking for that extra crunch.
Storage and Reheating
Let’s be real, you probably won’t have leftovers. But if you do, don’t put them in the fridge. The refrigerator circulates dry air, which turns bread stale faster than leaving it on the counter.
Store them in an airtight container or a Ziploc bag at room temperature for up to two days.
To Reheat:
Do not microwave them. The microwave turns bread into rubber.
Wrap them in foil and pop them in a 350°F oven for 10 minutes. This wakes up the butter and crisps the crust back up.
Why We Love Garlic
Have you ever wondered why garlic smells so good when it hits hot butter? It’s chemistry. The sulfur compounds break down and release that intoxicating aroma.
Garlic also has a history of warding off evil (and vampires). So, technically, eating these breadsticks is a safety precaution. You are protecting your home. You’re welcome.
Pairing Ideas
Obviously, these go with pasta. Spaghetti and meatballs, lasagna, fettuccine alfredo—it’s all fair game.
But don’t limit yourself. Serve them alongside a big salad to make the meal feel substantial. Use them to sop up the broth from a hearty soup.
Or, embrace the chaos and serve them with breakfast. I mean, savory brunch is a thing, right? While I usually lean toward savory, sometimes you need to balance the meal, kind of like having cinnamon rolls for dessert after a salty dinner. Life is about balance.
The Flour Debate: Bread vs. All-Purpose
Does the type of flour matter? Yes, but don’t panic.
All-Purpose Flour: This is what most of us have in the pantry. It works perfectly fine. It creates a tender, soft breadstick.
Bread Flour: This has a higher protein content. More protein means more gluten. More gluten means a chewier texture. If you want that distinct “pull” when you bite into the bread, use bread flour.
For a deep dive into the science of gluten and why protein content changes the chew of your bread, King Arthur Baking explains it brilliantly.
Variations on the Theme
Once you master the basic garlic parmesan bread sticks, you can get creative.
- Spicy: Add red pepper flakes to the butter mixture.
- Herby: Mix dried oregano and basil into the dough for a “pizza seasoning” flavor.
- Cheesy Stuffed: Flatten the dough, place a string cheese in the middle, seal it up, and bake. Boom. Stuffed crust breadsticks.
A Note on “Healthy” Swaps
I know someone will ask if they can make these with whole wheat flour or cauliflower.
You can use whole wheat flour, but use a 50/50 mix with white flour. Whole wheat is heavy and dense. If you use 100% whole wheat, you are making garlic parmesan doorstops.
As for cauliflower? Look, I respect the keto hustle. But cauliflower is a vegetable. It will never be bread. If you want bread, eat the bread. Just eat one stick instead of five (if you have that kind of self-control, which I certainly do not).
Final Thoughts
There is something deeply satisfying about pulling a tray of golden brown dough out of the oven. It connects us to a primal part of our brains. We made fire. We made food. We survive.
Plus, you get to lick the garlic butter off your fingers.
Making these at home allows you to skip the preservatives and the sad, lukewarm delivery bag. You get them at their absolute peak freshness.
So, don’t be afraid of the yeast. Don’t skimp on the garlic. And definitely don’t apologize for eating three of them before dinner is even served.
Go bake something delicious.
Soft & Buttery Garlic Parmesan Bread Sticks
Author: Prep: 20 minutes Cook: 15 minutes Total: 1 hour 35 minutesEquipment
- Stand mixer with dough hook
- Large Baking Sheet
- Parchment paper
- Pastry brush
- Small saucepan or microwave-safe bowl
- Microplane Grater
Ingredients
The Dough
- 1 cup warm water approx. 110°F
- 2 ¼ teaspoons instant yeast 1 standard packet
- 1 tablespoon granulated sugar
- 3 cups all-purpose flour spooned and leveled
- 1 ½ teaspoons kosher salt
- 2 tablespoons olive oil
- ½ teaspoon garlic powder for flavor inside the dough
The Garlic Butter Topping
- 4 tablespoons salted butter melted
- 2 cloves fresh garlic minced
- 1 tablespoon fresh parsley chopped
- ⅓ cup parmesan cheese freshly grated
- Pinch of coarse sea salt optional, for finish
Instructions
- Bloom the Yeast: In the bowl of your stand mixer (or a large bowl), combine the warm water and sugar. Sprinkle the yeast on top and give it a quick stir. Let it sit for 5–10 minutes until it gets foamy. If it doesn't foam, your yeast might be dead—start over!
- Mix the Dough: Add the flour, olive oil, salt, and garlic powder to the yeast mixture. Using the dough hook, mix on low speed until combined. Increase speed to medium-low and knead for 5–7 minutes. The dough should be smooth, elastic, and slightly tacky (but not sticking to your fingers).
- The Rise: Lightly oil a large clean bowl. Form the dough into a ball, place it in the bowl, and roll it around to coat it in oil. Cover with a warm, damp towel or plastic wrap. Let it rise in a warm spot for about 1 hour, or until doubled in size.
- Preheat & Prep: Preheat your oven to 400°F (200°C). Line a large baking sheet with parchment paper.
- Shape the Sticks: Punch the dough down gently to release the air. Turn it out onto a lightly floured surface. Divide the dough into 12 equal pieces. Roll each piece into a rope about 7–8 inches long. You can leave them as ropes or twist them for a fun texture. Place them on the baking sheet about an inch apart.
- The First Butter: Brush the raw dough lightly with a little bit of plain olive oil or melted butter. This helps the crust turn golden.
- Bake: Bake for 12–15 minutes, or until the breadsticks are golden brown on top.
- The Garlic Butter Finish: While they bake, melt the 4 tablespoons of butter in a small bowl. Stir in the minced fresh garlic and chopped parsley.
- Top & Serve: The moment the garlic parmesan bread sticks come out of the oven, brush them generously with the garlic butter mixture. Immediately sprinkle with the grated parmesan cheese so it melts slightly. Serve warm with marinara sauce!
Notes
- Two-Stage Garlic: We use garlic powder in the dough for savory depth and fresh garlic in the butter for that punchy aroma. It’s the secret to the best flavor.
- Don’t Burn the Garlic: We add the fresh garlic butter after baking. If you put fresh minced garlic on the dough before it goes into a 400°F oven, it will burn and taste bitter.
- Grate Your Own Cheese: Skip the pre-shredded bag! Freshly grated parmesan melts better and has a nuttier flavor that makes these taste like they came from a fancy bakery.
- Storage: These are best eaten fresh. If you have leftovers, store them in an airtight container at room temperature for 2 days. Reheat in the oven (wrapped in foil) at 350°F for 5-10 minutes to make them soft again.
Nutrition


