
Look, we need to talk about twisted dough. You know exactly what I mean. That distinctive knot, the glossy brown skin, the satisfying crunch of coarse salt hitting your tongue—pretzels are basically the perfect food vehicle. Whether you are grabbing a handful of mini twists from a bag while binging a show or standing in line at the mall for that buttery, soft goodness that smells like heaven, pretzels hold a special place in our snacking hearts.
But here is the thing: most people take them for granted. We just eat them. We rarely stop to appreciate the weird chemistry, the monk-filled history, or the absolute chaos of making them at home (which you should absolutely do, by the way).
So, grab a snack—preferably a salty one—and let’s chat about why this ancient carbohydrate is actually the king of the pantry. And no, I won’t accept any arguments about potato chips right now.
The Great Debate: Hard vs. Soft
Okay, I have to start here because this usually divides the room. You have the Hard Pretzel Camp and the Soft Pretzel Camp.
Personally? I think they serve entirely different purposes. It’s like comparing a cracker to a bagel.
Hard pretzels are all about that snap. You want them when you need a mindless crunch. They are shelf-stable, reliable, and they don’t judge you when you eat half the bag during a movie. Plus, they act as edible spoons for hummus or peanut butter.
Soft pretzels, however, are an event. You don’t just mindlessly eat a soft pretzel; you commit to it. It’s warm, chewy, and usually covered in butter. IMO, a fresh soft pretzel beats a hard pretzel nine times out of ten. But I get the appeal of the crunchy ones.
Do you have a preference, or do you play both sides?
A Tiny Bit of History (Don’t Panic, It’s Cool)
I know, I know—history lessons usually make eyes glaze over. But the origin of the pretzel is actually kind of funny.
Legend has it that back in the 600s A.D., Italian monks invented pretzels to reward children who learned their prayers. They shaped the dough to look like arms crossed in prayer. They called them “pretiola,” which means “little rewards.”
So, technically, every time you eat a pretzel, you are participating in a 1,400-year-old religious reward system.
Fast forward a few centuries, and they made their way to Pennsylvania via German immigrants. Pennsylvania is actually the pretzel capital of the world. They produce roughly 80% of the pretzels made in America. If you live in PA, you probably already knew that. If you don’t, well, now you have a fun fact for your next awkward dinner party.
The Science of the Chew: Why Pretzels Aren’t Bagels
Ever wondered why a pretzel tastes distinctively “pretzely”? It’s not just the shape. You can twist a breadstick into a knot, but it won’t taste like a pretzel.
The secret weapon is alkalinity.
The Lye Factor
Real, traditional soft pretzels take a bath in a lye solution before they hit the oven. Yes, lye. As in sodium hydroxide. The same stuff found in drain cleaner and soap making.
Now, before you freak out and call poison control, hear me out. When you bake the pretzel, the heat neutralizes the lye completely. It becomes harmless. But before that happens, the lye reacts with the dough’s proteins and sugars. This reaction, known as the Maillard reaction, creates that deep, mahogany brown crust and that specific, slightly metallic, savory flavor we love.
The Baking Soda Cheat
Most home bakers (and me, when I’m feeling lazy) don’t want to mess with hazardous chemicals in the kitchen wearing safety goggles. I totally get that.
The alternative is a baking soda bath. You boil water, dump in a mountain of baking soda, and poach the raw dough for about 30 seconds.
Does it work? Mostly. You get the color and a decent chew. But if you want that authentic, mall-kiosk flavor that hits you right in the soul, lye is the only way to go. Just be careful, okay?
Making Them at Home: A messy Labor of Love
If you enjoy flour covering every surface of your kitchen, you need to try making these from scratch. It’s genuinely satisfying.
Here is how the process usually goes down in my kitchen:
- The Dough: It’s a standard yeast dough. Flour, water, yeast, a little sugar. You knead it until it’s smooth. If you’ve ever made homemade pizza dough, the texture feels pretty similar—tacky, but not sticky.
- The Rise: Let it nap for an hour. It needs to double in size.
- The Roll: This is the fun part. You roll a piece of dough into a long snake. I’m talking 20-24 inches long.
- The Twist: Make a U-shape, twist the ends around each other twice, and bring them down to the bottom of the U. Press them down hard. If you don’t press hard enough, they will explode into weird sticks in the water.
- The Bath: Dunk them in your boiling baking soda water. They puff up and look kind of gross and slimy. This is normal. Trust the process :/
- The Bake: Brush with egg wash, sprinkle with chunky salt, and blast them in a hot oven (like 450°F).
When you pull them out, and they are golden brown? Pure magic.
The Shape Game: It’s Not Just Knots
While the twisted knot is iconic, I actually think it’s not always the most efficient shape for eating.
- Pretzel Bites: These are superior for parties. You just chop your dough rope into one-inch nuggets. They have a higher surface area for the baking soda bath, meaning more chewy crust per bite. Plus, you can dip them without looking like a monster trying to shove a giant knot into a tiny cup.
- Sticks/Rods: Great for dipping, but they lack the structural integrity of the knot.
- The Braid: If you feel fancy, braiding the dough creates massive ridges that hold salt and butter perfectly.
Speaking of parties, if you whip up a batch of pretzel bites, you really need a solid dip. I love pairing them with a spicy mustard or a rich jalapeno popper dip for that perfect salty-creamy combo.
Dips and Toppings: The Real MVP
A pretzel without a dip is like a car without wheels—it still works, but you aren’t going anywhere exciting.
The Savory Side
- Mustard: The classic. Spicy brown mustard cuts through the density of the dough. It’s sharp, acidic, and perfect.
- Cheese Sauce: Plastic-looking nacho cheese is a guilty pleasure, but real beer cheese is where it’s at. The bitterness of the beer complements the salt on the pretzel.
- Ranch: Don’t look at me like that. People in the Midwest dip everything in ranch, and they are onto something.
The Sweet Side
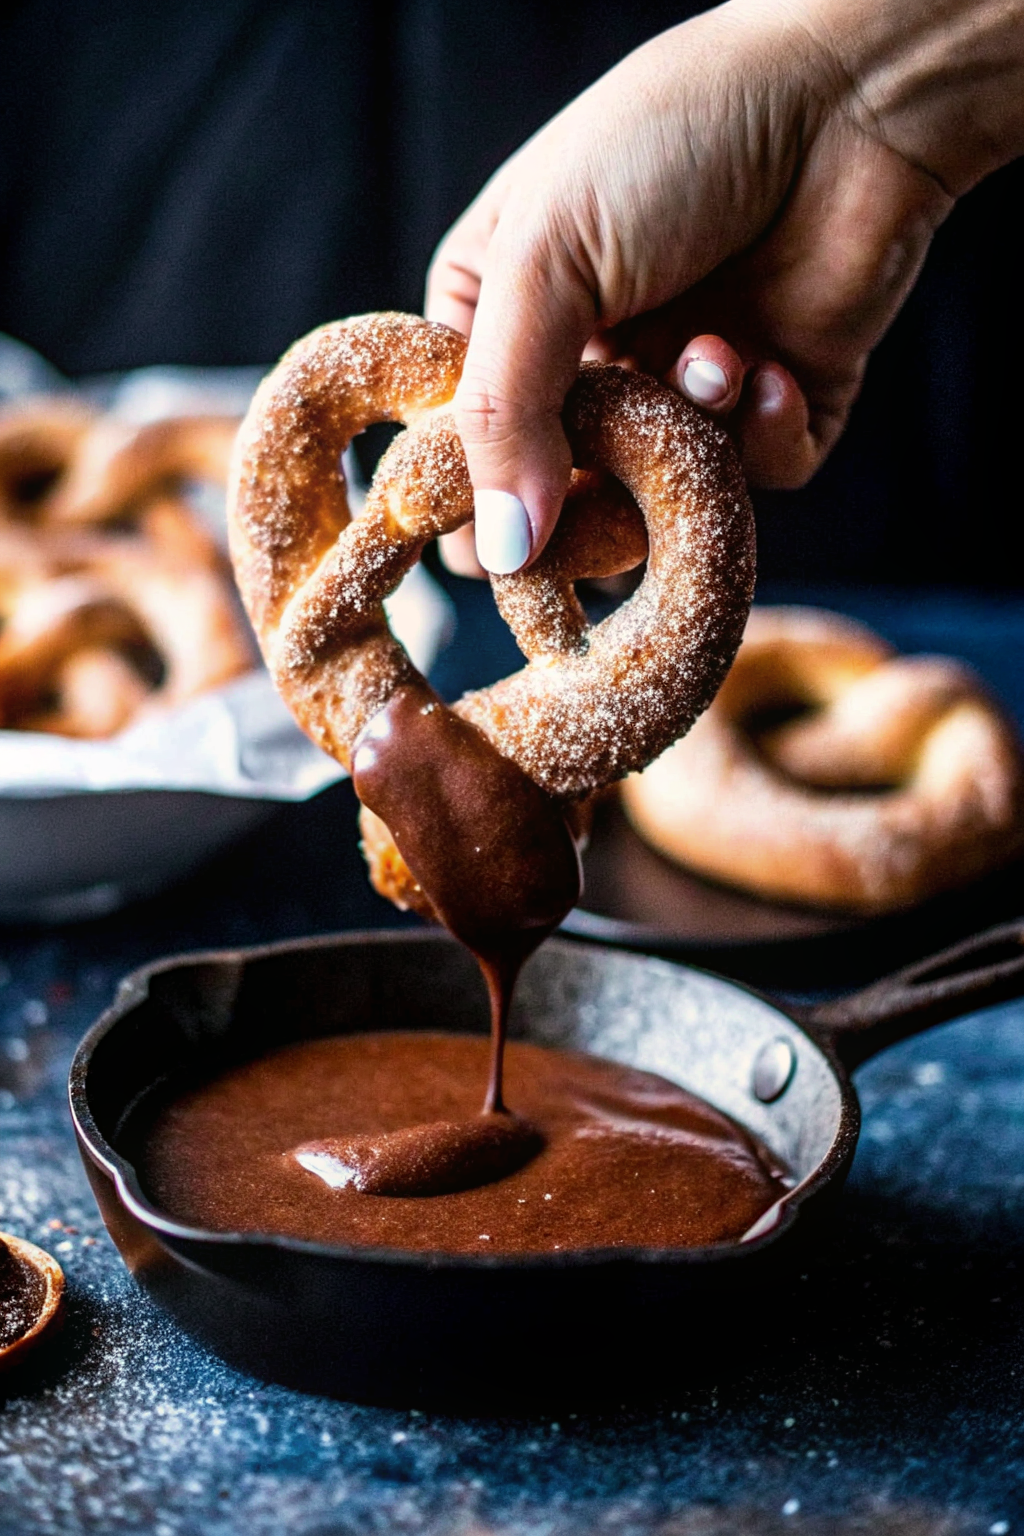
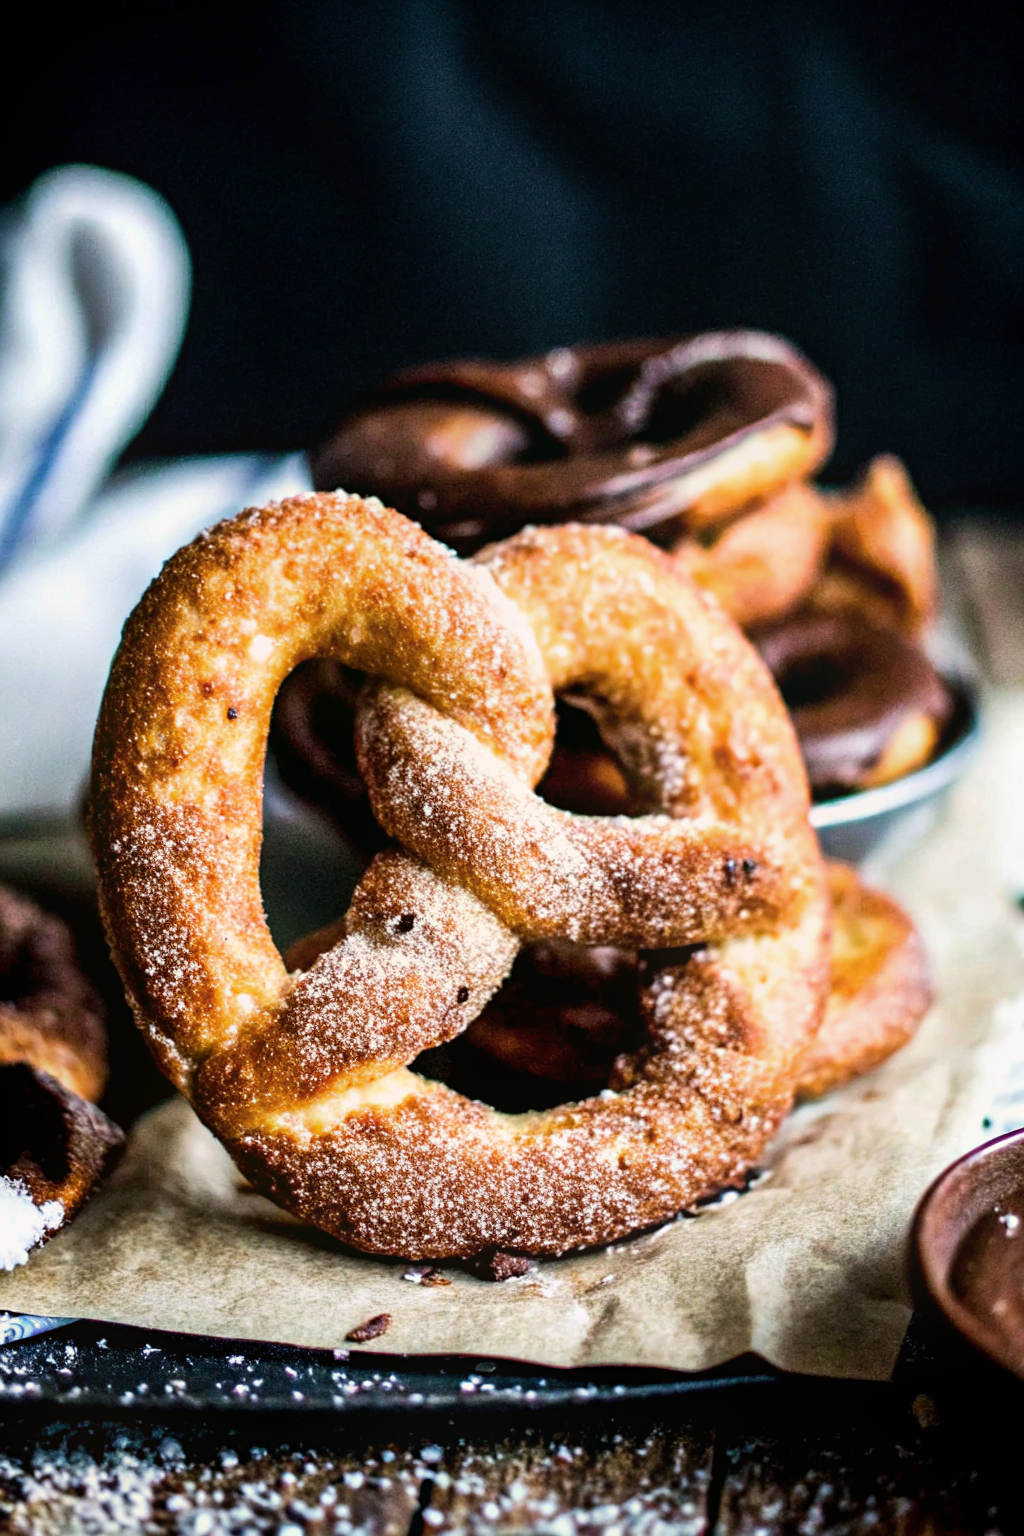
Sometimes you want dessert. Cinnamon sugar pretzels are dangerous. You brush the baked pretzel with melted butter and dunk it face-first into a bowl of cinnamon sugar.
If you are going the sweet route, I highly recommend making a cream cheese icing for dipping. It gives you that mall vibe instantly. Actually, if you have a recipe for cinnamon rolls, just steal the icing recipe from that. It works perfectly.
Store-Bought Power Rankings (My Honest Opinion)
Look, we don’t always have time to boil dough. Sometimes you just need to buy a bag. Here is my completely subjective, unscientific ranking of store-bought brands.
- Snyder’s of Hanover (Sourdough Hard Pretzels): The crunch on these could break a window. They have that fermented sourdough funk that adds so much flavor.
- Rold Gold: The classic thin twists. They are buttery and lighter. I can eat a whole bag of these without realizing it.
- Dot’s Homestyle Pretzels: Have you tried these? They originated in North Dakota. They are seasoned with this secret, buttery, spicy rub that is incredibly addictive. FYI, they are pricey, but worth it.
- Generic Store Brand Rods: usually stale. Pass.
Troubleshooting Your Dough Disaster
If you decide to bake these and they come out looking sad, here is likely what went wrong. I’ve made these mistakes so you don’t have to.
- Why are they pale? You didn’t use enough baking soda (or lye) in the water, or your oven wasn’t hot enough. Pretzels need aggressive heat.
- Why are they wrinkly? You let them sit out too long after boiling before baking. Get them in the oven ASAP.
- Why do they taste metallic? Too much baking soda left on the skin. Let them drip dry for a second before putting them on the baking sheet.
The Salt Situation
We need to address the salt. Pretzel salt is not table salt.
If you use regular table salt on a soft pretzel, it will just dissolve into the damp dough and make it taste like seawater. You need coarse sea salt or specific “pretzel salt.”
Pretzel salt is compressed salt dust. It’s white, opaque, and it doesn’t melt easily. It stays crunchy. That texture contrast is half the fun of eating a pretzel. If you can’t find it, coarse kosher salt is a decent backup, but it’s not quite the same.
Nutritional Value (Or Lack Thereof)
Let’s be real for a second. Pretzels are pure refined carbs and sodium. They are basically energy hugs.
If you are watching your salt intake, this is probably your nightmare food. But for the rest of us, that sodium spike is part of the experience. You drink more water (or beer), you feel full, you move on with your life.
There is this myth that pretzels are a “healthy” snack compared to chips because they are baked, not fried. I mean… sure? But let’s not pretend we are eating kale salad here 🙂 You eat pretzels for the soul, not for the vitamins.
The Frozen Aisle Dilemma
Can we talk about the frozen soft pretzels you buy at the grocery store? SuperPretzel is the big name here.
Here is my hot take: They are disappointing.
They are usually dry and have the texture of a kitchen sponge. You microwave them, and they become rubber; you bake them, and they become rocks. If you need a soft pretzel fix and can’t bake one, go to a pretzel stand. Don’t rely on the freezer section unless you are desperate.
However, if you must eat a frozen one, do not use the microwave. Dampen it with a little water and put it in the toaster oven. It helps brings a little life back to the crust.
A Note on “Gluten-Free”
My heart goes out to the gluten-free crowd when it comes to pretzels. The whole structure of a pretzel relies on gluten. That stretch, that chew, that pull—it’s all gluten strands working hard.
Gluten-free hard pretzels have gotten pretty good recently (lots of crunch), but I have yet to find a gluten-free soft pretzel that doesn’t taste like sad mashed potatoes molded into a knot. If you know of one, please tell me. I want to believe they exist.
Why We Keep Coming Back
At the end of the day, pretzels are nostalgic. They remind us of baseball games, carnivals, movies, and school snacks. They are simple. Flour, water, yeast, salt.
There is something beautiful about how such basic ingredients can create something so iconic. Whether you are dipping a hard stick into peanut butter or tearing apart a hot, soft pretzel covered in cinnamon sugar, you are participating in a global tradition of enjoying twisted carbs.
So, here is my challenge to you: Go bake a batch.
Buy the yeast. Boil the water. Make a mess. Even if they come out looking like alien blobs instead of perfect knots, they will taste better than anything you pull out of a crinkly plastic bag.
And if you absolutely refuse to bake? Go treat yourself to a fresh one at the mall. You deserve that buttery happiness.
Just don’t forget the cheese dip. Seriously, don’t.
For more on the fascinating chemistry behind why that lye bath makes such a difference, check out this deep dive from Serious Eats. It explains the science way better than I can.
Now, if you’ll excuse me, I have some dough rising that needs my attention. Happy snacking!
The Best Soft Homemade Pretzels
Author: Prep: 20 minutes Cook: 15 minutes Total: 1 hour 35 minutesEquipment
- Stand mixer with dough hook
- Large Stockpot
- Slotted Spoon or Spider Strainer
- Baking sheets
- Parchment Paper or Silicone Baking Mats
- Pastry brush
Ingredients
For the Dough:
- 1 ½ cups warm water approx. 110°F
- 1 tablespoon granulated sugar
- 2 teaspoons kosher salt
- 1 packet active dry yeast 2 ¼ tsp
- 4 ½ cups all-purpose flour
- 4 tablespoons unsalted butter melted
- Vegetable oil for greasing the bowl
For the Soda Bath:
- 10 cups water
- ⅔ cup baking soda
For the Topping:
- 1 large egg yolk beaten with 1 tbsp water
- Coarse pretzel salt or coarse sea salt
Instructions
- Bloom the Yeast: In the bowl of your stand mixer, combine the warm water and sugar. Sprinkle the yeast on top and let it sit for about 5 minutes until it looks foamy and alive.
- Make the Dough: Add the flour, melted butter, and kosher salt to the yeast mixture. Using the dough hook attachment, mix on low speed until combined. Increase speed to medium and knead for 4–5 minutes until the dough is smooth, elastic, and pulls away from the sides of the bowl.
- The Rise: Lightly oil a large clean bowl. Form the dough into a ball, place it in the bowl, and turn it once to coat it in oil. Cover with plastic wrap or a warm towel. Place in a warm, draft-free spot for about 1 hour, or until the dough has doubled in size.
- Prep for Baking: Preheat your oven to 450°F (230°C). Line two baking sheets with parchment paper and lightly grease them (or use silicone mats).
- The Bath Setup: In a large pot, bring the 10 cups of water and the baking soda to a rolling boil. Watch out—it will fizz up aggressively when you add the soda!
- Shape the Pretzels: Turn the dough out onto a lightly oiled surface (try not to use too much flour). Divide the dough into 8 equal pieces. Roll each piece into a long rope, about 22–24 inches long.
- The Twist: Make a U-shape with the rope. Twist the two ends around each other twice, then bring the ends down to the bottom of the U to form the classic pretzel shape. Crucial: Press the ends firmly into the dough to seal them, or they will unravel in the water!
- The Dip: Drop the pretzels into the boiling baking soda water, one or two at a time. Boil for 30 seconds. Use a slotted spoon to remove them, letting the excess water drip off, and place them on the prepared baking sheets. They will look a bit wrinkly and puffy—that’s normal!
- Top and Bake: Brush the top of each pretzel with the egg yolk wash (this gives them that glossy shine). Sprinkle generously with coarse pretzel salt. Bake for 12–15 minutes until they are a deep golden brown.
- Cool and Serve: Transfer to a wire rack to cool for at least 5 minutes before eating. Serve warm with spicy mustard or cheese sauce.
Notes
- The Salt Matters: Do not use regular table salt for the topping! It will melt and make the pretzel soggy. Use coarse sea salt or buy specific “pretzel salt” for that authentic crunch.
- Storage: These homemade pretzels are best eaten the day they are made. If you have leftovers, store them in a paper bag (plastic makes them soggy) for up to 2 days. To reheat, pop them in a toaster oven or air fryer for a few minutes to crisp up the crust.
- Dip It: If you aren’t a fan of mustard, try mixing cream cheese with powdered sugar and cinnamon for a sweet dip, or melt down some sharp cheddar with a splash of milk for a quick cheese sauce.
- Troubleshooting: If your pretzels are pale, your oven wasn’t hot enough or you skipped the egg wash. That high heat is non-negotiable!
Nutrition


