
Let’s be honest: nobody actually likes waiting eight hours for a slow cooker to do its job. I certainly don’t. When the craving for salty, cheesy, meaty goodness hits, I want it now, not next Tuesday. That is exactly why I adore these Instant Pot Pulled Pork Nachos. We take a massive cut of pork shoulder, bully it into submission with high pressure, and end up with tender, shreddable meat in a fraction of the time. It feels like cheating, but if this is wrong, I don’t want to be right.
I remember the first time I tried to make pulled pork in the oven. I spent all day babysitting a roasting pan, only to end up with meat that tasted like shoe leather and disappointment. Never again. With the pressure cooker, you lock the lid, press a button, and walk away to live your life (or doom-scroll on your phone). Plus, putting this pork on top of crispy chips with a mountain of cheese? That’s just smart decision-making.
Why The Instant Pot Beats The Slow Cooker
You might ask, “Can’t I just use my Crock-Pot?” Sure, if you enjoy torture. The beauty of the Instant Pot lies in its ability to break down connective tissue rapidly. Speed is the name of the game here. We want that gelatinous, melt-in-your-mouth texture without the all-day commitment.
Pressure cooking forces moisture into the meat. It keeps things juicy. I have found that slow cookers often dry out the outer layer of the pork before the center finishes cooking. The Instant Pot creates a sealed environment where flavor has nowhere to go but into the meat. FYI, this also means your house smells amazing in about 45 minutes rather than 8 hours.
Choosing The Right Cut of Meat
Don’t overthink this, but please, for the love of food, do not buy a pork loin. Pork loin is too lean. If you pressure cook a loin, you will end up with dry, stringy sadness. You want a boneless pork shoulder or pork butt (Boston butt).
These cuts have glorious marbling and fat caps. The fat renders down during the cook, basting the meat from the inside out. I usually grab a 3 to 4-pound roast. If it has a huge layer of fat on one side, I trim it down a bit, but I never remove it all. Fat equals flavor. Remove it, and you remove the joy.
- Pork Shoulder: Often comes with skin; check if you need to remove it.
- Pork Butt: Usually the best option for consistent marbling.
- Picnic Roast: Works in a pinch but has more bone and cartilage to navigate.
The Rub Down and The Sear
Here is where many people mess up: they throw raw, pale meat directly into the pot. Do not do this. You miss out on the Maillard reaction, which is just a fancy science term for “browning makes things taste good.”
I cut the pork into four or five large chunks. This increases the surface area for the seasoning. I use a mix of brown sugar, smoked paprika, garlic powder, cumin, and a healthy hit of kosher salt. Rub that spice mix into every crevice like you’re applying expensive sunscreen.
Set your Instant Pot to “Sauté.” Add some oil and sear those chunks until they look dark and crusty. This step builds the foundation of your flavor profile. If you skip this, your nachos will lack depth, and I will be very disappointed in you :/ .
The Liquid Equation
You need liquid to create pressure, but you don’t want to boil the meat. I use a combination of chicken broth and—don’t judge me—a splash of cola or Dr. Pepper. The acidity and sugar in the soda help tenderize the meat and caramelize the sauce later.
If you want a more traditional Mexican vibe, use orange juice and lime juice. Just ensure you scrape the bottom of the pot with a wooden spoon after searing. The little burnt bits stuck to the bottom (called fond) hold all the flavor. If you leave them there, your Instant Pot will scream “Burn Error” at you, and nobody wants to deal with that panic.
Pressure Cooking Without The Stress
Once you lock that lid, you are on the home stretch. I cook my pork on High Pressure for 60 minutes. Does that sound like a lot? Maybe. But we want this meat falling apart if you look at it wrong.
After the timer beeps, let it do a Natural Release for at least 15 minutes. This is crucial. If you flip the vent immediately, the rapid change in pressure causes the moisture inside the meat to boil and evaporate instantly. You end up with dry meat. Let it rest. It’s had a hard day.
While the pork releases pressure, I usually prep a side dish or a drink. If you are hosting a party, this is the perfect time to whip up some appetizers, perhaps something like these bacon wrapped jalapeno poppers to keep the spicy theme going.
The Shred and The Sauce
Open the lid. The pork should surrender immediately to two forks. Remove the meat to a bowl and shred it. Now, look at that liquid left in the pot. Do not throw it away. That is liquid gold.
I turn the Sauté function back on and boil that liquid down until it thickens slightly. Then, I toss the shredded meat back in. This coats every strand of pork in its own juices. This is the difference between “okay” nachos and “life-changing” nachos.
Building The Ultimate Nacho Platter
Now we pivot to the architecture of the nachos. Yes, it is architecture. You cannot just dump chips on a plate and hope for the best. You need a strategy.
The Chips:
Buy sturdy chips. Thin, restaurant-style chips shatter under the weight of our magnificent pork. You need a chip with structural integrity. I prefer stone-ground corn chips that feel like they could withstand a minor earthquake.
The Cheese:
I will say this once, and I will say it loudly: Shred your own cheese. Pre-shredded cheese comes coated in cellulose (wood pulp) to keep it from clumping in the bag. That cellulose prevents it from melting properly. You want gooey, stretchy cheese, not oily, plastic-looking strands. Grab a block of Monterey Jack or Sharp Cheddar and get to work.
The Layering Technique:
I use a massive sheet pan. I don’t pile the chips into a mountain; I spread them out. This ensures every single chip gets a piece of the action. Nobody wants that one naked chip at the bottom of the pile. That chip is a tragedy.
- Layer One: Spread chips in a single layer.
- Cheese Layer: Sprinkle a generous amount of cheese directly on the chips.
- Meat Layer: Distribute the hot pulled pork evenly.
- Repeat: Add a second layer of chips, more cheese, and more meat.
The Broiler Step
Pop the baking sheet under the broiler for about 3–5 minutes. Watch it like a hawk. Cheese goes from “perfectly melted” to “charred disaster” in about 30 seconds. You want the cheese bubbling and the edges of the chips slightly toasted.
While the cheese melts, I like to think about what else I can serve. If it’s a full dinner spread, I might pair this with something fresh to cut the heaviness, like a side from my easy greek salad recipe, because balance is key, right?
The Toppings: Hot vs. Cold
This is where you show your personality. The contrast between the hot, salty pork and cheese against cold, fresh toppings makes these nachos elite. IMO, you need acidity to cut through the fat.
I always add:
- Pickled Red Onions: Easy to make, bright pink, and tangy.
- Jalapeños: Fresh for crunch, pickled for vinegar.
- Cilantro: Unless you have that soap gene, in which case, I pity you.
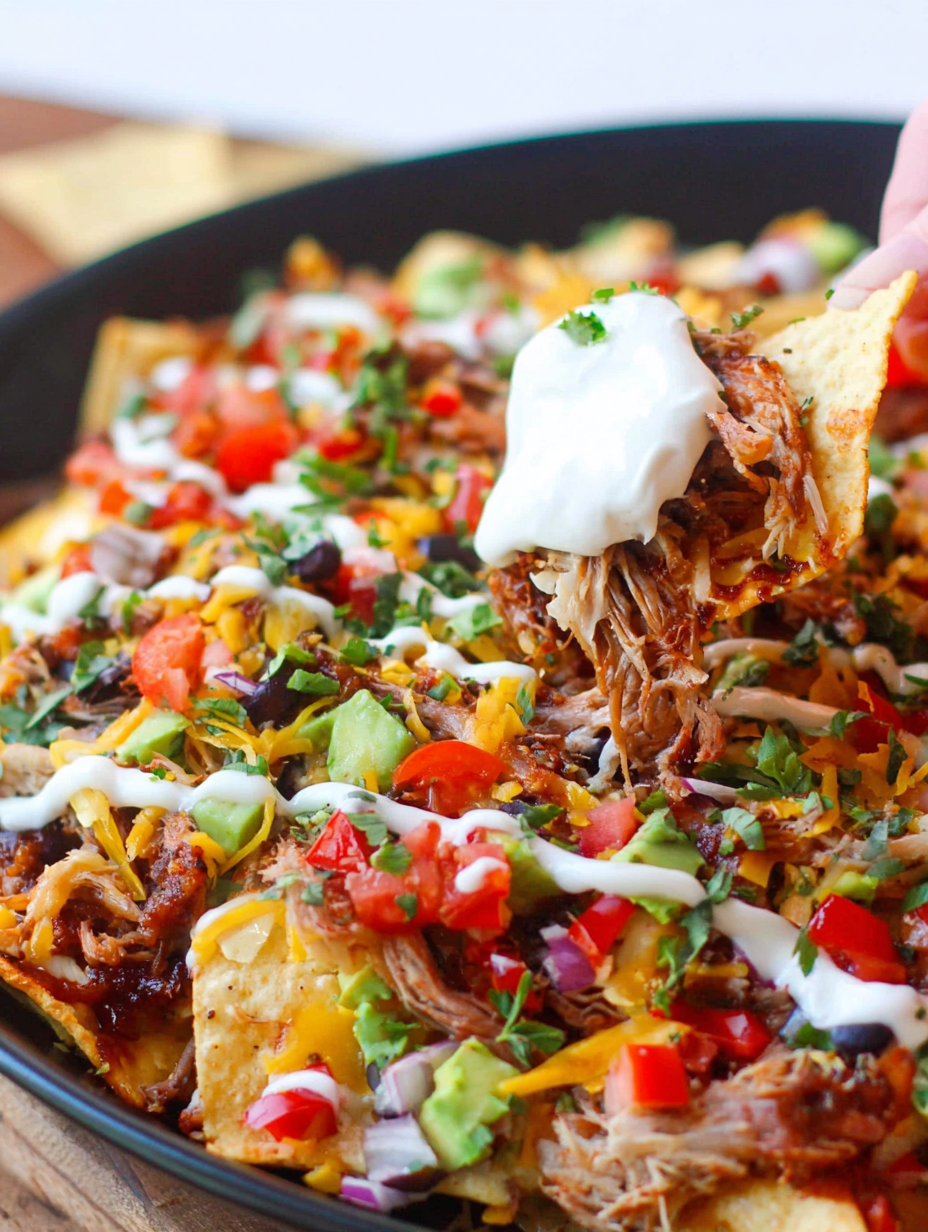
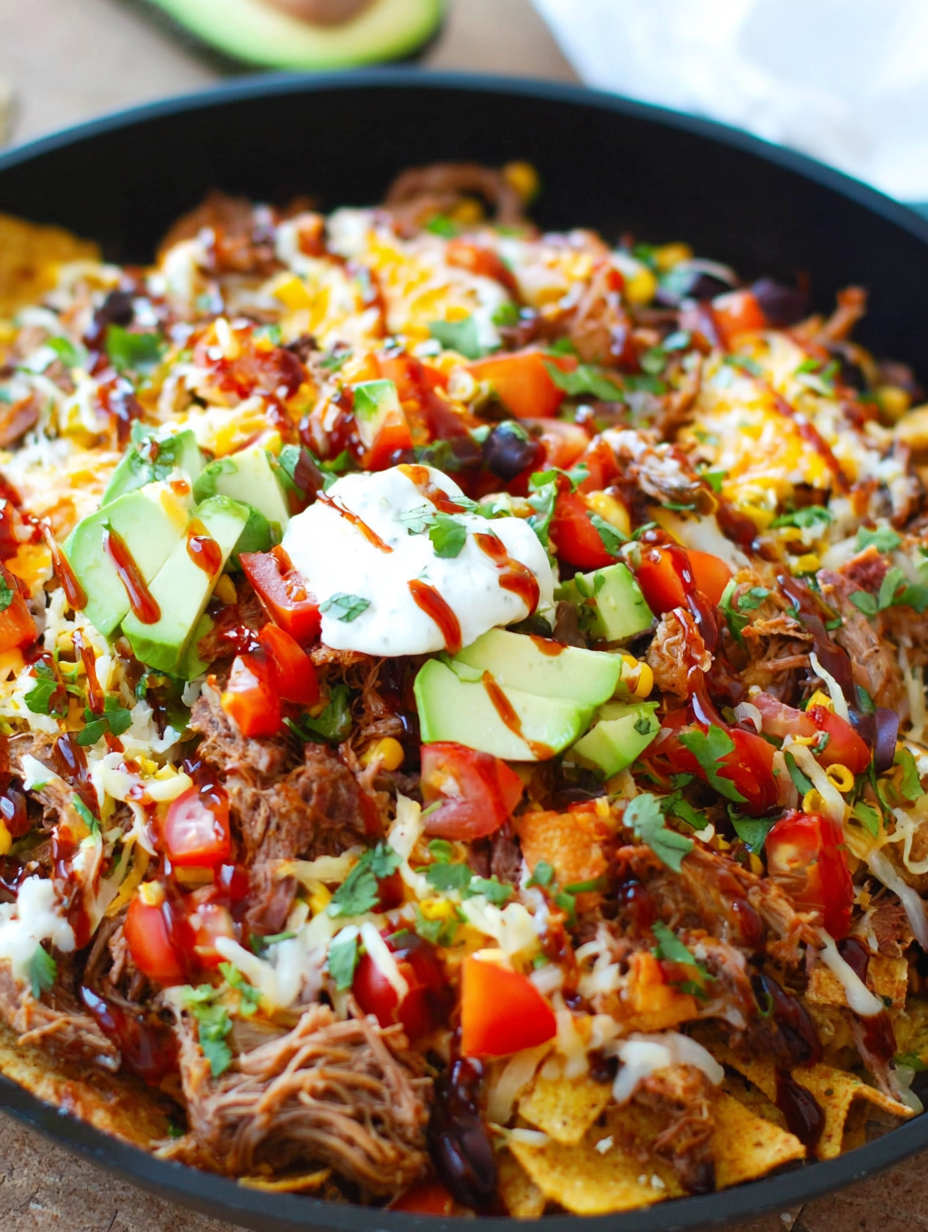
- Sour Cream or Crema: Put it in a squeeze bottle to look fancy.
- Avocado: Dice it right before serving so it doesn’t turn brown.
If you really want to go all out, drizzle some BBQ sauce over the top. It bridges the gap between the savory pork and the corn chips perfectly.
Troubleshooting Your Nachos
Ever wondered why your nachos get soggy halfway through eating them? It’s usually the toppings. Wet ingredients like salsa or tomatoes should go on after the bake, right before you serve. Do not bake the salsa. Hot salsa on nachos is weird.
Also, serve them immediately. Nachos have a half-life of about 20 minutes before they turn into a sad casserole. Eat fast. It’s a competitive sport.
Step-by-Step Walkthrough
Let’s recap the process so you don’t get lost in the sauce (literally).
Ingredients:
- 3-4 lb Pork Shoulder (cut into chunks)
- 2 tbsp Brown Sugar
- 1 tbsp Smoked Paprika
- 1 tbsp Garlic Powder
- 1 tsp Cumin
- 1 tsp Salt & Black Pepper
- 1 tbsp Vegetable Oil
- 1 cup Chicken Broth
- 1/2 cup Cola or Dr. Pepper
- 1 bag Sturdy Tortilla Chips
- 3 cups Freshly Shredded Cheese (Cheddar/Jack blend)
Instructions:
- Mix the spices: Combine sugar, paprika, garlic, cumin, salt, and pepper in a small bowl.
- Season the meat: Rub the spice mixture all over the pork chunks. Be aggressive.
- Sear: Turn the Instant Pot to Sauté. Add oil. Brown the meat on all sides (do this in batches if you need to). Remove meat.
- Deglaze: Pour in the broth and soda. Use a wooden spoon to scrape up the browned bits. This is flavor town.
- Pressure Cook: Return the meat to the pot. Close the lid. Set to High Pressure for 60 minutes.
- Release: Let it Natural Release for 15 minutes, then vent the rest.
- Shred: Remove meat, shred it, and return it to the juices in the pot.
- Assemble: On a baking sheet, layer chips, cheese, and pork.
- Broil: Melt the cheese in the oven for 3-5 minutes.
- Top: Add cold toppings immediately.
Variations to Try
Once you master the pork, you can experiment. Sometimes I swap the cola for a dark beer. The yeastiness adds a great depth. Other times, I toss the shredded pork in a gochujang sauce for a Korean fusion twist.
If you have leftovers (unlikely, but possible), the pork freezes beautifully. I often make a double batch just to have meat ready for tacos or sandwiches later in the week. And speaking of sandwiches, if you have extra buns lying around, this meat makes incredible sliders. Check out my easy burger bun recipe if you’re feeling ambitious enough to bake your own bread.
Final Thoughts
Food brings people together, but a giant tray of Instant Pot Pulled Pork Nachos makes people stay. This recipe saves you time without sacrificing flavor, and frankly, that’s the kind of energy we need in the kitchen. You get the smoky, tender meat you crave, the crunch of the chips, and the gooey satisfaction of real cheese, all in under two hours.
So, grab your pressure cooker, buy a ridiculous amount of cheese, and treat yourself. You’ve earned it. And if anyone complains that you didn’t smoke the pork for 12 hours over hickory wood? Kick them out. You don’t need that kind of negativity in your life .
Now, go make a mess in the kitchen!
For more tips on handling different cuts of meat and ensuring food safety, check out the USDA’s guide on pork cooking temperatures.
Instant Pot Pulled Pork Nachos
Author: Prep: 15 minutes Cook: 1 hour 15 minutes Total: 1 hour 45 minutesEquipment
- Instant Pot (6 qt or larger)
- Large Rimmed Baking Sheet
- Box Grater
Ingredients
The Dry Rub
- 2 tbsp Brown sugar packed
- 1 tbsp Smoked paprika
- 1 tbsp Garlic powder
- 1 tsp Ground cumin
- 1 tsp Kosher salt
- 1 tsp Black pepper
The Pork
- 3-4 lb Boneless pork shoulder or pork butt cut into 4-5 large chunks
- 1 tbsp Vegetable oil
- 1 cup Chicken broth
- 1/2 cup Cola Dr. Pepper, or dark beer
The Nachos
- 1 bag Sturdy tortilla chips stone ground is best
- 3 cups Monterey Jack or Sharp Cheddar cheese freshly shredded
Suggested Toppings
- Pickled red onions
- Fresh Jalapeño slices
- Chopped cilantro
- Sour cream or Mexican crema
- Diced avocado
- BBQ sauce optional
Instructions
- Mix the Spices: In a small bowl, combine the brown sugar, smoked paprika, garlic powder, cumin, salt, and black pepper.
- Season the Meat: Rub the spice mixture generously all over the pork chunks, ensuring every crevice is coated.
- Sear the Pork: Set your Instant Pot to Sauté (High). Add the vegetable oil. Once shimmering, sear the pork chunks on all sides until a dark crust forms (about 3–4 minutes per side). Work in batches if necessary so you don’t crowd the pot. Remove the meat and set aside.
- Deglaze the Pot: Pour in the chicken broth and cola (or soda of choice). Use a wooden spoon to vigorously scrape up the browned bits (fond) stuck to the bottom of the pot to prevent a burn warning.
- Pressure Cook: Return the seared pork and any accumulated juices to the pot. Lock the lid in place and set the valve to “Sealing.” Cook on High Pressure for 60 minutes.
- Natural Release: When the timer beeps, allow a Natural Pressure Release for 15 minutes. Then, carefully vent any remaining steam.
- Shred and Sauce: Remove the pork to a large bowl and shred with two forks—it should fall apart easily. Turn the Instant Pot back to Sauté and let the cooking liquid boil down for about 5–10 minutes until slightly thickened. Return the shredded pork to the pot and toss to coat in the juices.
- Assemble: Preheat your oven broiler. Spread a layer of tortilla chips on a large baking sheet. Top with half the cheese and half the pork. Add a second layer of chips, the remaining cheese, and more pork.
- Broil: Place under the broiler for 3–5 minutes. Watch closely! Remove once the cheese is bubbly and the chips are slightly toasted.
- Serve: Top immediately with pickled onions, jalapeños, cilantro, sour cream, and avocado. Serve warm!
Notes
- Don’t skip the sear: Browning the meat adds a depth of flavor you can’t get from pressure cooking alone.
- Shred your own cheese: Pre-shredded cheese contains anti-caking agents that prevent it from melting smoothly. For the best Instant Pot Pulled Pork Nachos, grab a block and use a box grater.
- The Chips Matter: Use thick, stone-ground chips. Thin, restaurant-style chips will get soggy and break under the weight of the meat and cheese.
- Storage: The pork freezes beautifully for up to 3 months. Store leftover nachos in the fridge, but note they are best eaten fresh (reheat in an air fryer or oven to crisp them back up)


