
Have you ever walked into a fancy kitchen store during the holidays? You know the one. It smells like cinnamon brooms and expensive espresso machines. You wander over to the seasonal display, pick up a tin of Peppermint Bark, and check the price tag. Then you almost drop the tin because, seriously, $30 for chocolate and crushed candy canes? It feels like highway robbery.
I refuse to pay a premium for something I can make in my pajamas. Plus, let’s be honest, the store-bought stuff often sits on a shelf for months. It tastes a little stale. When you make it at home, you get that snap, that fresh minty punch, and the satisfaction of saving money.
Making bark sounds incredibly simple, and it is. But it also has a reputation for being finicky. The layers separate. The chocolate blooms and turns gray. The white chocolate refuses to melt. I have ruined my fair share of batches. But through those disasters, I learned exactly what not to do. So, grab your apron. We are going to make a holiday treat that puts the fancy tin to shame.
The Great Chocolate Debate
You cannot hide bad ingredients in this recipe. There is nowhere for them to hide. You only use chocolate, peppermint, and more chocolate. If you buy the cheapest “baking chips” on the bottom shelf, your bark will taste like waxy plastic.
Ditch the Chips
Standard chocolate chips contain stabilizers to help them hold their shape in cookies. This makes them terrible for melting. They turn thick and sludge-like. Buy high-quality chocolate bars.
Go to the baking aisle and look for brands like Ghirardelli, Guittard, or Lindt. Grab the 4-ounce bars. They melt into a smooth, silky pool that spreads like a dream. IMO, if you skimp here, you might as ever just buy a Hershey bar and call it a day.
White Chocolate Matters Most
Read the label on your white chocolate. If it says “White Morsels” or “Vanilla Chips” and doesn’t list cocoa butter in the ingredients, put it back. That is just palm oil and sugar. It tastes oily and won’t bond correctly with the dark chocolate layer. You need real white chocolate with actual cocoa butter.
The Equipment You Actually Need
You don’t need a marble slab or a tempering machine. However, you do need a few specific tools to make your life easier.
- Offset Spatula: This tool spreads the chocolate into a perfectly even layer. A spoon leaves ridges. An offset spatula makes you look like a professional chocolatier.
- Parchment Paper: Do not use wax paper. The heat from the chocolate can melt the wax. Foil works, but it wrinkles. Parchment is the gold standard here.
- A Heavy Rolling Pin: You need this for crushing the candy canes. It creates the perfect texture.
Step 1: The Dark Chocolate Foundation
We start with the bottom layer. You can use semi-sweet or dark chocolate here. I prefer semi-sweet because it balances the sweetness of the white chocolate layer on top.
Melting Strategy
You have two choices: the microwave or the double boiler.
- The Microwave: This is fast, but risky. If you burn chocolate, you can’t fix it. It seizes up and becomes grainy. If you choose this route, microwave in 30-second intervals and stir aggressively between each one.
- The Double Boiler: This is my preferred method. Set a glass bowl over a pot of simmering water. The steam gently melts the chocolate. It takes longer, but it creates a smoother texture.
Spread the melted dark chocolate onto your parchment-lined baking sheet. You want it about 1/4 inch thick. Now, here is the trick: Do not stick it in the freezer.
If you freeze the bottom layer, it gets too cold. When you pour the warm white chocolate on top, the temperature shock causes the layers to split later. Leave it at room temperature or in the fridge for just 10 minutes. You want it set, but not rock hard.
Step 2: The Peppermint Factor
While the bottom layer sets, let’s talk about flavor. You need peppermint extract. But be careful. Peppermint is a bully. If you add too much, your Peppermint Bark tastes like toothpaste.
Mix the extract into the white chocolate after you melt it. Oil-based flavorings work best because water-based extracts can sometimes seize the chocolate. If you can find peppermint oil, use it. If not, standard extract works if you stir quickly.
Also, crushing the candy canes is therapeutic. Put unwrapped canes in a heavy-duty Ziploc bag. Whack them with your rolling pin. Don’t pulverize them into dust, though. You want chunks. Pro Tip: Sift the crushed candy through a mesh strainer. This separates the fine pink dust from the nice crunchy pieces. Use the pieces for the topping and stir the dust into the white chocolate for extra flavor.
Step 3: The Marriage of Layers
This is the moment of truth. Your dark chocolate layer feels firm to the touch but not icy cold. Your white chocolate is melted and smooth.
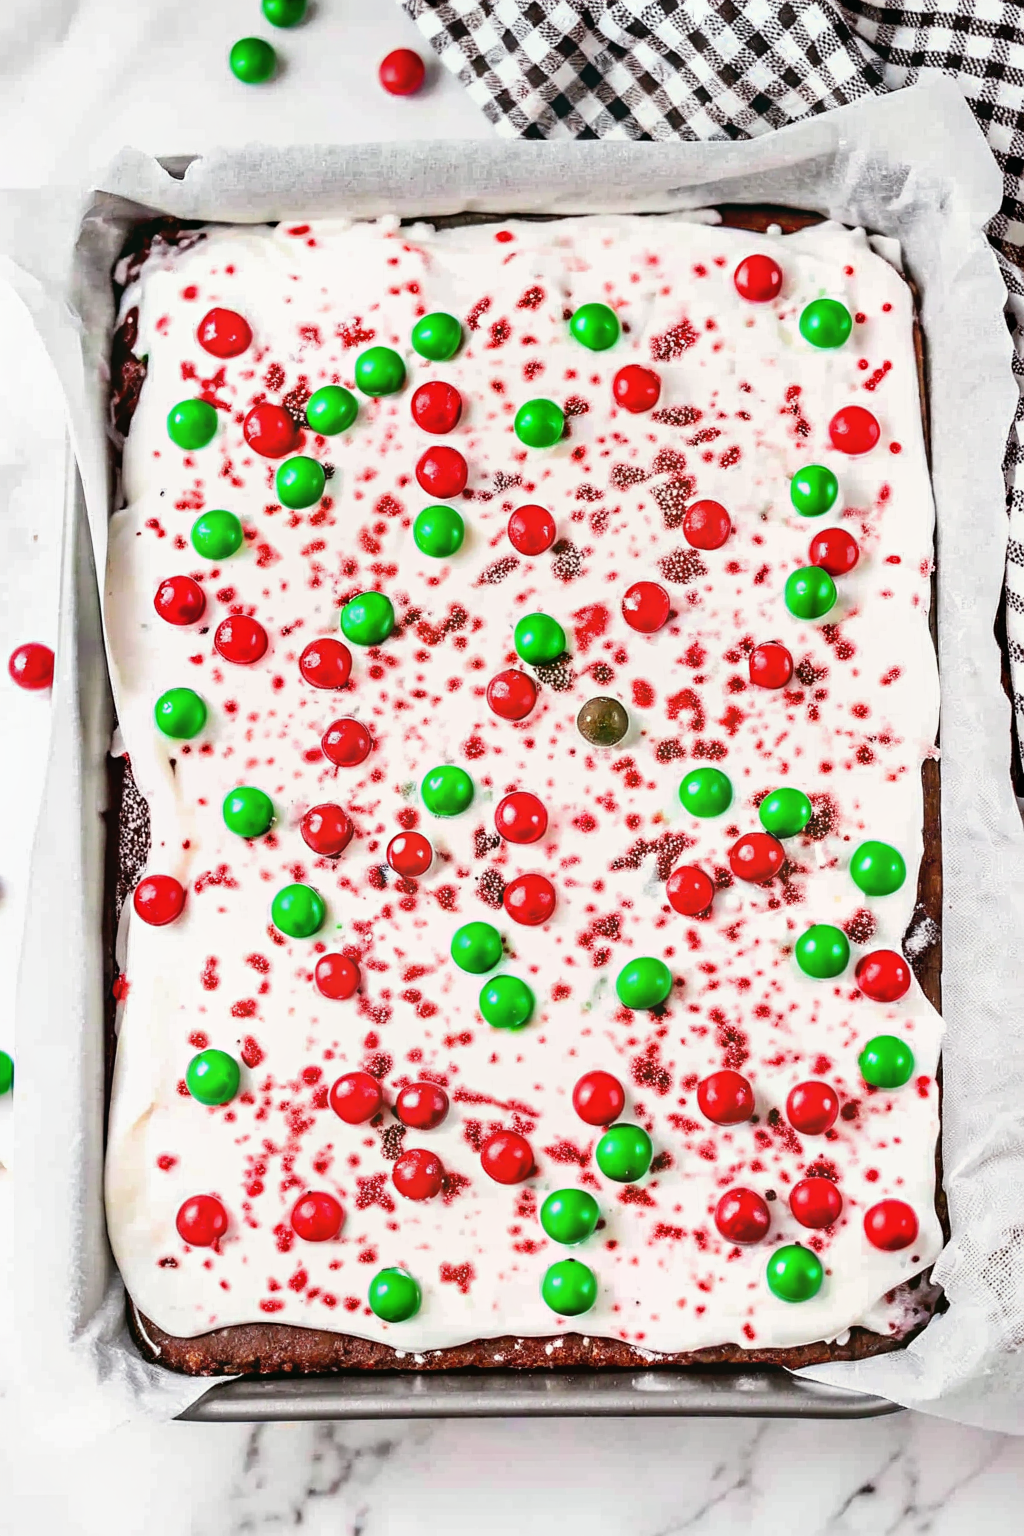
Pour the white chocolate directly over the dark chocolate. Use your offset spatula to spread it quickly. The heat from the white chocolate melts the surface of the dark chocolate slightly. This fuses them together.
If you wait too long and the dark chocolate is too cold, the layers will snap apart when you break the bark. We want a unified piece of candy, not a sandwich that falls apart.
Immediately sprinkle your crushed candy canes on top. Gently press them down with your hand so they stick. If you wait until the white chocolate sets, the candy just rolls off.
Troubleshooting: Why Does My Chocolate Look Weird?
Sometimes, despite your best efforts, things go wrong. Chocolate is temperamental.
The Problem: Gray Streaks (Blooming)
- The Cause: This happens when the cocoa butter separates from the solids. It usually means the chocolate got too hot or cooled down too slowly.
- The Fix: It still tastes fine! It just looks a little rustic. Next time, remove the chocolate from the heat before it fully melts and stir to finish the process.
The Problem: The Layers Separated
- The Cause: Temperature shock. One layer was too cold, and the other was too hot.
- The Fix: Let the bark come to room temperature before you break it. If you break it while it’s frozen, it snaps cleanly into two separate sheets :/
The Problem: The Chocolate Seized
- The Cause: A drop of water got into the bowl. Water is the enemy of melted chocolate.
- The Fix: Sadly, you can’t use this for bark anymore. Add some heavy cream to it and turn it into a ganache for chocolate brownies instead. Waste not, want not.
Cutting vs. Breaking
How do you want your final product to look?
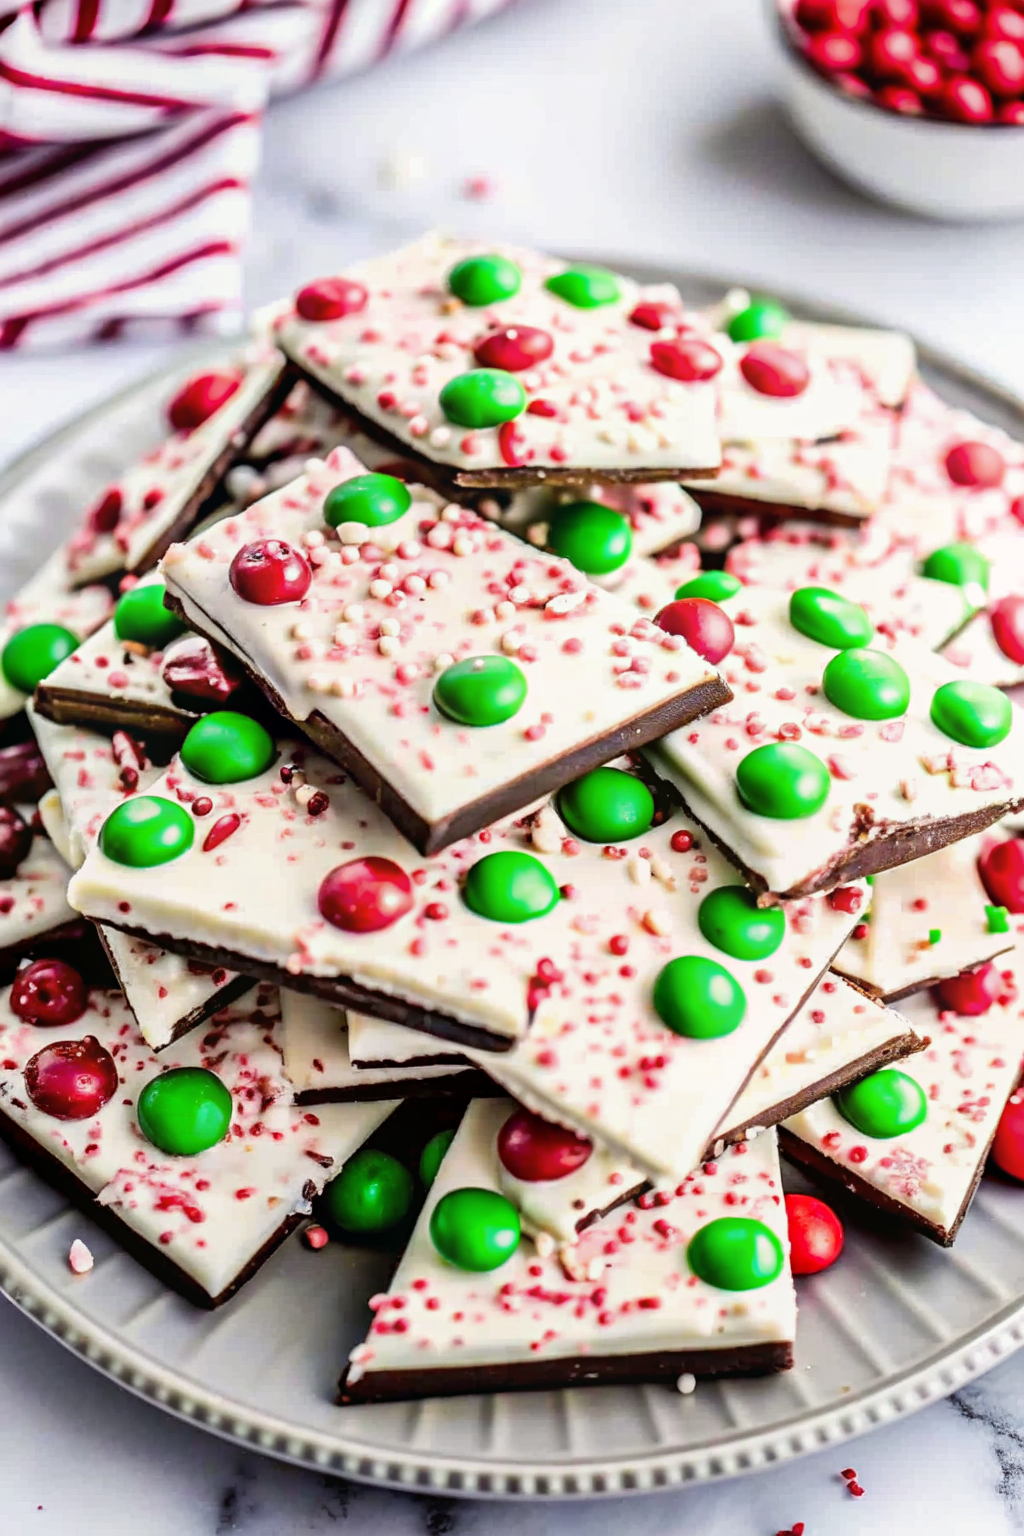
The Rustic Break
This is the classic method. Once the bark is fully set (I usually let it sit at cool room temperature for a few hours), just use your hands. Snap it into random shards. It looks homemade and inviting.
The Clean Cut
If you want perfectly square pieces, you need a knife.
- Let the bark set, but not fully harden.
- Score lines with a sharp knife.
- Let it harden completely.
- Run your knife under hot water, wipe it dry, and cut along the lines.
Personally? I prefer the break method. It’s faster, and nobody complains about irregular shapes when their mouth is full of chocolate.
Serving and Gifting Ideas
Peppermint Bark makes the ultimate gift. It looks festive, tastes expensive, and travels well.
Grab some clear cellophane bags and tie them with a red ribbon. You just made a gift that looks better than anything in the Hallmark aisle.
I also love serving this as a coffee companion. Place a piece on a saucer next to a cup of espresso. Or, crumble the small bits over a mug of hot chocolate. The white chocolate melts into the drink, adding a creamy mint layer that is absolutely to die for.
If you are putting together a holiday dessert board, this bark adds a nice crunch and color contrast next to softer treats like sugar cookies. The pink and white really pops against the other baked goods.
Variations on a Classic
Once you master the basic technique, you can get weird with it.
- Dark on Dark: Skip the white chocolate. Use a layer of 70% dark chocolate and a layer of 50% semi-sweet. It’s intense and sophisticated.
- The Oreo Crunch: Stir crushed Oreos into the white chocolate layer. Mint and cookies and cream? Yes, please.
- The Drizzle: Melt a tiny bit of dark chocolate and drizzle it over the finished white layer before adding the candy canes. It looks like abstract art.
Why You Should Make This Tonight
We overcomplicate the holidays. We bake 12-layer cakes and stress over perfect pies. Sometimes, you just want something easy that hits the spot.
Peppermint Bark requires zero baking. You don’t even need to turn on the oven. You can make a batch in 20 minutes (plus setting time) while watching a cheesy holiday movie.
It’s satisfying to make. Spreading that glossy chocolate is like Zen gardening for foodies. And smashing the candy canes? That is pure stress relief.
So, skip the expensive tin. Go buy the good chocolate. You will save money, and frankly, yours will taste fresher. Your friends will ask for the recipe, and you can just smile and say it’s a trade secret (or send them this article).
For a deeper dive into the science of tempering chocolate and why it gives that perfect “snap,” check out this guide from King Arthur Baking.
Now, go melt some chocolate. Happy holidays!
Classic Homemade Peppermint Bark
Author: Prep: 20 minutes Cook: Total: 1 hour 20 minutesEquipment
- Large Baking Sheet
- Parchment paper
- Offset Spatula
- Heat-Proof Mixing Bowls
- Rolling Pin
Ingredients
The Dark Layer
- 12 oz High-quality semi-sweet or dark chocolate bars chopped
The White Layer
- 12 oz High-quality white chocolate bars must contain cocoa butter, chopped
- 1/2 tsp Peppermint extract oil-based is best
The Topping
- 3-4 Standard candy canes or 1/2 cup crushed peppermint candy
Instructions
- Prep Your Station: Line a large baking sheet with parchment paper. Don’t use wax paper or foil, as parchment gives the cleanest release.
- Melt the Dark Chocolate: Place the chopped semi-sweet chocolate in a heat-proof bowl. Melt it using a double boiler or in the microwave in 30-second intervals, stirring vigorously between each burst until smooth.
- Spread the Base: Pour the melted dark chocolate onto the parchment paper. Use an offset spatula to spread it into a rectangle about 1/4-inch thick.
- ** The Critical Set:** Let the dark layer sit at room temperature for about 10–15 minutes. It should be set enough that it doesn’t mix with the top layer, but not rock hard. Warning: Do not freeze this layer, or the layers will separate later!
- Crush the Candy: While the base sets, place your candy canes in a heavy-duty Ziploc bag. Whack them with a rolling pin until you have a mix of small chunks and dust.
- Melt the White Chocolate: Melt the white chocolate using the same method as the dark chocolate. Once smooth, stir in the peppermint extract. Work quickly so the chocolate doesn’t seize.
- Layer It Up: Pour the white chocolate directly over the set dark chocolate. Spread it gently and quickly with the spatula to cover the dark layer completely.
- Add the Crunch: Immediately sprinkle the crushed candy canes over the wet white chocolate. Press them down very gently with your hand to ensure they stick.
- Final Set: Let the Peppermint Bark sit at room temperature until completely firm (about 1 hour). You can pop it in the fridge for the last 10 minutes if your kitchen is warm.
- Break and Serve: Once hard, peel off the parchment paper and use your hands to snap the bark into jagged, rustic pieces.
Notes
- Chocolate Quality: Do not use standard chocolate chips. They contain stabilizers that prevent them from melting smoothly. Use baking bars (like Ghirardelli or Lindt) for the best snap.
- Layer Separation: The #1 reason layers separate is temperature shock. Make sure your bottom layer isn’t freezing cold when you pour the warm top layer on.
- Cutting: If you prefer clean squares instead of rustic shards, let the bark set slightly, score it with a sharp knife, and then snap it along the lines once fully hard.
- Storage: Store in an airtight container at room temperature for up to 2 weeks. If your house is very warm, you can keep it in the fridge.
Nutrition


