
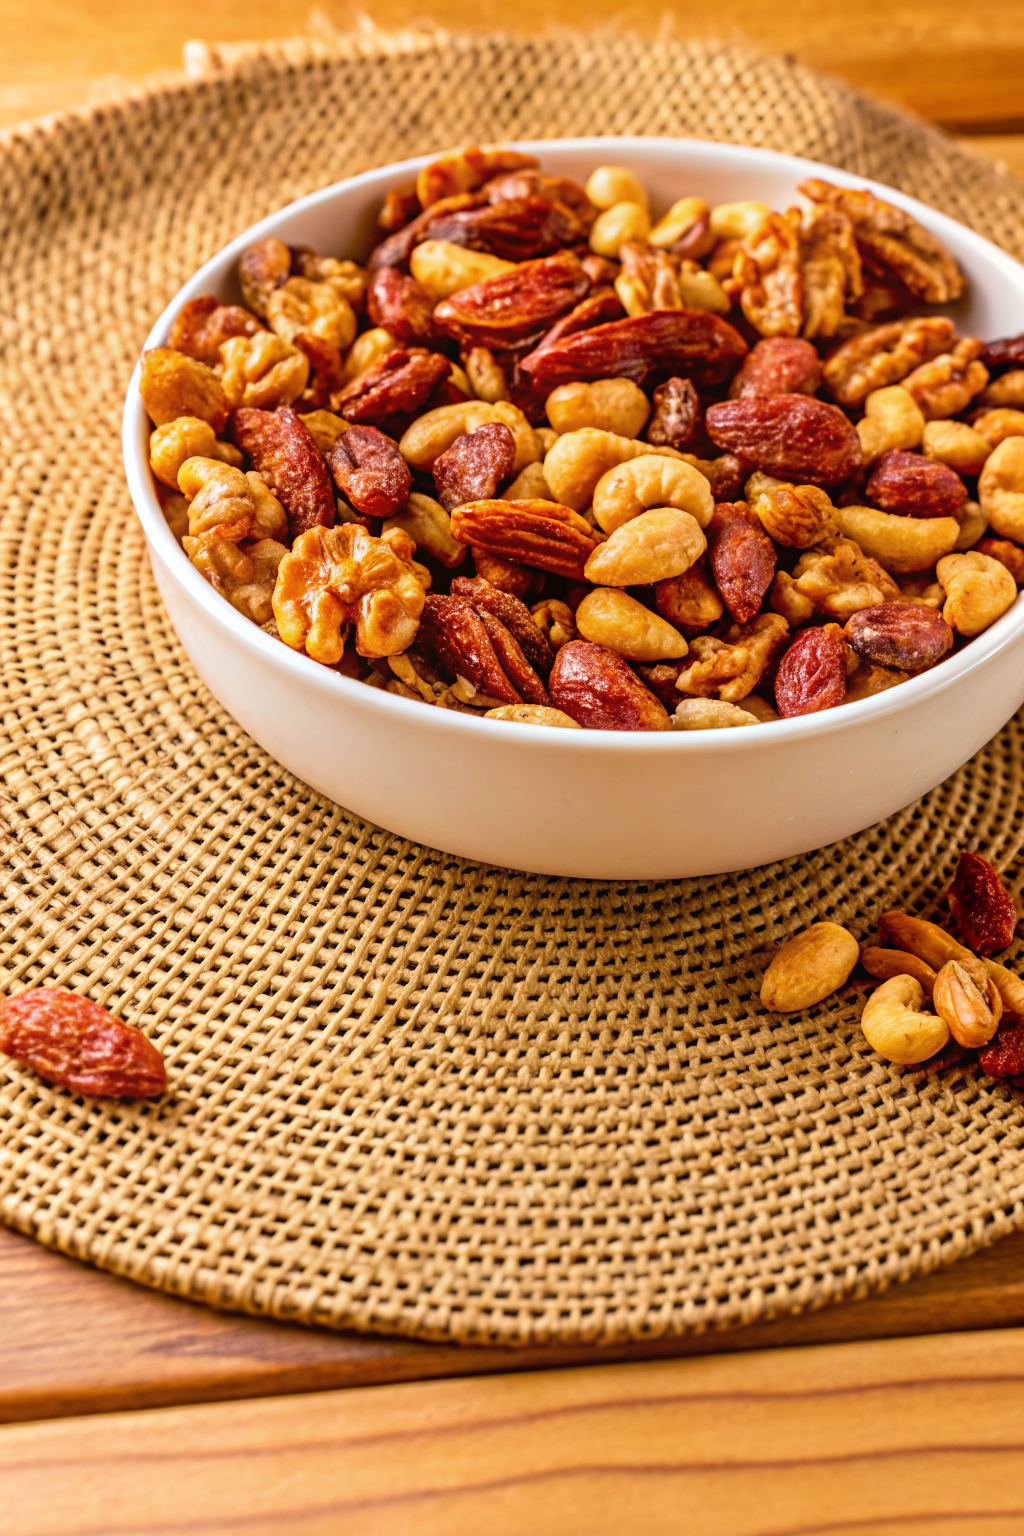
We all know the struggle. You walk into a holiday party, starving, and spot a bowl of “mixed nuts” on the coffee table. You reach in, hoping for a buttery cashew or a crunchy pecan. Instead, your hand emerges with five peanuts and a single, sad almond. It is the ultimate betrayal. IMO, store-bought mixed nut tins are basically lying to us. They promise variety but deliver filler.
If you want a snack that actually tastes like luxury—and doesn’t leave your fingers coated in cheap vegetable oil—you need to make your own salted mixed nuts.
I used to think roasting nuts at home was a waste of time. Why bother when the grocery store sells them by the gallon? Then I actually tried it. The difference blew my mind. Homemade roasted nuts are warmer, fresher, and seasoned exactly how you like them. Plus, you control the ratio. If you want 50% pecans, you get 50% pecans. No peanut police will stop you.
Let’s fix your snacking game forever. We are going to make the ultimate batch of salted mixed nuts, and we are going to do it right.
Why Store-Bought Nuts Disappoint
You might wonder, “Is it really worth the effort?” The answer is a resounding yes. Commercial mixed nuts suffer from three major problems that ruin the experience.
Here is why DIY wins every time:
- The Peanut Ratio: Most brands fill their tins with up to 60% peanuts because they are cheap. When you make your own, you curate the mix.
- Stale Oils: Factories often roast nuts in low-quality vegetable oils that go rancid quickly. This gives the nuts a slightly cardboard-like aftertaste.
- Salt Overload: Manufacturers use salt to mask stale flavors. You end up burning your tongue after three handfuls :/
When you roast at home, you use fresh ingredients. You control the sodium. You achieve a crunch that makes the canned stuff feel soggy in comparison.
Selecting Your All-Star Lineup
The beauty of this recipe lies in your freedom to choose. You don’t have to tolerate Brazil nuts if you hate them (does anyone actually like them?). You build your dream team. However, you should understand how different nuts roast to ensure an even cook.
The Heavy Hitters
- Cashews: These are the crowd favorites. They provide a creamy, buttery texture. Buy them raw and whole. Broken pieces roast too fast and burn.
- Almonds: These add the necessary crunch. Look for raw, skin-on almonds for a deeper, earthier flavor.
- Pecans: My personal favorite. They have a natural sweetness that pairs perfectly with salt. Watch them closely, though; they burn faster than almonds.
- Walnuts: These bring a slight bitterness that balances the sweetness of the pecans. Their craggy surface holds salt beautifully.
- Hazelnuts: If you want to feel fancy, throw these in. They have a distinct, rich flavor that elevates the whole mix.
Pro Tip: Buy raw, unsalted nuts. If you buy pre-roasted nuts and try to roast them again to add flavor, you will end up with charcoal. Start from scratch for the best results.
The Secret Binding Agent
Most people toss their nuts in oil or melted butter before roasting. This works, but it often leaves the nuts feeling greasy. Plus, the salt tends to fall off the moment you pick them up.
I have a better way. Use an egg white.
It sounds weird, I know. But whisking a single egg white until it’s frothy and tossing the nuts in it creates a microscopic, sticky layer. This layer glues the salt and spices to the nut surface without adding any flavor. The result is a dry, crisp finish rather than an oily mess.
If you are vegan or allergic to eggs, you can use maple syrup or a touch of olive oil. But if you eat eggs, try the egg white method. It changes the texture game completely.
The Roasting Process: Low and Slow
You cannot rush greatness. If you crank your oven to 400°F, the outside of the nuts will scorch before the inside dries out and becomes crunchy. We want an even, golden roast all the way through.
- Preheat to 300°F (150°C). This gentle heat allows the moisture to evaporate slowly.
- Mix your coating. Whisk your egg white with a splash of water until foamy. Toss your nuts in a large bowl with the liquid until they shine.
- Season aggressively. Add your salt, pepper, and any other spices now. The egg white will hold onto them for dear life.
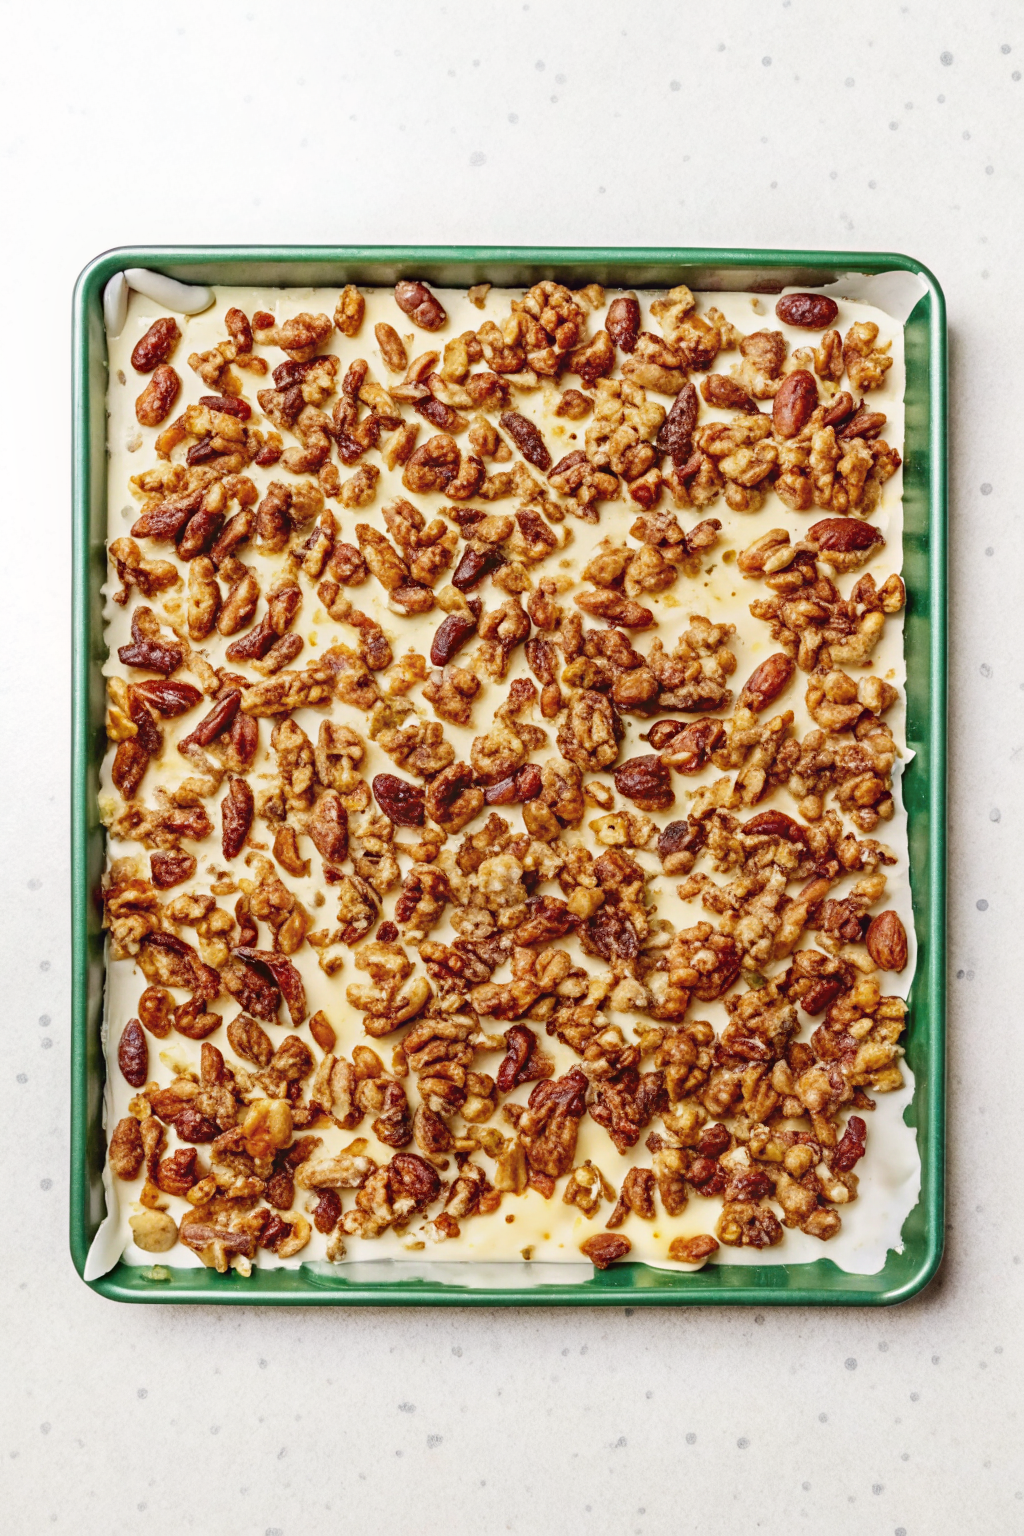
- Spread them out. Use a large baking sheet lined with parchment paper. Do not overcrowd the pan. If the nuts are piled on top of each other, they will steam instead of roast.
Roast the nuts for about 20 to 25 minutes. Stir them every 10 minutes. This is non-negotiable. The nuts on the edge of the pan cook faster than the ones in the center. Stirring ensures everyone gets an equal tan.
Flavor Variations to Spice Things Up
While plain salted mixed nuts are classic, you might want to get adventurous. Once you master the base technique, the flavor possibilities are endless.
Try these winning combinations:
- Rosemary and Sea Salt: Finely chop fresh rosemary and toss it in with the salt. The herb oils release in the oven and smell incredible.
- Sweet and Heat: Mix cayenne pepper, brown sugar, and salt. The sugar caramelizes slightly, giving you a spicy brittle vibe.
- Curry Spiced: Add a teaspoon of curry powder and turmeric. This turns a standard snack into something exotic that pairs perfectly with an IPA.
- Truffle Salt: If you feel bougie, finish the roasted nuts with a dusting of truffle salt right when they come out of the oven.
I usually make a big batch of the classic salted version, then separate a small portion to experiment with spices. That way, if I mess up the ratio, I haven’t ruined three pounds of expensive cashews.
The Critical Cooling Phase
This step requires patience. When you pull the nuts out of the oven, they will feel soft. You might think, “Oh no, I messed up! They aren’t crunchy!”
Relax. Nuts crisp up as they cool.
The heat keeps the oils inside the nut fluid. As they return to room temperature, that structure hardens, creating the snap we all love. Leave them on the baking sheet for at least 45 minutes. Do not touch them. Do not eat them. Just let them be.
If you pack them into a jar while they are still warm, the residual steam will trap moisture inside the container. You will end up with chewy, soggy nuts within a day. Nobody wants that.
Serving and Pairing Ideas
Now that you have the perfect batch of salted mixed nuts, what do you do with them? Obviously, you can eat them by the handful while watching Netflix. But they also elevate other dishes.
Serve them as a starter before a heavy meal. For example, if you are planning a massive dinner like a roast goose, these nuts make a perfect light nibble for guests arriving early. They wake up the palate without filling everyone up too much.
You can also coarsely chop them and use them as a texture bomb. Sprinkle them over salads or roasted vegetables. I love tossing a handful over crispy roasted potatoes right before serving. The contrast between the fluffy potato and the crunchy, salty nut is unbeatable.
And don’t forget dessert. Salty and sweet is a classic combo for a reason. Try scattering some crushed pecans or walnuts over a slice of apple pie dessert. It adds a savory crunch that cuts through the sugar and makes the fruit flavor pop.
Storing Your Treasure
Because homemade nuts lack the weird preservatives found in store-bought cans, they don’t last until the next apocalypse. However, they keep well if you treat them right.
Follow these storage rules:
- Air-tight is right. Use a glass mason jar or a high-quality plastic container with a locking lid. Oxygen makes the natural oils in nuts go rancid.
- Keep them cool. The pantry is fine for a couple of weeks. If you want them to last a month or more, put the jar in the fridge.
- Freeze for the long haul. Yes, you can freeze roasted nuts. They stay fresh for up to six months. Just let them thaw on the counter before eating so you don’t crack a tooth.
The Economics of Roasting
Let’s talk money for a second. Nuts are expensive. I won’t pretend this is a budget recipe like rice and beans. However, buying raw nuts in the bulk section is significantly cheaper than buying small, branded cans of roasted nuts.
You pay a premium for the roasting and packaging when you buy commercial brands. By doing the labor yourself, you save money per pound. Plus, you aren’t paying for the cheap peanuts they use to fluff up the weight. You are paying for pure, high-quality ingredients.
If you plan to make these often, look for bulk suppliers online or visit a warehouse club. You can buy 3-pound bags of raw almonds and cashews for a fraction of the supermarket price.
Health: The Good and The Bad
We often hear that nuts are a “superfood.” They contain healthy fats, protein, and fiber. This is true. But let’s be honest with ourselves here. Salted mixed nuts are calorie-dense energy bombs.
It is very easy to consume 800 calories in ten minutes while chatting at a party. The salt makes them addictive. The fat makes them satisfying.
Enjoy them responsibly:
- Use a small bowl. Don’t eat straight from the jar.
- Balance the salt. If you watch your sodium, use half the salt the recipe calls for. They still taste great.
- Focus on the nutrient density. Unlike chips, which are empty carbs, nuts actually fuel your body.
For a deeper look into the nutritional benefits of different nuts, check out this guide from Healthline. It breaks down exactly why your body loves walnuts and almonds, provided you don’t eat three pounds at once.
Troubleshooting Your Batch
Even with a simple recipe, things go wrong. Here is how to save your snacks.
“My nuts are burnt.”
This happens to the best of us. Ovens run hot sometimes. If they are slightly dark, call them “extra roasted” and eat them. If they are black and bitter, sadly, you must trash them. Next time, check them five minutes earlier.
“They taste bland.”
You likely didn’t use enough salt, or you didn’t use a binder like egg white or oil. While the nuts are still warm, toss them in a little melted butter and add more salt. It won’t stick as well as the egg method, but it will fix the flavor.
“They aren’t crunchy.”
You either didn’t roast them long enough, or you didn’t let them cool completely. Put them back in the oven at 250°F (120°C) for another 10 to 15 minutes to dry them out further. Then, let them cool again.
Final Thoughts
Making your own salted mixed nuts feels like a small act of rebellion against the mediocre snacks of the world. You refuse to settle for stale oil and excessive peanuts. You demand quality, crunch, and perfect seasoning.
Once you set a bowl of warm, homemade nuts on the table, you will see people’s eyes light up. They taste the difference immediately. It’s a simple luxury, but one that makes any gathering—or just a Tuesday night on the couch—feel a little more special.
So, grab your baking sheet and get roasting. Just don’t blame me when you can never go back to the blue tin again :
Salted Mixed Nuts Recipe
Author: Prep: 5 minutes Cook: 25 minutes Total: 1 hour 15 minutesEquipment
- Large Baking Sheet
- Parchment paper
- Large mixing bowl
- Whisk
- Airtight storage jar
Ingredients
The Mix
- 4 cups Raw mixed nuts Cashews, Almonds, Pecans, Walnuts, Hazelnuts — Do not use pre-roasted!
The Coating
- 1 large Egg white
- 1 tsp Water
The Seasoning
- 1 tbsp Sea salt or Kosher salt
- 1/2 tsp Freshly cracked black pepper
- 1 tbsp Fresh rosemary finely chopped (optional)
- 1/4 tsp Cayenne pepper optional, for heat
Instructions
- Preheat and Prep: Preheat your oven to 300°F (150°C). Line a large baking sheet with parchment paper to prevent sticking and make cleanup easy.
- Make the Glue: In a large mixing bowl, whisk the egg white and the teaspoon of water together vigorously until the mixture becomes frothy and foamy.
- Coat the Nuts: Add your raw mixed nuts to the bowl. Toss them well until every single nut shines with the egg white mixture.
- Season: Sprinkle the salt, pepper, and any optional spices (like rosemary or cayenne) over the nuts. Toss again to ensure the seasoning distributes evenly.
- Spread: Pour the nuts onto the prepared baking sheet. Spread them out in a single layer. Do not overcrowd them, or they will steam instead of roast.
- Roast: Bake for 20 to 25 minutes. Crucial Step: Open the oven and stir the nuts every 10 minutes to ensure they brown evenly and don’t burn at the edges.
- Cool Completely: Remove the pan from the oven. The nuts will still feel slightly soft—this is normal! Let them cool on the pan for at least 45 minutes. They will crisp up as they reach room temperature.
- Store: Once completely cool, transfer to an airtight container.
Notes
- Why Egg White? It acts as a binder that glues the salt to the nuts without adding the greasiness of oil or butter.
- Customize It: Feel free to change the ratio! Love pecans? Use more. Hate walnuts? Skip them. Just make sure they are all raw.
- Storage: These keep well in an airtight jar at room temperature for 2 weeks. For longer storage, keep them in the fridge to prevent the oils from going rancid.
- Don’t Rush: Roasting at a higher temperature (like 400°F) will burn the outside before the inside is crunchy. Low and slow is the only way.


