
Let’s be real for a minute. Making Stuffed Cabbage Rolls is not a quick weeknight activity. It is a project. It is an event. You don’t just decide to whip these up at 5:30 PM on a Tuesday unless you enjoy eating dinner at midnight.
But here is the thing: they are worth every single minute of effort. There is something deeply comforting about a tender cabbage leaf wrapped tight around a savory meat filling, slow-cooked in a rich tomato sauce until it practically melts in your mouth. It’s food that tastes like a hug from a grandmother you may or may not have.
I remember watching my aunt make these. She had an assembly line that covered the entire kitchen table. It looked intimidating. But once I actually tried it myself, I realized it isn’t difficult; it just requires patience and a little bit of technique.
We are going to break this down properly. No cracked leaves, no dry filling, and definitely no bland sauce. We are aiming for the kind of Stuffed Cabbage Rolls that people talk about for days after eating them.
The Great Cabbage Debate: Boiling vs. Freezing
Before we even touch the meat, we have to deal with the cabbage itself. This is usually the part where people quit. Getting the leaves off the head without tearing them feels like performing surgery.
You generally have two options here.
Option 1: The Boiling Method (Traditional)
This involves coring the cabbage and submerging the entire head in a pot of boiling water. You stand there with tongs, peeling off the outer leaves as they soften.
My honest opinion? I hate this method. It’s messy, you risk scalding your fingers, and wrestling a slippery, hot vegetable is not my idea of fun :/. Plus, the leaves retain a lot of water, which can dilute your sauce later.
Option 2: The Freezer Method (The Cheat Code)
This is the superior method, IMO. You buy the cabbage a few days in advance. You throw the entire head—bag and all—into the freezer. The night before you want to cook, you take it out and let it thaw in the sink.
Freezing breaks down the cell walls of the vegetable. When it thaws, the leaves are perfectly pliable, soft, and rubbery. They peel off effortlessly with zero risk of burns. It changes the texture slightly, making it softer, but since we cook these for a long time anyway, it doesn’t matter.
Choosing the Right Meat and Rice Ratio
A Stuffed Cabbage Roll is only as good as its filling. If you treat this like a meatloaf wrapped in a leaf, you will end up with a dry, dense brick. You need a filler to keep the texture light.
The Meat Mix
Ground beef is the standard choice. However, I strongly suggest using a mix.
- Beef and Pork: Use a 50/50 split. Beef provides the hearty flavor, while pork adds the necessary fat content to keep everything juicy.
- Fat Percentage: Do not buy extra-lean beef. You want at least 80/20. Fat equals flavor and moisture.
The Rice Situation
This is where many home cooks mess up. Do you put the rice in raw? Do you cook it first?
If you use raw rice, it sucks all the moisture out of the meat as it cooks, resulting in a dry filling. If you use fully cooked rice, it turns to mush.
The Solution: Par-cook your rice. Boil the rice for about 5 to 7 minutes until it’s half-done, then drain it. This allows the rice to finish cooking inside the roll, absorbing the flavorful meat juices without drying out the beef. It creates the perfect fluffy texture.
Flavoring the Filling
Bland filling is a crime. Ground meat needs aggressive seasoning. Aside from the mandatory salt and black pepper, you need aromatics.
Sauté your onions and garlic in butter before adding them to the meat mixture. Putting raw onions in the filling often results in a crunch that feels out of place in a soft roll. Sautéing them adds sweetness and ensures they melt into the background.
I also like to add fresh parsley and a dash of paprika. Some people add an egg to bind it all together, similar to how you would for meatballs. I find this helpful, especially if you are worried about the rolls falling apart.
The Sauce: Sweet, Sour, or Savory?
The sauce profile depends heavily on your heritage.
- Eastern European (Polish/Hungarian): Usually leans toward a sweet and sour profile. This often involves tomato sauce, brown sugar, lemon juice, or even vinegar. Sometimes raisins get involved (which is a polarizing topic).
- Italian Style: strictly savory, using a marinara base with basil and oregano.
For the best Stuffed Cabbage Rolls, I prefer a hybrid. I use a tomato base (crushed tomatoes or tomato sauce) but spike it with a little brown sugar and apple cider vinegar. That tangy “zing” cuts through the richness of the pork and beef.
If you enjoy hearty, tomato-based dishes like stuffed pepper soup, you will appreciate a sauce that has some depth to it. Don’t just dump a can of tomato soup on top and call it a day.
The Rolling Technique
Okay, you have your limp cabbage leaves and your bowl of meat. Now we roll.
- Prep the Leaf: Take a sharp paring knife and shave down the thick vein at the bottom of the leaf. You don’t need to cut it out completely (which leaves a hole), just shave it flat so the leaf rolls evenly.
- Portion Control: Place about 1/3 cup of filling near the stem end. Do not overstuff! Rice expands. If you pack it too tight, the roll will burst open in the oven.
- The Tuck: Fold the stem end over the meat. Fold in the sides (like a burrito). Then roll it forward until you reach the ruffled edge.
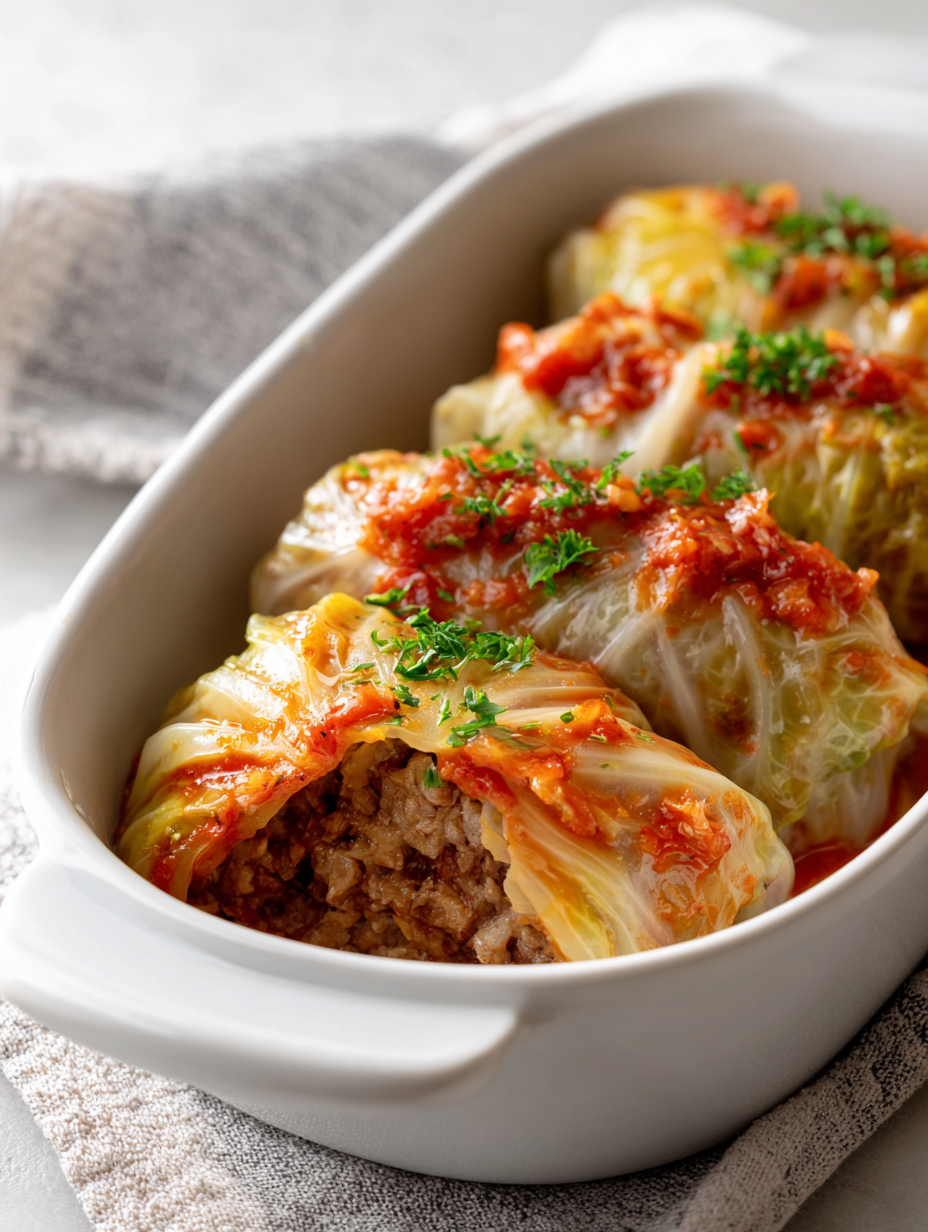
Place the rolls seam-side down in your baking dish. Packing them in snugly prevents them from unraveling during the cooking process.
The Cooking Vessel and Method
You need a heavy vessel for this. A Dutch oven is perfect, but a deep 9×13 casserole dish works too.
The Bed of Sauerkraut:
Here is a secret tip. Before you put the rolls in, layer the bottom of the pan with sauerkraut or chopped leftover cabbage. This prevents the rolls from burning on the bottom and adds an incredible fermented tang to the sauce.
Pour your sauce over the rolls. You want them covered but not drowning. Cover the dish tightly with foil or a heavy lid.
Low and Slow:
Bake them at 350°F (175°C) for at least 2 hours. Yes, 2 hours. You want the cabbage to be buttery soft. If you rush it, the cabbage stays rubbery and tough to cut.
Serving Suggestions
What do you eat with these? Since the roll contains meat and rice (protein and carb), it is technically a complete meal. However, you need something to soak up that extra sauce.
Mashed Potatoes: This is the classic pairing. A scoop of creamy potatoes next to the roll, covered in the tomato glaze, is perfection.
Crusty Bread: You need a vehicle to wipe the plate clean. A slice of homemade sourdough bread works wonders here. The tang of the sourdough complements the acidity of the tomato sauce beautifully.
Sour Cream: A dollop of cold sour cream on top of the hot cabbage roll provides a temperature and texture contrast that takes the dish to the next level.
Storage and Freezing
Here is the best part: Stuffed Cabbage Rolls taste better the next day. As they sit in the fridge, the flavors meld together. The sauce penetrates the meat, and the cabbage softens further.
To Freeze:
You can freeze them cooked or uncooked.
- Uncooked: Freeze them right in the casserole dish. Thaw in the fridge for 24 hours before baking.
- Cooked: Bake them, let them cool completely, and freeze portions in airtight containers. They reheat beautifully in the microwave or oven.
This makes them the ultimate meal prep food. You spend one Sunday afternoon making a giant batch, and you have instant comfort food for months.
Troubleshooting Common Issues
Even with the best intentions, things go wrong.
Problem: The cabbage is tough.
Solution: You didn’t cook it long enough, or you didn’t prep the leaves properly. Put the dish back in the oven. Cabbage is forgiving; you can’t really “overcook” it in this context.
Problem: The filling is dry.
Solution: You used lean beef or didn’t add enough sauce. Next time, mix in some pork sausage. For now, just smother it in extra sauce and sour cream.
Problem: The rolls fell apart.
Solution: You didn’t pack them tightly enough in the pan, or you didn’t place them seam-side down. It’s fine; just call it a “cabbage casserole” and eat it with a spoon. It tastes the same .
Why This Dish Has Stood the Test of Time
Every culture seems to have a version of this dish. From Polish Golabki to Middle Eastern Malfouf, wrapping meat in leaves is universal. It stems from peasant cooking—taking humble ingredients like cabbage and rice and stretching a small amount of meat to feed a whole family.
According to The Spruce Eats, the concept of the stuffed cabbage roll likely originated in the Middle East before spreading to Eastern Europe, where it became a staple. It’s history on a plate.
Variations to Try
Once you master the classic, get creative.
- The Vegetarian: Swap the meat for mushrooms and lentils. The texture of lentils mimics ground meat surprisingly well.
- The Low Carb: Swap the rice for cauliflower rice. Since cauliflower releases water, skip the par-cooking step and squeeze the cauliflower dry before mixing.
- The Unstuffed Version: If you lack the patience to roll, chop the cabbage and brown the meat. Layer it all in a pot like a lasagna. We call this “Cabbage Roll in a Bowl,” and it delivers 90% of the flavor with 10% of the effort.
If you enjoy vegetable-heavy comfort dishes, you might also like experimenting with southern collard greens. While the flavor profile differs, the technique of slow-cooking tough greens until tender remains a crucial skill in the kitchen.

Final Thoughts
Making Stuffed Cabbage Rolls is a labor of love. It requires you to slow down. You can’t rush the leaf prep, and you can’t rush the bake time.
But when you pull that heavy pan out of the oven, bubbling and smelling like savory tomato magic, you feel a sense of accomplishment. You made something real. You made something that nourishes not just the body, but the soul.
So, clear your schedule for a Sunday afternoon. Buy the big head of cabbage. Freeze it (seriously, try the freezer trick). Invite some friends over, because this recipe always makes way more than you think it will.
Get cooking. You’ve got this.
Classic Stuffed Cabbage Rolls
Author: Prep: 40 minutes Cook: 2 hours Total: 2 hours 55 minutesEquipment
- Large Dutch Oven or 9×13 inch Baking Dish
- Large Stockpot (if boiling cabbage)
- Paring Knife
- Large mixing bowl
- Aluminum foil
Ingredients
The Cabbage
- 1 large head green cabbage about 3-4 lbs
The Filling
- 1 lb ground beef 80/20 fat ratio works best
- 1/2 lb ground pork adds juiciness!
- 1 cup white rice par-cooked (boil for 7 mins and drain)
- 1 small yellow onion finely diced and sautéed
- 2 cloves garlic minced
- 1 large egg lightly beaten
- 1 teaspoon salt
- 1/2 teaspoon black pepper
- 1/4 teaspoon paprika
- 2 tablespoons fresh parsley chopped
The Sauce & Assembly
- 1 can 28 oz crushed tomatoes
- 1 can 15 oz tomato sauce
- 2 tablespoons brown sugar for a little sweetness
- 1 tablespoon apple cider vinegar for the tang
- 1 cup sauerkraut drained (optional, for the bottom of the pan)
Notes
- Par-Cook the Rice: Don’t skip this! If you use raw rice, it sucks the moisture out of the meat. If you use fully cooked rice, it turns to mush. Boiling it for 5–7 minutes is the sweet spot.
- Freezing: These freeze beautifully. Bake them, let them cool, and freeze in airtight containers. Reheat in the oven or microwave for an instant meal.
- Sauce Adjustments: If you prefer a savory Italian-style sauce, skip the brown sugar and vinegar and add basil and oregano instead.
- Leftovers: These honestly taste better on day two after the flavors have had time to meld in the fridge.


