
Let’s be honest for a second. Hosting during the holidays feels like running a marathon while juggling flaming torches. You want everything to look magical, but you also want to sit down and actually drink your wine. That is exactly why I fell in love with Christmas Tree Charcuterie.
I used to roll my eyes at “themed” food. It felt a little too Pinterest-perfect for my chaotic kitchen. But then I made one. I realized that arranging meat and cheese in a triangle requires zero cooking, zero baking, and zero stress. Yet, when you set it on the table, people gasp. They take photos. They think you are a culinary artist.
We are going to embrace the cheese (pun intended) today. I will show you exactly how to build a board that looks impressive but takes 20 minutes tops. Put down the complicated appetizer recipes; we are making art with salami.
Why This Works (And Why You Need It)
You might ask, “Why not just make a regular board?” You certainly can. But shaping your charcuterie into a Christmas tree instantly elevates the vibe. It acts as a centerpiece. It screams “festive” without you having to hang a single garland.
Plus, it’s a massive time-saver. You don’t need to cook anything. You just need to chop and arrange. This frees up your oven for the heavy hitters.
The Strategy:
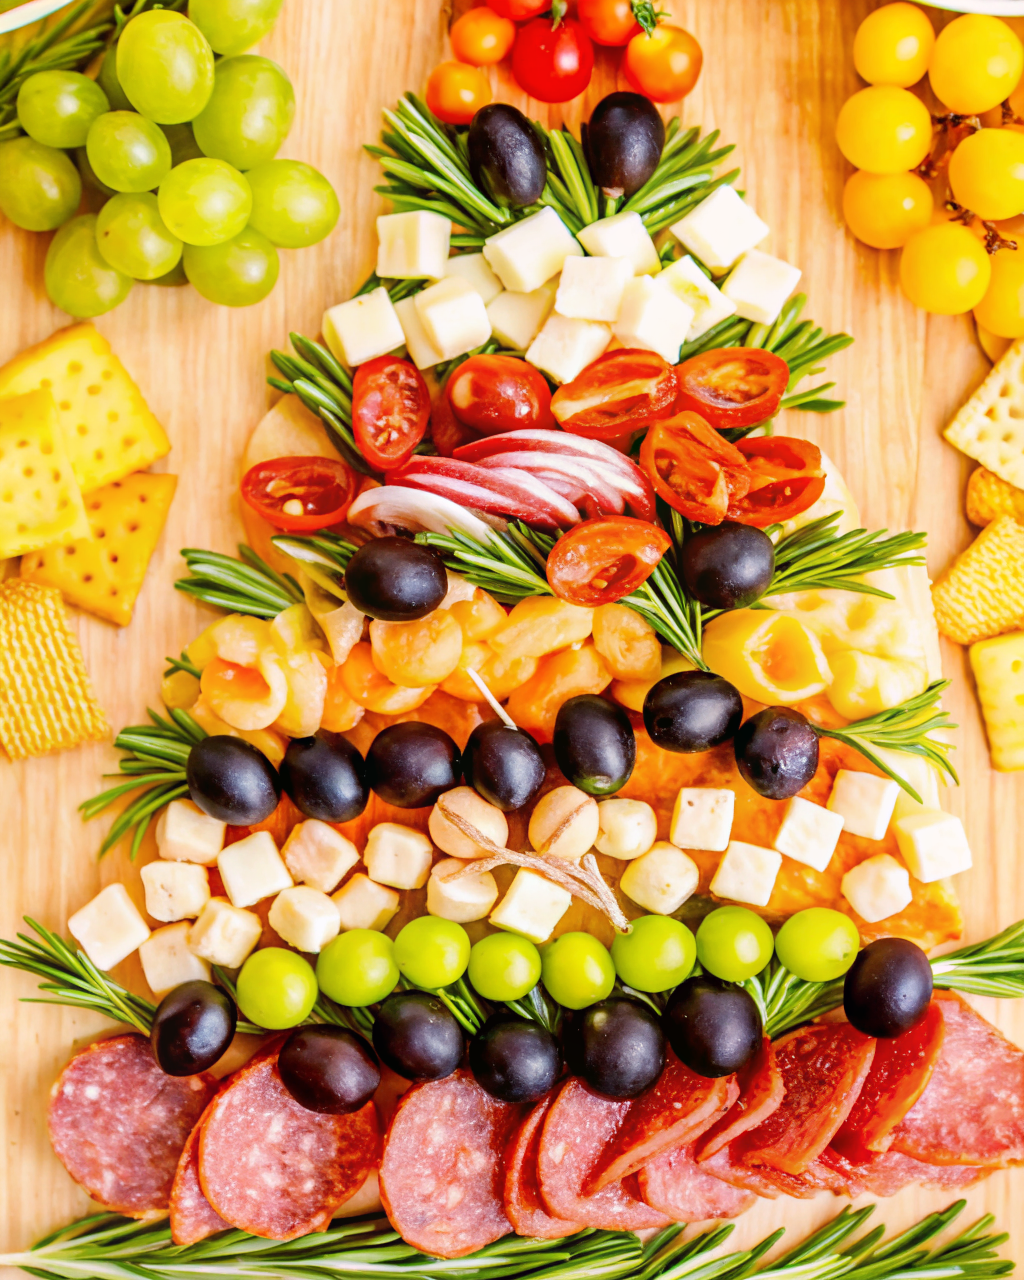
- Visual Impact: The green herbs and red meats naturally look like Christmas colors.
- Scalability: You can make a tiny tree for two or a massive tree for twenty.
- Customization: Hate olives? Don’t use them. Love spicy cheese? Load it up.
Choosing Your Foundation
You need a flat surface. This seems obvious, but I have made mistakes here. Do not use a plate with a curved rim. The cheese cubes will slide toward the center, and your tree will look like a shrub that got sat on.
The Best Surfaces:
- Large Rectangular Wooden Board: This gives you room for the tree and the crackers around the base.
- Slate Board: The dark background makes the cheese pop.
- Parchment Paper: If you don’t have a giant board, tape parchment paper directly to your counter or table. I call this the “grazing table” approach. It makes cleanup a breeze because you just bundle up the paper and toss it.
The Ingredients: Building Your Palette
To make a convincing Christmas Tree Charcuterie, you need variety in texture and color. We aren’t just stacking cheddar here.
The Greens (The Pine Needles)
This is the most critical element. You cannot skip this. Fresh rosemary sprigs mimic pine branches perfectly.
- Buy two packs. You will use a lot.
- Thyme works too, but it’s more tedious to arrange.
- Sage leaves look nice but don’t give that “needle” effect.
The Meats (The Garland)
You need meats that you can manipulate.
- Salami: Fold it in quarters or roll it.
- Prosciutto: Ribbon it loosely. It looks elegant and adds a soft texture.
- Pepperoni: Great for smaller boards, but use the small ones.
The Cheeses (The Structure)
You need structural integrity. Soft brie is delicious, but it won’t hold the edge of a tree very well.
- Cubes are King: Cubed cheddar, pepper jack, or havarti build distinct rows.
- Mozzarella Pearls: These look like white ornaments.
- Cheese Slices: Cut them into triangles for variety.
If you want another tree-themed appetizer that actually requires an oven (but is still super easy), you should absolutely check out my savory Christmas puff pastry trees. They look adorable sitting next to this cold board.
Step-by-Step Assembly Guide
Okay, grab your ingredients. We are going to build this thing. Do not panic; it’s just snacks in a triangle.
Step 1: The Outline
I like to cheat. I take my rosemary sprigs and lay down the outline of a triangle on the board first. This gives me boundaries. If you start placing cheese without a guide, you might end up with a lopsided blob.
Step 2: The Base
Start at the bottom. This is your widest point.
- Lay down a thick row of cheese cubes.
- Make sure they touch. Gaps look sad.
- Create a “trunk” at the very bottom using a small stack of pretzel sticks or a rectangular piece of cheddar.
Step 3: Layering Up
Now, work your way up the triangle.
- Alternate Colors: If your first row is yellow cheese, make the next row red meat.
- Add Greenery: Between every single row of food, tuck in small sprigs of rosemary. This separates the layers and creates that “bough” look.
Pro Tip: Don’t make the rows straight. Curve them slightly downward like a real tree branch hangs. It looks more organic and less like a geometry project.
Step 4: The Fillers (Ornaments)
Once you have your main stripes of meat and cheese, you need to accessorize.
- Cherry Tomatoes: Bright red ornaments.
- Olives: Green or black ornaments.
- Nuts: Almonds or pecans fill in the gaps.
- Fruit: Green grapes or pomegranate seeds add a burst of sweetness.
Step 5: The Star
Every tree needs a topper.
- Use a star-shaped cookie cutter on a slice of thick cheese (like Gouda).
- Use a star-shaped cracker.
- If you are fancy, slice a star fruit.
Advanced Styling Tips
You want this to look professional? Here are the secrets I use to make my friends jealous.
The “Salami River” vs. The “Salami Rose”
For a tree, I prefer the river method. Fold your salami in half, then in half again. Stack them tightly in a row. The ruffled edges look like a textured garland. Salami roses are cool, but they break the linear flow of the tree shape. IMO, save the roses for a round board.
The Snowy Dusting
This is my favorite trick. Once you assemble the entire tree, take a hunk of Parmesan cheese and a microplane. Grate fresh cheese “snow” over the entire board. It makes the rosemary look frosted and adds a salty kick to everything.
Color Blocking
Pay attention to contrast. Do not put white cheddar next to mozzarella pearls. They disappear into each other. Put a dark salami or a bright green grape row between them.
Pairing Your Charcuterie
You cannot serve dry cheese and meat alone. You need vehicles (crackers) and lubrication (drinks).
The Cracker Situation
Do not put the crackers on the tree. They ruin the aesthetic.
- Pile the crackers around the base of the tree like presents.
- Use a separate bowl for breadsticks.
- Include a small bowl of honey or jam near the board for dipping.
Drink Pairings
- Red Wine: A Cabernet Sauvignon stands up well to the fatty meats.
- White Wine: A crisp Sauvignon Blanc cuts through the rich cheese.
- Holiday Mocktail: Cranberry juice with sparkling water and a lime twist matches the color scheme perfectly.
If you are serving this as a starter before a heavy meal, keep the portions lighter. For example, if you plan to serve a rich garlic butter baked salmon as the main course, you don’t want your guests filling up entirely on cheddar cubes before dinner.
Troubleshooting Common Disasters
I have messed this up before so you don’t have to.
“My Tree Looks Skinny”
You didn’t make the base wide enough. A Christmas tree is an isosceles triangle, not a skyscraper. Add more cheese to the bottom sides to widen the stance.
“The Rosemary is Wilting”
Did you buy it a week ago? Herbs need to be fresh. If you must buy them early, wrap them in a damp paper towel and store them in the fridge. Do not wash the rosemary until right before you build the board, or it gets soggy.
“The Meat looks Sweaty”
This happens if you leave it out too long. Cheese tastes best at room temperature, but meat can get oily. Assemble the board, then keep it in the fridge. Pull it out 30 minutes before guests arrive.
Speaking of timing, if you need a warm appetizer to balance out this cold spread, you can easily whip up a batch of mini meatball bites. They are easy to grab with a toothpick and add a nice savory contrast to the cheese.
Food Safety Reality Check
We need to be serious for a second. Charcuterie lives in the “danger zone” of temperatures.
- The 2-Hour Rule: Do not leave meat and soft cheese out for more than two hours.
- Replenish, Don’t Heap: Instead of putting 5 pounds of meat out at once, make a smaller tree and refill it. Or, make two smaller trees and keep one in the fridge.
According to the USDA, bacteria grow rapidly at room temperature, so keep an eye on the clock while you mingle.
Cost-Saving Hacks
Charcuterie can get expensive fast. You don’t need to spend $100 on cheese.
- Buy Blocks, Not Pre-Sliced: Block cheese is always cheaper. Cube it yourself. It takes 5 minutes and saves you money.
- Shop at Discount Grocers: Places like Aldi or Trader Joe’s have incredible cheese selections for half the price of a standard supermarket.
- Fill with Cheap Stuff: Use more grapes, crackers, and pretzels. Use less prosciutto. The board will still look full and lush.
What to Do with Leftovers?
You will have leftovers. It is inevitable.
- Adult Lunchables: Pack little containers of meat and cheese for work lunches.
- Mac and Cheese: Melt all the leftover cheese cubes down into a sauce. It sounds chaotic, but a mix of cheddar, gouda, and havarti makes the best mac and cheese sauce you will ever taste.
- Pizza Toppings: Chop up the leftover salami and pepperoni for a homemade pizza night.

Final Thoughts
The Christmas Tree Charcuterie is more than just a snack; it’s a mood. It sets the tone for a fun, relaxed gathering. It tells your guests, “I put in effort, but I’m also here to party.”
Don’t stress about making it perfect. If your rows are crooked, call it “rustic.” If you run out of rosemary, use parsley. The point is to gather around the table and eat good food with people you actually like.
So, go buy the big block of cheddar. Get the fancy salami. Turn on some holiday music and start building. You might just surprise yourself with how artistic you can be with a pile of snacks.
Now, go pour yourself a glass of wine. You earned it.
Festive Christmas Tree Charcuterie Board
Author: Prep: 20 minutes Cook: Total:Equipment
- Large Rectangular Wooden Board (or slate platter)
- Sharp Knife (for cubing cheese)
- Star Cookie Cutter (small)
- Microplane Grater (optional, for "snow")
Ingredients
The Structure
- 2-3 packs Fresh rosemary sprigs essential for the pine look
- 1/2 cup Pretzel sticks for the tree trunk
The Cheeses
- 8 oz Sharp Cheddar cheese cubed
- 8 oz Pepper Jack or Havarti cubed
- 1 cup Mozzarella pearls fresh balls
- 1 thick slice Gouda or Provolone for the star topper
- 2 tbsp Parmesan cheese block (for grating)
The Meats
- 6 oz Salami folded into quarters
- 4 oz Pepperoni slices
- 4 oz Prosciutto optional, ribboned loosely
The Ornaments & Fillers
- 1 cup Green grapes
- 1 cup Cherry tomatoes
- 1/2 cup Almonds or Pecans
- 1/4 cup Pomegranate seeds (for garnish
For Serving
- 2 cups Assorted crackers arrange around the base
Instructions
- Prep the Ingredients: Wash and thoroughly dry the rosemary sprigs and produce. Cube your block cheeses into bite-sized pieces. Fold the salami slices into quarters to create ruffled fans.
- Create the Outline: On your large board, arrange a few sprigs of rosemary in a large triangle shape. This acts as your guide so the Christmas Tree Charcuterie stays symmetrical.
- Build the Trunk: At the very bottom center of the triangle, stack the pretzel sticks to create a rectangular tree trunk.
- Lay the Base: Start at the bottom of the triangle (just above the trunk). Lay down a wide, curved row of cubed cheese (e.g., Cheddar). Make sure the pieces touch to create a solid line.
- Layer Up: Above the cheese row, place a row of folded salami. Above that, add a row of green grapes or mozzarella pearls. Continue alternating ingredients (meat, cheese, fruit) as you work your way up, making each row slightly shorter than the last to form a tapered tree shape.
- Add the Greenery: This is the secret step! Tuck small sprigs of fresh rosemary between every single row of food. This separates the colors and creates the illusion of pine boughs.
- Decorate: Fill in any gaps with nuts or cherry tomatoes (your “ornaments”).
- Top the Tree: Use a small cookie cutter to punch a star shape out of the thick slice of Gouda. Place it proudly at the very top of the tree.
- Make it Snow: Take your microplane and grate fresh Parmesan cheese over the entire board to look like freshly fallen snow.
- Serve: Pile your crackers around the base of the tree or in a separate bowl nearby. Serve immediately or chill until guests arrive.
Notes
- Temperature Check: Cheese tastes best at room temperature, but meat can get oily. Assemble the board and store it in the fridge, then pull it out 30 minutes before serving.
- Save Money: Buy blocks of cheese and cube them yourself rather than buying pre-cut cubes. It’s fresher and much cheaper.
- Customize It: Don’t like olives or tomatoes? Swap them for blackberries or raspberries for a different color pop.
- Food Safety: Don’t leave the board out for more than 2 hours. If you are hosting a long party, make two smaller trees and swap them out halfway through.
Nutrition


