
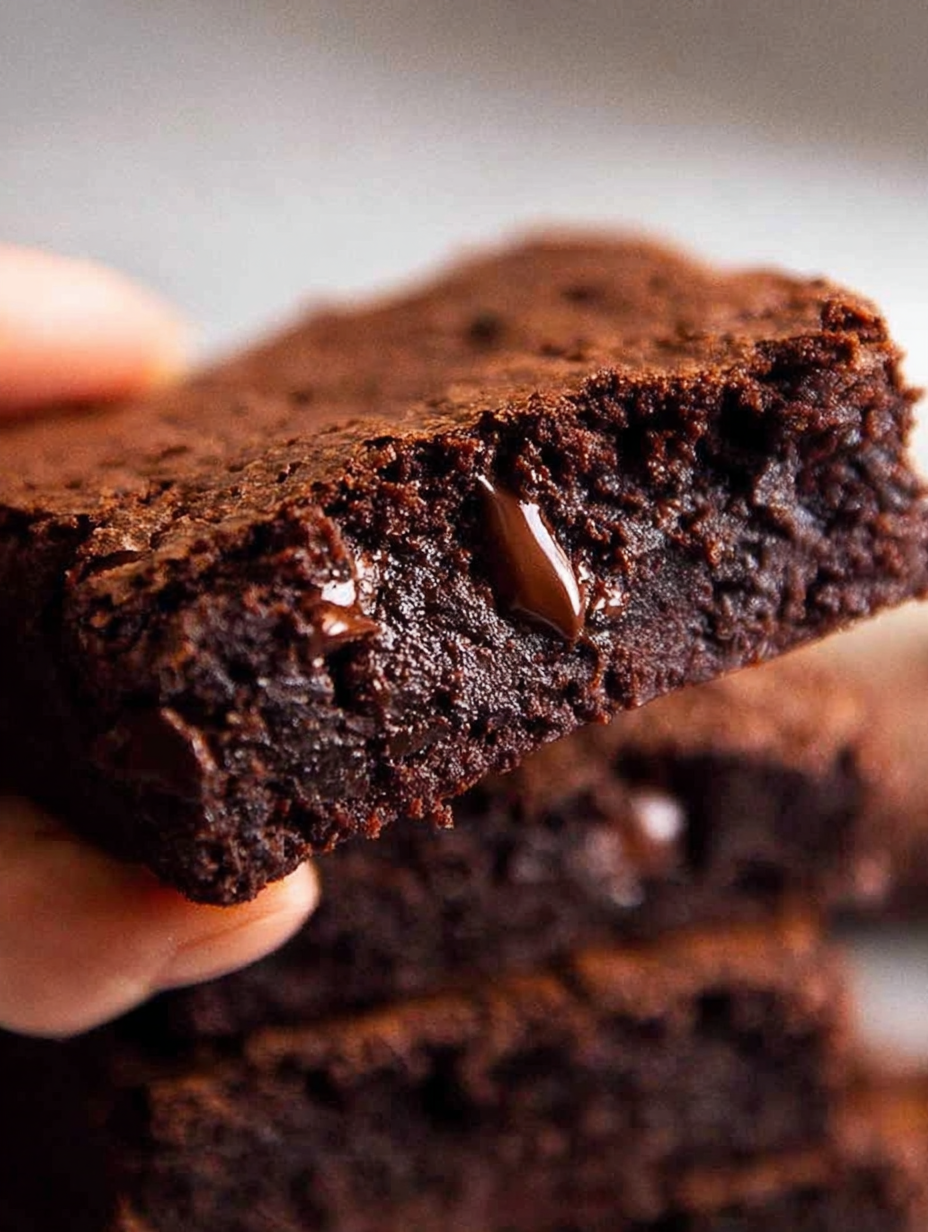
Let’s get one thing straight right now: if you prefer cakey brownies, we might have a problem. I’m kidding (mostly). But seriously, when I say Dark Chocolate Brownies, I am talking about dense, fudgy, stick-to-the-roof-of-your-mouth decadent squares of joy. We aren’t making chocolate cake in a square pan here.
I spent years trying to find the perfect balance between “cooked enough to hold a shape” and “basically just warm fudge.” It’s a fine line. I have eaten enough dry, crumbly disappointments to know exactly what we want to avoid. You want a brownie that demands a glass of cold milk, not one that requires it just to swallow.
Today, we are going to fix your brownie game forever. We are ditching the box mix. Put it back on the shelf. You deserve better than powdered eggs and preservatives. We are making the real deal, and IMO, it’s actually easier than you think.
The Great Debate: Cocoa Powder vs. Melted Chocolate
You might wonder, which one should I use? The answer is both.
Using only cocoa powder often leads to a lighter, airier texture—great for cake, terrible for fudgy brownies. Using only melted chocolate gives you that density, but it can sometimes lack that deep, punchy chocolate flavor. By combining them, you get the best of both worlds.
Why the Percentage Matters
Do not grab the semi-sweet chips you use for cookies. You need bar chocolate, and you need to look at the percentage. I recommend 60% to 70% dark chocolate.
This range provides enough sugar to balance the bitterness but enough cocoa solids to provide that rich structure. If you go too high (like 85%), your brownies might turn out dry and crumbly because there isn’t enough cocoa butter. If you go too low, they become cloyingly sweet.
Pro Tip: Chop your chocolate bar finely. It melts faster and more evenly, preventing you from scorching it in the microwave or double boiler.
The Fat Factor: Butter is King
Oil creates a chewy texture, but butter provides flavor. Since we are using dark chocolate, we need the creamy, savory notes of butter to round everything out.
I personally take it a step further. I brown the butter. If you have five extra minutes, melt your butter in a saucepan until it foams and turns a nutty golden brown. This adds a caramel-like depth that makes people ask, “What is that secret ingredient?”
If you just want to get these in the oven fast, melted butter works perfectly fine. Just make sure it isn’t piping hot when you mix it with your eggs, or you’ll end up with scrambled eggs in your batter. Nobody wants that :/.
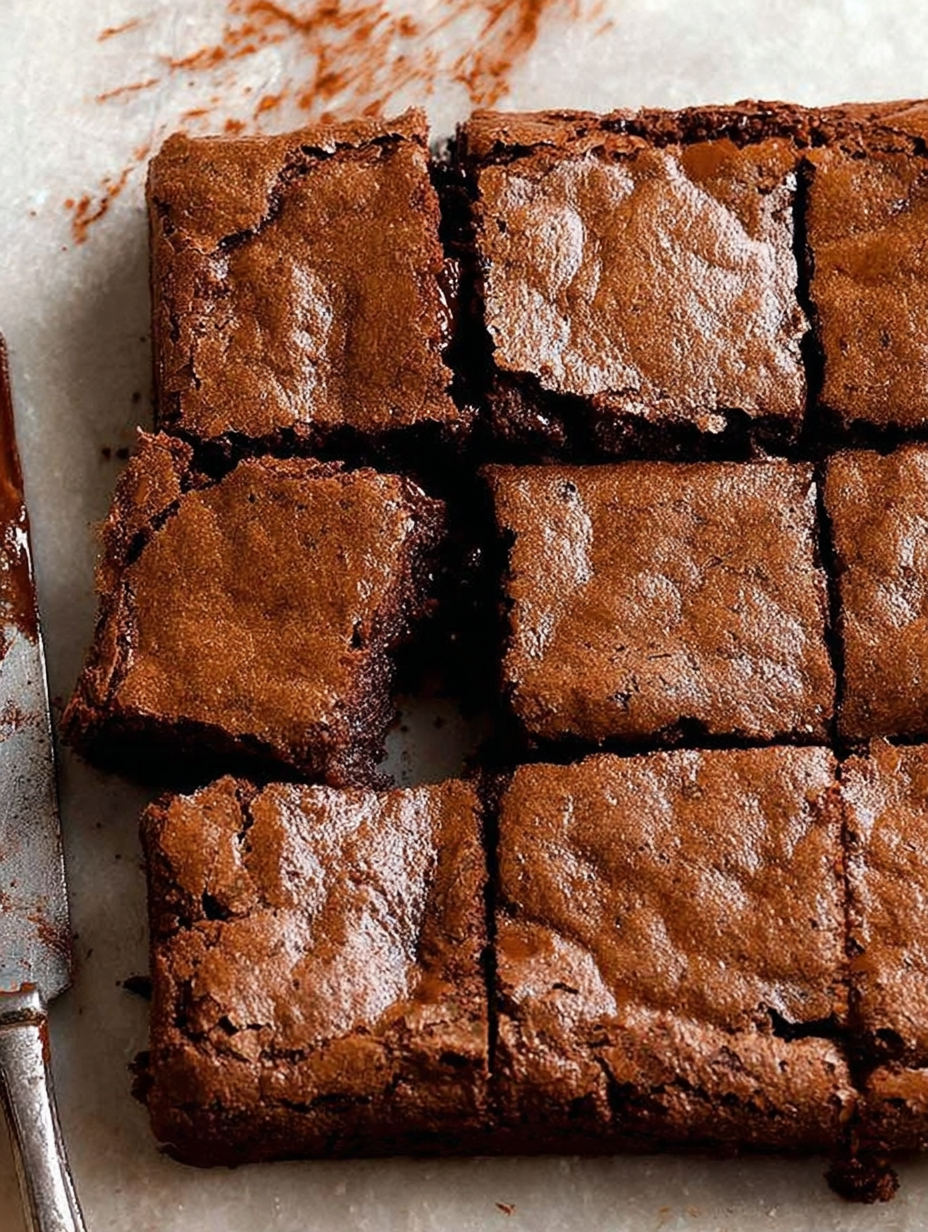
The Science of the “Crinkly Top”
You know that paper-thin, shiny, crackly layer on top of a bakery brownie? That is the holy grail. It isn’t magic; it’s science.
That crust forms when you dissolve the sugar properly into the eggs. Most people rush this step. They whisk the sugar and eggs for thirty seconds and move on. Do not do this.
You need to beat the sugar and eggs until the mixture is pale, thick, and falls off the whisk in ribbons. This usually takes about 3 to 5 minutes with an electric mixer. This process creates a meringue-like structure on top of the heavy batter.
Sugar Selection
Use a mix of white granulated sugar and brown sugar.
- White Sugar: Helps create that shiny crust and crisp edges.
- Brown Sugar: Adds moisture and a hint of molasses flavor, contributing to the chewiness.
If you skip the white sugar entirely, you lose the crackly top. If you skip the brown sugar, you lose some moisture. Balance is key.
Flour: Less is More
Here is where instinct fails us. Usually, in baking, flour provides the structure. In fudgy brownies, flour is almost an afterthought. We want the structure to come from the solidified chocolate and eggs.
We use just enough flour to hold the butter and chocolate together. If you add too much, you instantly veer into “cakey” territory.
Crucial Step: Do not pack your flour into the measuring cup. Spoon it in and level it off. Or better yet, use a scale. Too much flour is the number one reason brownies turn out dry.
Also, once you add the flour, stop mixing. The moment the white streaks disappear, put the spatula down. Over-mixing develops gluten. Gluten makes bread chewy and tough. We want tender and melting.
Flavor Enhancers You Cannot Skip
Chocolate on its own is great, but it needs a supporting cast to really shine.
Vanilla Extract
You might think, “It’s chocolate, why do I need vanilla?” Vanilla acts like salt; it enhances the main flavor. It makes chocolate taste more like chocolate. Always use a generous splash. If you make your own homemade vanilla extract, even better, as the alcohol content usually cooks off, leaving just the pure aromatic goodness.
Espresso Powder
This is my secret weapon. Adding a teaspoon of instant espresso powder doesn’t make your brownies taste like coffee. Instead, the bitterness of the coffee counteracts the sweetness of the sugar and amplifies the cocoa notes. It adds a complexity that makes the brownies taste expensive.
Sea Salt
Salt is non-negotiable. I put fine sea salt in the batter and flaky sea salt on top before baking. The salt cuts through the richness of the dark chocolate and cleanses your palate, making you want another bite immediately.
The Baking Vessel
Believe it or not, your pan choice matters.
- Metal Pans: These conduct heat efficiently. They give you those crisp edges and corners that everyone fights over.
- Glass Dishes: Glass takes longer to heat up and holds heat longer. This can lead to over-baked edges and an under-baked center.
If you must use glass, lower your oven temperature by 25 degrees. But for the best results, use a light-colored metal pan. Dark metal pans absorb too much heat and can burn the bottom before the middle sets.
Lining the Pan: always line your pan with parchment paper, leaving an overhang on the sides. This allows you to lift the entire block of brownies out once they cool. It makes cutting them infinitely easier.
The Method: Step-by-Step
Let’s walk through the actual process so you can visualize it.
- Melt the Chocolate and Butter: Combine your chopped dark chocolate and butter in a heatproof bowl. You can use a microwave in 30-second bursts, stirring in between. You want a smooth, glossy river of chocolate.
- Whisk Eggs and Sugar: While the chocolate cools slightly, beat your eggs and sugars. Remember, we want pale and thick. This is your arm workout for the day.
- Combine: Pour the chocolate mixture into the egg mixture. Fold them together gently. It will look like a marble cake for a second before blending into a uniform dark brown.
- Dry Ingredients: Sift your flour, cocoa powder, and salt directly into the bowl. Sifting is important here because cocoa powder loves to form stubborn little clumps.
- Fold: Gently fold until just combined.
- Add Ins: Toss in your chocolate chips or nuts now.
- Bake: Pour into your prepared pan and smooth the top.
How to Tell When They Are Done
This is the hardest part of making brownies. If you wait until a toothpick comes out clean, you have failed. You just baked dry chocolate sponges.
You want the toothpick to come out with moist crumbs attached. Not raw liquid batter, but sticky, damp crumbs. The brownies continue to cook in the hot pan after you take them out of the oven. This is called carry-over cooking.
If you pull them out when they seem “perfect,” they will be overdone by the time they cool. Trust the jiggle. The center should still have a very slight wobble to it.
The Torture of Cooling
Here is the step nobody likes. You must let the brownies cool completely in the pan. I know, it smells amazing, and you want to dive in. But if you cut them while they are hot, they will fall apart into a gooey mess.
The cocoa butter needs time to resolidify. This sets the texture. If you want super clean cuts, let them cool to room temperature and then put the pan in the fridge for an hour. Cold brownies cut like butter.
Pro Tip: Run your knife under hot water and wipe it dry before each cut. The hot blade melts through the chocolate chips and gives you those sharp, professional edges.
Mix-Ins and Variations
Once you master the base recipe, you can get creative. The dense batter holds mix-ins well.
- Walnuts or Pecans: Toast them first! Raw nuts are chewy and sad. Toasted nuts add a necessary crunch.
- Raspberry Swirl: Dollop some raspberry jam on top and swirl it with a knife before baking. The tart fruit pairs beautifully with dark chocolate.
- Cheesecake Swirl: If you feel ambitious, beat some cream cheese, sugar, and an egg, and swirl that in. It’s like two desserts in one. It reminds me of my favorite classiccheesecakerecipe but in a handheld format.
- Mint: Add a drop of peppermint extract for a holiday vibe.
Troubleshooting Your Brownies
Did something go wrong? Let’s diagnose the issue.
- Too Greasy? You might have added the butter while it was too hot, causing the emulsion to break. Or, you used low-quality chocolate with added vegetable oils.
- Too Cakey? You used too much flour or too much baking powder (FYI, this recipe doesn’t even need baking powder). Or you over-baked them.
- Sunken Middle? You under-baked them significantly, or you beat too much air into the eggs and then opened the oven door too early, causing the structure to collapse.
Why Dark Chocolate is Actually Good for You
I’m not saying these brownies are a salad, but dark chocolate has benefits. High-quality dark chocolate contains antioxidants and minerals like iron and magnesium.
According to Healthline, dark chocolate can actually improve brain function and lower blood pressure. So, technically, eating a brownie is a form of self-care. You are doing it for your health.
Serving Suggestions
Sure, you can eat these straight out of the pan standing over the sink. I have done it. But if you want to elevate the experience, warm the brownie slightly and top it with a scoop of vanilla bean ice cream. The contrast between the hot, fudgy brownie and the cold, melting ice cream is unbeatable.
If you want to get really fancy, drizzle some homemade chocolate ganache over the top. It adds yet another texture of chocolate and makes the dessert look restaurant-quality.
Storing Your Masterpiece
If, by some miracle, you have leftovers, store them in an airtight container at room temperature. They will stay fresh for about 3 to 4 days. In fact, I think they taste better on day two. The flavors meld together, and the texture becomes even fudgier.
You can also freeze them. Wrap individual squares in plastic wrap and toss them in a freezer bag. When you have a craving, just microwave one for 15 seconds. It tastes freshly baked.
Final Thoughts
Making dark chocolate brownies from scratch is one of the highest-reward activities you can do in the kitchen. The effort-to-payoff ratio is off the charts. You mix a few ingredients in a bowl, wait 25 minutes, and end up with something that tastes better than anything you can buy at a bakery.
Don’t let the fear of “messing up” stop you. Even a “bad” batch of brownies is still melted chocolate and sugar. It’s going to be delicious no matter what.
So, grab your dark chocolate, brown that butter, and respect the cooling process. Your friends will ask for the recipe, and you can casually tell them it’s a secret family formula (I won’t tell anyone).
Now, go preheat your oven. You’ve got baking to do.
Fudgy Dark Chocolate Brownies
Author: Prep: 20 minutes Cook: 25 minutes Total: 1 hour 45 minutesEquipment
- 8×8 inch light-colored metal baking pan
- Parchment paper
- Electric hand mixer (or stand mixer)
- Heatproof mixing bowl
- Rubber spatula
- Small saucepan (for melting butter)
Ingredients
The Chocolate Base
- 10 tablespoons 140g unsalted butter
- 4 oz 113g high-quality dark chocolate bar (60-70% cocoa), chopped finely
- 1 teaspoon instant espresso powder optional, but highly recommended
The Structure
- 2 large eggs room temperature
- 1 egg yolk
- 3/4 cup 150g granulated white sugar
- 1/4 cup 50g light brown sugar, packed
- 1 teaspoon vanilla extract
The Dry Ingredients
- 1/2 cup + 1 tablespoon 70g all-purpose flour (spooned and leveled)
- 1/4 cup 20g unsweetened cocoa powder (Dutch-processed preferred)
- 1/2 teaspoon fine sea salt
The Finish
- Flaky sea salt like Maldon for sprinkling
- 1/2 cup semi-sweet chocolate chips optional mix-in
Notes
-
Prep the Oven and Pan:
Preheat your oven to 350°F (175°C). Line an 8×8 inch metal baking pan with parchment paper, leaving an overhang on the sides so you can easily lift the brownies out later. -
Melt the Chocolate & Butter:
In a small saucepan over medium-low heat, melt the butter. (Pro tip: Let it bubble until it turns golden brown for extra flavor!). Remove from heat and immediately stir in the chopped Dark Chocolate and espresso powder. Stir until smooth and glossy. Set aside to cool slightly. -
The Ribbon Stage (Crucial Step):
In a large bowl using an electric mixer, beat the eggs, egg yolk, granulated sugar, and brown sugar on medium-high speed. Beat for a full 3–5 minutes until the mixture is pale, thick, and falls off the beaters in “ribbons.” This creates that shiny crackly top! -
Combine Wet Ingredients:
Pour the slightly cooled chocolate/butter mixture into the egg mixture. Add the vanilla extract. Gently fold with a rubber spatula until combined. -
Add Dry Ingredients:
Sift the flour, cocoa powder, and fine sea salt directly into the bowl. Gently fold the batter just until the white streaks of flour disappear. Do not over-mix, or your brownies will be tough! If adding extra chocolate chips, fold them in now. -
Bake:
Pour the thick batter into your prepared pan and smooth the top. Bake for 22–27 minutes. -
The Doneness Test:
Check them at 22 minutes. A toothpick inserted into the center should come out with moist crumbs attached, not raw batter. If it comes out clean, they are over-baked! There should still be a slight jiggle in the very center. -
Cool and Slice:
Remove from the oven and sprinkle immediately with flaky sea salt. Let the Dark Chocolate Brownies cool completely in the pan (about 1 hour). Lift them out using the parchment paper and slice with a sharp knife


