
Let’s be honest for a second: is there a better way to repurpose old, stale carbs than French toast? I don’t think so. You take a loaf of bread that is practically a doorstop, soak it in a rich custard, fry it in butter, and drown it in syrup. It is absolute alchemy.
We all have that memory of waking up to the smell of butter browning in a pan. It screams “weekend.” It tells you that, for at least the next hour, you have zero responsibilities other than eating something delicious.
But here is the tragedy: so many people make bad French toast. I’m talking about the soggy, limp slices that taste like scrambled eggs on wet bread. Or the ones that are burnt to a crisp on the outside but still raw and doughy in the middle. It’s heartbreaking.
We need to fix that. We need to reclaim this brunch staple and give it the respect it deserves. So, grab your skillet and let’s chat about how to turn simple ingredients into a breakfast masterpiece. And no, we aren’t counting calories today 🙂
The Bread: It Makes or Breaks the Dish
If you take a slice of flimsy, processed white sandwich bread and dunk it in milk, you will get mush. That is just physics. The bread needs structure. It needs to stand up to the custard.
You need sturdy bread.
My absolute favorite choice is Challah. It’s an egg-enriched bread that is naturally sweet and pillowy. When you fry it, the outside gets this incredible golden crust while the inside stays creamy. Brioche is a close second for the same reasons.
If you can’t find those, buy a loaf of thick-cut Texas Toast or a rustic French loaf. Just steer clear of the thin stuff.
The Stale Factor
This sounds counterintuitive, but fresh bread is the enemy. Fresh bread contains too much moisture. If you try to soak it, it falls apart. You want bread that is slightly thirsty.
FYI, if you only have a fresh loaf, don’t panic. Slice it and lay the pieces out on a wire rack for a few hours (or overnight) to dry out. Or, pop the slices in a low oven (200°F) for 10 minutes. You want them to feel a little stale to the touch. This ensures they soak up the custard without disintegrating.
The Custard: More Than Just Eggs and Milk
A lot of people just whisk an egg with a splash of milk and call it a day. That works, but it won’t change your life. To get that restaurant-quality richness, you need to think about the fat content.
Use whole milk or half-and-half.
Skim milk just doesn’t cut it here. You want the fat to create a creamy interior. I usually do a ratio of roughly 1/4 cup of milk per egg. This ratio prevents the dish from tasting too “eggy.”
Flavoring the Mix
The custard is your chance to add personality.
- Vanilla Extract: Be generous. I use a full teaspoon for every two eggs.
- Cinnamon: Essential. Whisk it well, or it will clump.
- Nutmeg: This is the secret weapon. Just a tiny pinch of freshly grated nutmeg adds a warmth that people can’t quite identify, but they love.
- Salt: Yes, salt. A pinch of salt wakes up the sugar. Without it, the flavor falls flat.
- Sugar: I add a tablespoon of sugar or maple syrup directly into the custard. It helps with caramelization in the pan.
If you are a fan of sweet breakfasts like homemade cinnamon rolls, you know that the filling is everything; think of the custard as the “filling” for your bread.
The Soak: Timing is Everything
How long do you leave the bread in the bowl? This is the most stressful part of the process for beginners.
The answer depends on your bread.
- Dry, thick Brioche: You can soak this for 10–20 seconds per side. You want the custard to penetrate deep into the center.
- Standard White Bread: A quick dip—maybe 2 seconds per side—is all you need.
The squish test: gently press the center of the bread. It should feel soft and heavy, like a water balloon, but it shouldn’t be falling apart. If it starts to break under its own weight, you soaked it too long. Get it in the pan immediately!
The Cooking Method: Butter vs. Oil
Here is a controversial opinion: I don’t cook French toast in pure butter.
Wait, hear me out. Butter has a low smoke point. It burns easily. Since French toast takes a few minutes to cook through, pure butter often turns black and bitter before the center of the bread cooks.
My Solution:
I use a mix of butter and a neutral oil (like vegetable or canola). The oil protects the butter solids from burning, but you still get that buttery flavor.
Alternatively, you can use clarified butter (ghee), which can handle higher heat.
Heat Management
Preheat your pan to medium heat. Not high. Never high.
If the pan is too hot, the sugar in the custard will scorch immediately. You will end up with a blackened exterior and a raw, runny interior.
Cook the slices for about 3–4 minutes per side. You want a deep, mahogany brown color. If it’s browning too fast, turn the heat down. Patience is your best friend here.
The Soggy Center Dilemma
Have you ever cut into a beautiful slice of French toast only to find a pocket of raw egg in the middle? It’s gross.
If you are cooking thick slices (over an inch thick), the pan might not be enough.
The Oven Finish Trick:
Sear the bread in the pan until golden brown on both sides. Then, transfer the slices to a wire rack set on a baking sheet and finish them in a 350°F oven for 5–10 minutes.
This technique ensures the custard cooks all the way through without burning the crust. It also puffs up the bread beautifully, making it look like a soufflé.
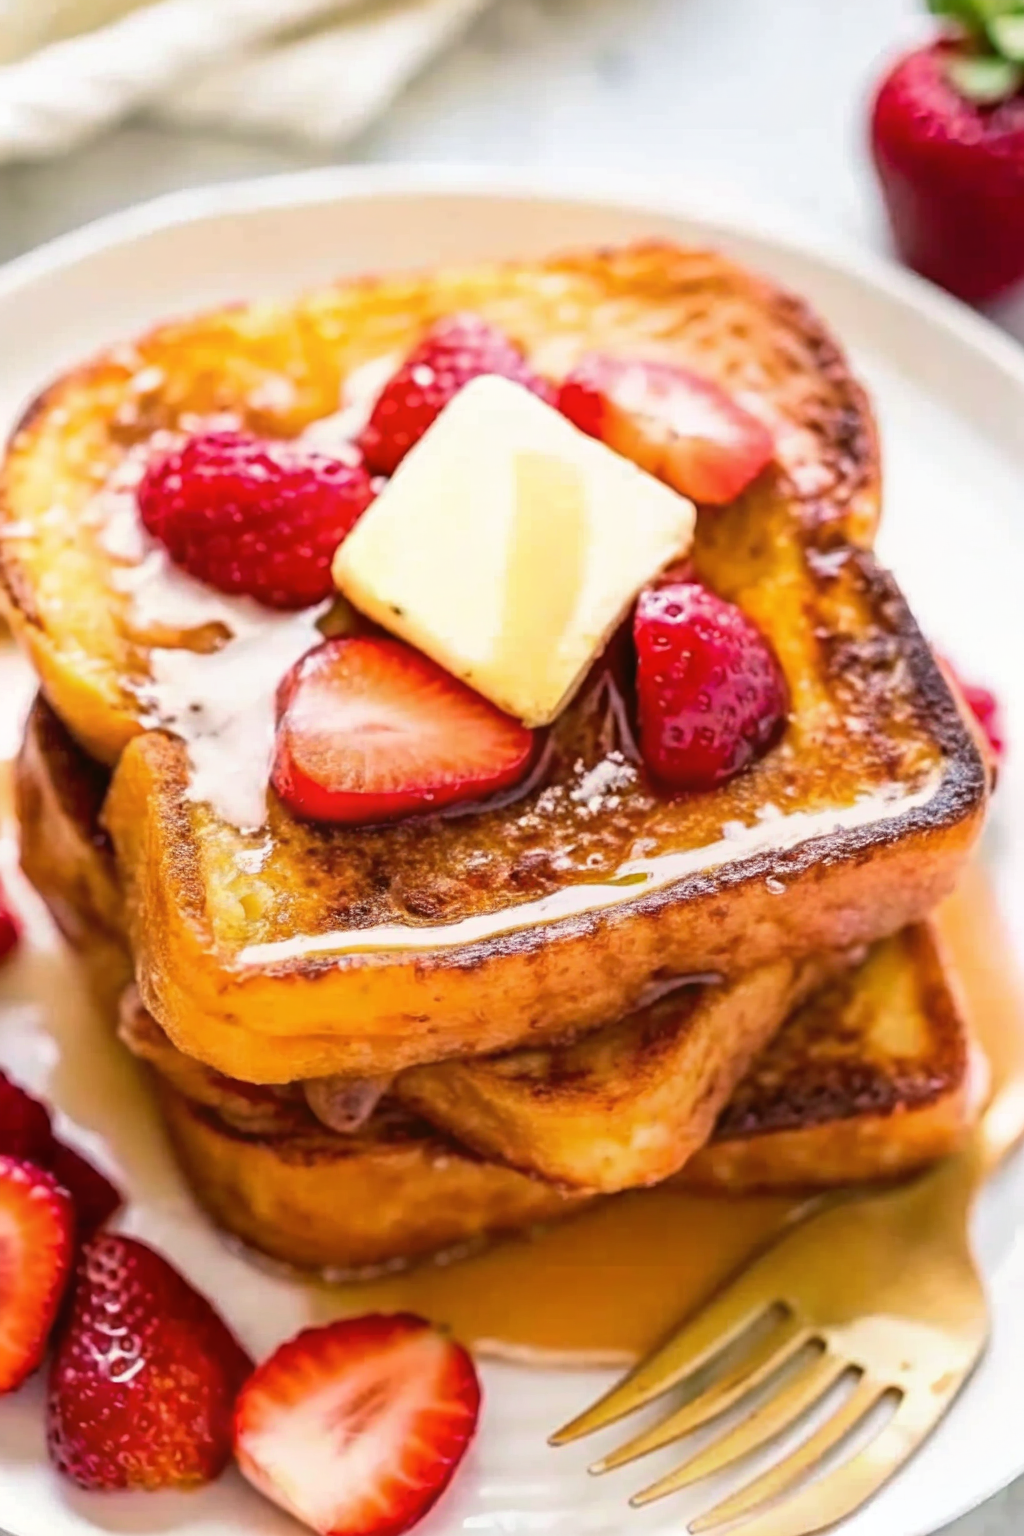
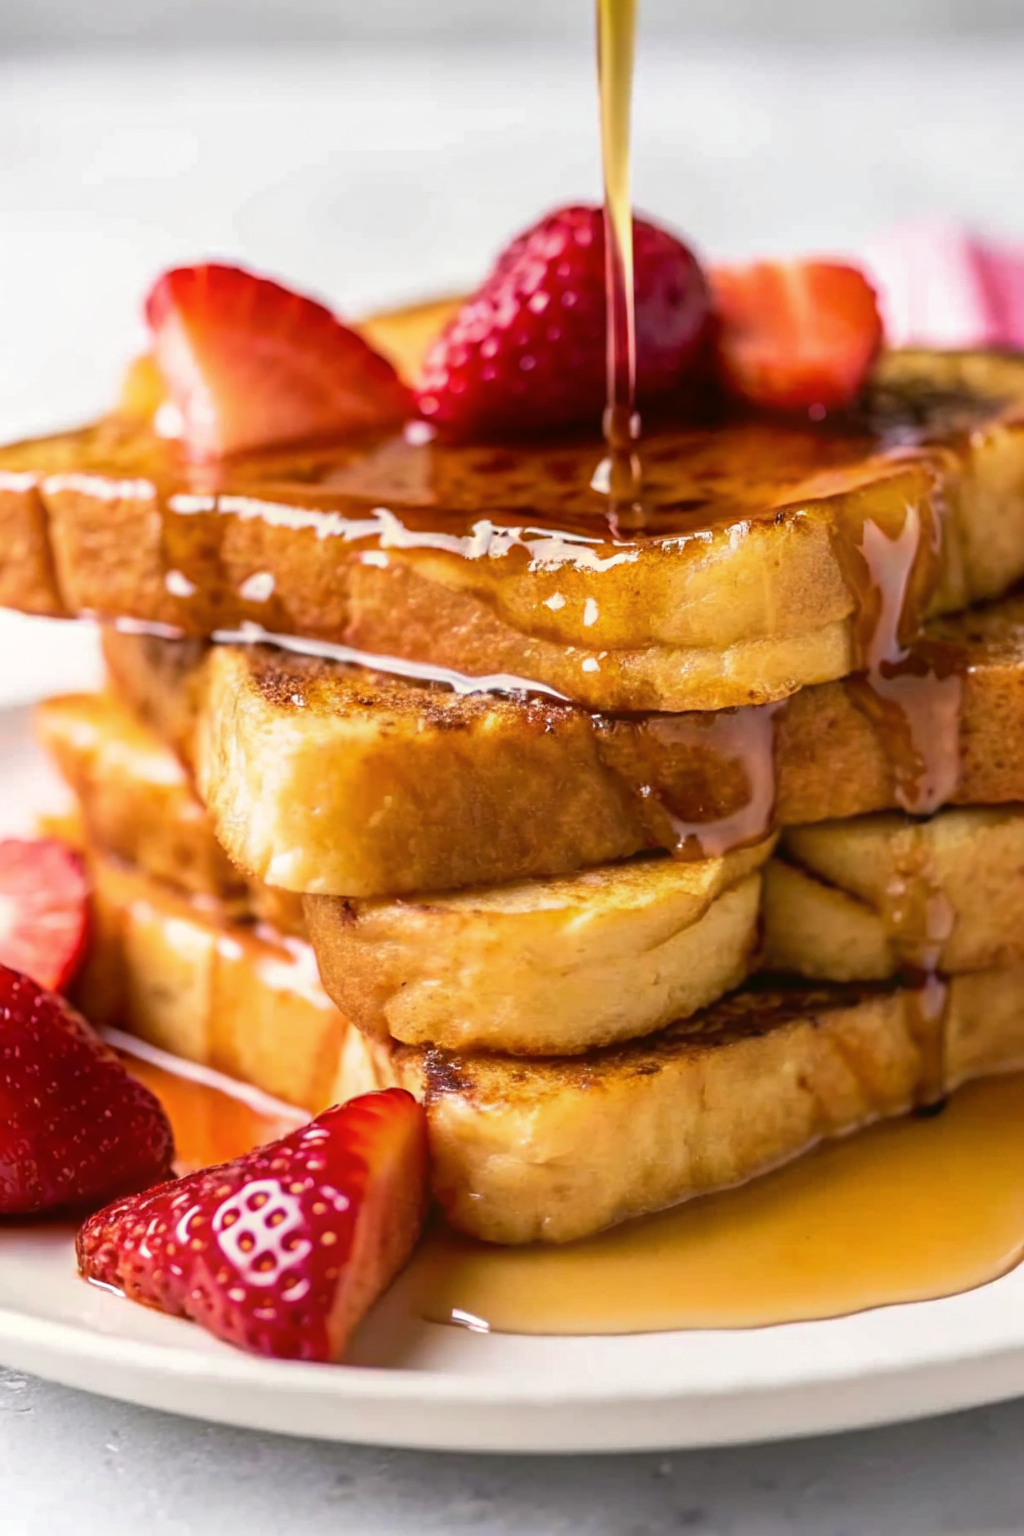
Toppings: Beyond the Maple Syrup
Look, I respect pure maple syrup. It’s a classic for a reason. But sometimes you want to mix it up.
- Fresh Fruit: Berries cut the richness of the custard.
- Whipped Cream: Obviously.
- Nut Butters: A smear of peanut or almond butter adds protein and saltiness.
- Yogurt: A dollop of Greek yogurt adds a nice tang.
- Lemon Curd: If you want bright, zesty flavor, this is a game-changer.
If you are hosting a brunch and want to offer variety, consider serving a savory option alongside the sweet toast. A tray of mini quiches provides a great salty contrast to the sugary syrup, keeping your guests’ palates balanced.
Variations on the Theme
Once you master the basic technique, you can get weird with it (in a good way).
Stuffed French Toast
Slice a pocket into a thick piece of bread. Stuff it with sweetened cream cheese and strawberries. Dip and fry as usual. It’s basically dessert for breakfast.
Crusted French Toast
After dipping the bread in the custard, press it into crushed cornflakes or panko breadcrumbs. Fry it up. The crunch is unbelievable. It reminds me of the fancy versions you get at upscale diners.
French Toast Sticks
Cut the bread into batons before dipping. These are crispier because they have more surface area. Plus, you can eat them with your hands, which is always more fun.
Savory French Toast? Yes, Please.
We always associate this dish with sugar, but savory versions are incredible.
Skip the sugar, vanilla, and cinnamon in the custard. Add salt, pepper, parmesan cheese, and fresh herbs. Fry it in olive oil.
Top it with a fried egg and some hot sauce. It’s rich, salty, and satisfying. If you are someone who prefers salty snacks like smoked salmon bites, a savory Parmesan French toast might actually be your new favorite breakfast.
Troubleshooting: Why Did It Fail?
Let’s troubleshoot some common disasters.
“It tastes like an omelet.”
You didn’t whisk the eggs enough. If you see streaks of egg white on the bread, it means the whites didn’t incorporate into the milk. Whisk it until it is totally uniform. You also might have used too many eggs and not enough milk.
“It’s greasy.”
Your pan wasn’t hot enough. If the oil isn’t hot, the bread just sits there and sponges it up. The bread should sizzle the second it hits the pan.
“The crust is tough.”
You probably used bread that was too crusty and didn’t let it soak long enough. If you are using a baguette, you really need to give it time to drink up the liquid.
Making Ahead and Reheating
Can you make French toast ahead of time? Yes!
I often make a huge batch on Sunday morning. I let the leftovers cool completely on a wire rack. Then, I freeze them in a single layer. Once frozen, I toss them in a freezer bag.
To Reheat:
Do not microwave them. They get rubbery.
Pop the frozen slices directly into the toaster. They come out crispy and hot, just like the store-bought frozen waffles, but a million times better.
A Note on “Healthy” French Toast
I get asked a lot if you can make this healthy.
You can use whole wheat bread. You can use egg whites. You can use almond milk.
It will be… edible. But let’s manage expectations. French toast is comfort food. It relies on the chemistry of fat and starch to create that luxurious texture.
If you strip away the yolks and the fat, you lose the custard effect. You just get wet, hot bread. IMO, it’s better to eat the real thing once in a while and enjoy it fully than to eat a sad, diet version every day :/
Why We Love It
There is a nostalgia factor here. Maybe your dad made it for you on birthdays. Maybe it was the only thing you knew how to cook in college.
It transforms humble ingredients into a feast. Flour, water, yeast, eggs, milk. That’s it. Yet, when combined correctly, they create a dish that feels decadent.
It is also forgiving. If you burn one side, you just flip it over and hide it with powdered sugar. No one has to know.
The Final Sizzle
So, this weekend, skip the cereal. Look at that loaf of bread sitting on your counter. Is it getting a little hard? Perfect.
Whisk up some eggs and milk. Grate some nutmeg. Get the butter foaming in the pan.
There is a specific sound—a gentle sizzle—when the soaked bread hits the hot skillet. It’s the sound of a good morning.
Don’t overthink it. Trust your instincts on the soak. Watch the heat. And pour the syrup like you mean it.
For a deep dive into the science of why egg-enriched breads work best for this dish, check out this guide from Bon Appétit. It explains the protein structure in a way that actually makes sense.
Now, if you’ll excuse me, I need to go buy some brioche. I’ve made myself hungry. Happy cooking!
Perfect French Toast Recipe
Author: Prep: 10 minutes Cook: 12 minutes Total: 25 minutesEquipment
- Non-stick skillet
- Mixing bowl
- Whisk
- Spatula
- Measuring cups & spoons
- Shallow dish (for soaking bread)
Ingredients
For the French Toast
- 8 slices thick bread brioche or challah recommended
- 3 large eggs
- ¾ cup milk or heavy cream for richer texture
- 1 tsp vanilla extract
- ½ tsp ground cinnamon
- 1 tbsp sugar optional
- 1 –2 tbsp butter for the skillet
- Pinch of salt
Optional Toppings
- Maple syrup
- Fresh berries
- Powdered sugar
- Whipped cream
- Toasted nuts
Instructions
- Make the custard mixture:
- Crack the eggs into a mixing bowl and whisk until smooth. Add the milk, vanilla, cinnamon, sugar, and salt. Whisk again until everything looks well combined.
- Prepare the bread:
- Place the bread slices in a shallow dish. Pour the custard mixture over the bread or dip each slice individually, allowing each side to soak for 10–15 seconds. Slightly stale bread works best because it holds up without falling apart.
- Heat the skillet:
- Set a non-stick skillet over medium-low heat. Add a little butter and let it melt until bubbly but not brown.
- Cook the French toast:
- Place the soaked bread slices onto the hot skillet. Cook for 2–3 minutes per side, or until golden brown with crispy edges. Adjust the heat if needed to avoid burning.
- Serve:
- Transfer the French toast to a plate and let it rest for a minute or two. Top with syrup, berries, powdered sugar, or any of your favorite toppings.
Notes
- Use day-old bread: Slightly stale bread absorbs the custard better and gives you a creamier interior without getting soggy.
- For extra richness: Replace part of the milk with heavy cream.
- Want caramelized edges? Sprinkle a little sugar on the bread before flipping it in the pan.
- Use thick slices: Aim for 1–1.5 inches to get that perfect custardy center.
- Make ahead: Mix the custard the night before and store in the fridge for easier mornings.
- Storage: Cooked French toast keeps well in the fridge for 2–3 days and reheats beautifully in the toaster.
Nutrition


