
We need to have a serious talk about the state of nachos in this world. How many times have you ordered a plate at a bar, only to receive a mountain of dry chips hiding a sad, lonely puddle of cheese in the center? It breaks my heart every single time. That is not a meal; that is a betrayal. When I say Loaded Nachos, I mean it. I want every single chip to carry its own weight. I want a perfect ratio of crunch, gooey cheese, savory meat, and bright toppings in every bite.
If you think making nachos just involves throwing a bag of chips in the microwave with some cheddar, we need to intervene immediately. A great tray of nachos requires architecture. It requires strategy. We are going to build a masterpiece that will ruin you for all other appetizers. Put on your apron, grab a sheet pan, and let’s fix this culinary injustice together.
The Foundation: It All Starts With the Chip
You cannot build a skyscraper on a swamp, and you cannot build Loaded Nachos on flimsy chips. If you use those paper-thin, restaurant-style chips that shatter if you look at them wrong, you will fail. They simply cannot handle the weight of the glory we are about to pile on top.
Choose the Right Vessel
Go for a thick, sturdy corn tortilla chip. You want something with structural integrity. I personally love the “cantina style” chips or the ones labeled “thick cut.” They have a robust corn flavor that stands up to spicy meat and rich cheese.
Salt Matters
Have you ever tasted a chip before adding it to the pile? Some brands go overboard with the salt. Since we are adding salty cheese, salty meat, and salty pickled jalapeños, you might want to look for a lightly salted chip. It balances the final flavor profile so you don’t feel like you just swallowed a mouthful of seawater.
The Cheese Strategy: Shred It Yourself
I will say this until I am blue in the face: Do not use pre-shredded cheese.
I know, I know. It’s convenient. It comes in a bag. But manufacturers coat that cheese in anti-caking agents like potato starch and cellulose to keep the strands from sticking together. Do you know what else those agents do? They prevent the cheese from melting into that luxurious, gooey blanket we crave. Pre-shredded cheese sweats grease and keeps its shape. It looks sad. :/
The Best Cheese Blend
Grab a block and a grater. It takes three minutes, and the result changes the game. I recommend a blend for the best flavor and meltability:
- Monterey Jack: This is the melting king. It turns into liquid gold.
- Sharp Cheddar: This adds the flavor punch that Jack lacks.
- Asiago or Cotija: sprinkle a little of this on at the end for a salty finish.
If you usually make sausage balls recipe for your parties, you already know the power of freshly grated cheddar. Apply that same logic here. The difference in texture will blow your mind.
The Protein: Seasoning is Key
While you can technically make vegetarian nachos, I believe a seasoned protein anchors the dish. Ground beef is the classic choice, but you can’t just brown it and dump it on. You need to season it aggressively.
The Taco Meat Upgrade
Cook your ground beef (or turkey) with plenty of chili powder, cumin, garlic powder, and onion powder. Add a splash of water or tomato sauce to create a loose, saucy consistency. You don’t want dry crumbles of meat rolling off the chips; you want a saucy mixture that clings to them.
Other Protein Options
- Shredded Chicken: Use a rotisserie chicken tossed in salsa verde.
- Chorizo: This adds a smoky, spicy kick that cuts through the rich cheese.
- Beans: Whether you use black beans or refried beans, rinse them well (if using whole) or thin them out (if using refried).
Imagine the protein you serve in a fancy shrimp cocktail. You treat that shrimp with respect, right? You poach it perfectly. Treat your nacho meat with the same respect. Don’t let it be an afterthought.
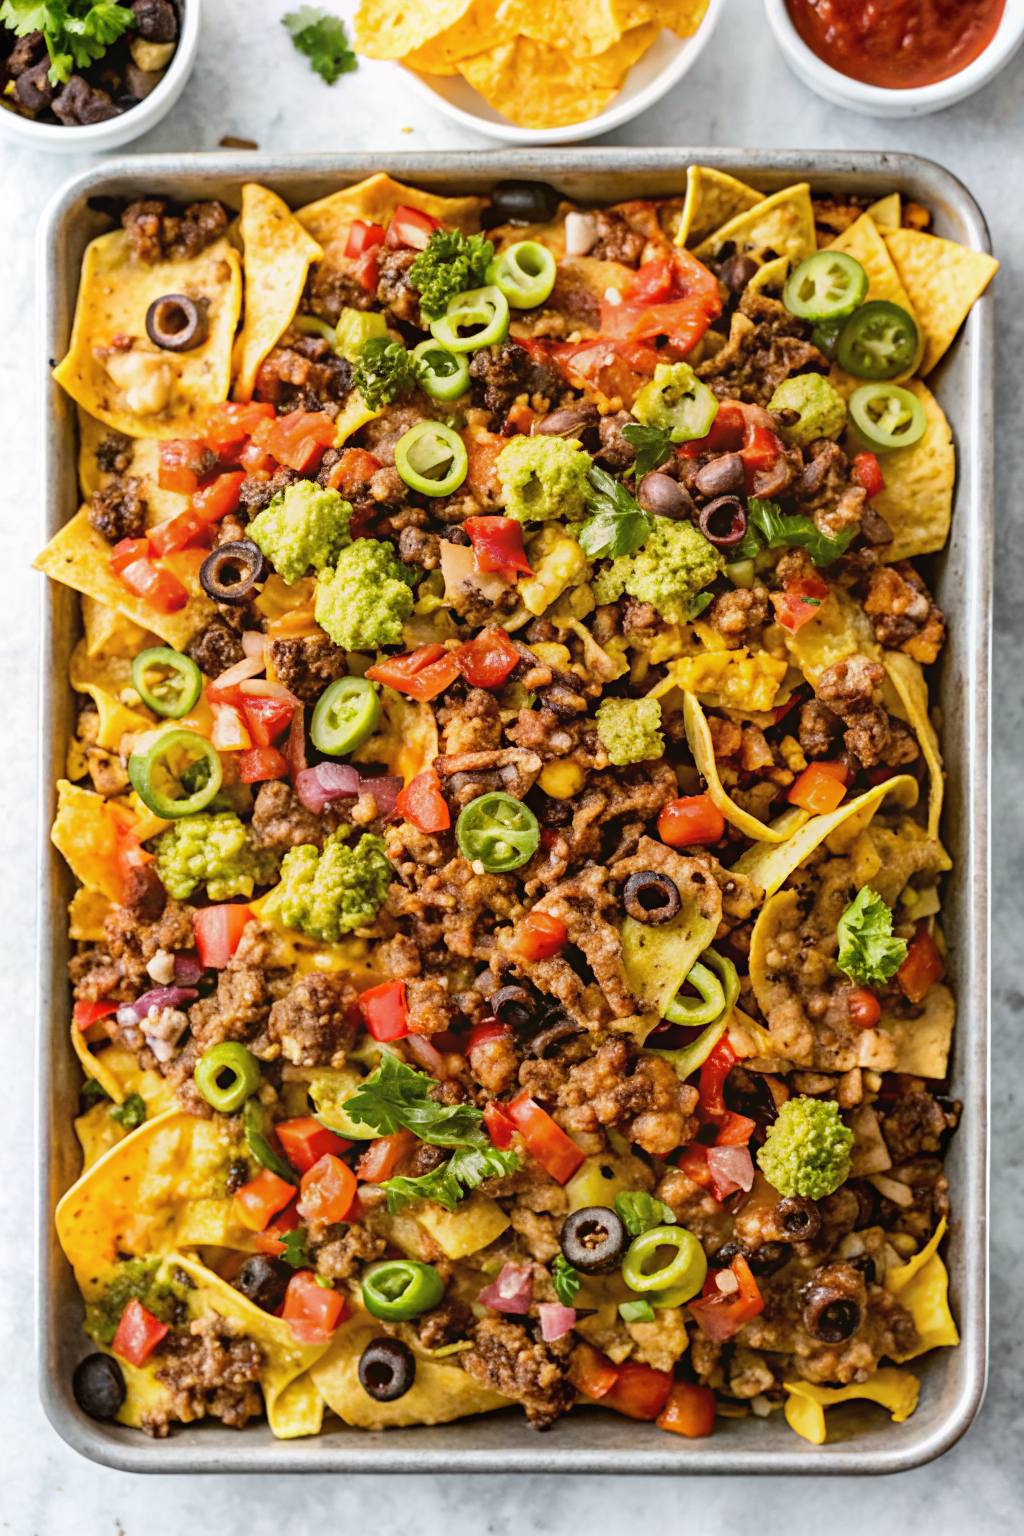
The Architecture: The Layering Method
This is where amateurs mess up. They pile the chips into a mountain, dump everything on top, and call it a day. That results in the “Nacho Lottery,” where one person gets the bite with all the cheese and everyone else gets dry chips. We hate that.
Wide, Not High
Use your biggest rimmed baking sheet (a half-sheet pan is perfect). Line it with parchment paper or foil for easy cleanup. Spread the chips out in a single, overlapping layer. You want maximum surface area.
The Lasagna Technique
If you must build vertically, you have to layer.
- Layer 1: Chips.
- Layer 2: Half the cheese and half the meat.
- Layer 3: More chips.
- Layer 4: The remaining cheese and meat.
This ensures that even the chips at the bottom get some love. No chip left behind!
Baking: The Meltdown
Preheat your oven to 400°F (200°C). We want a blast of high heat to melt the cheese quickly without burning the chips.
Pop the tray in for about 5 to 10 minutes. You don’t need a timer so much as you need eyeballs. Look for the cheese to bubble aggressively. You want the edges of the chips to just start turning golden brown.
Pro Tip: If you added beans, check them to ensure they aren’t drying out. If you used scoops, make sure the cheese pools inside them rather than running off onto the parchment paper.
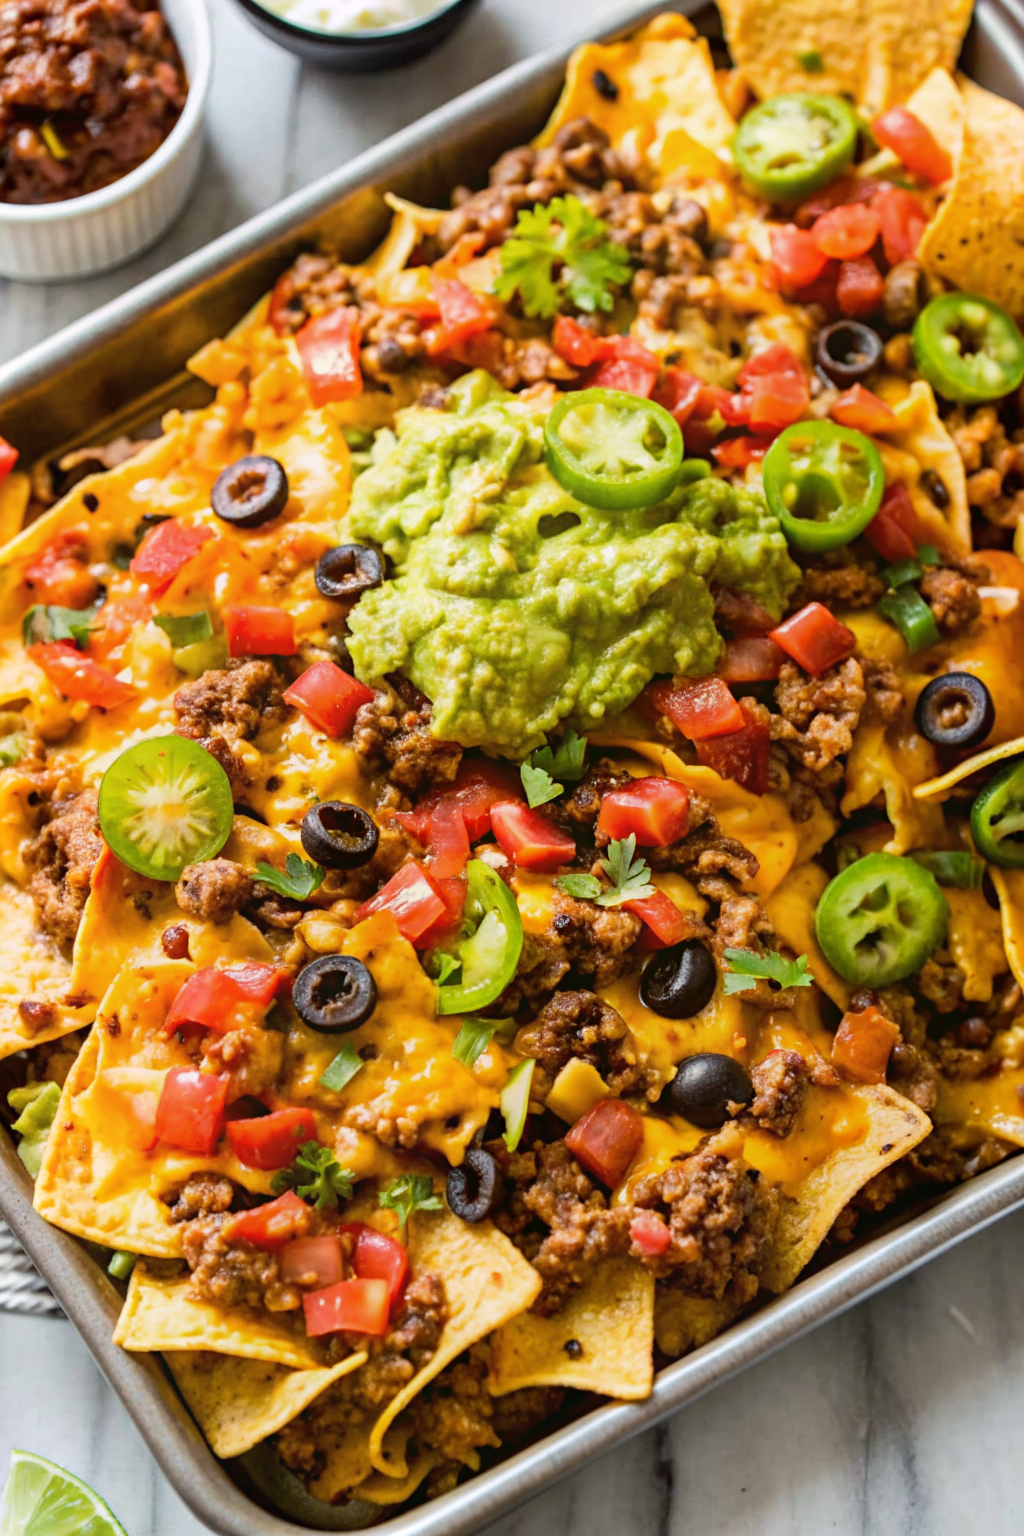
The Toppings: Hot vs. Cold
Here lies the most critical rule of Loaded Nachos: Know the difference between hot and cold toppings.
You should never, ever bake your guacamole. Warm avocado tastes like disappointment. You bake the chips, cheese, and meat. Everything else goes on fresh after you pull the tray from the oven. This temperature contrast makes the dish dynamic. The hot, salty cheese hits the cold, creamy sour cream, and magic happens.
The Cold Topping Roster
- Sour Cream: Put it in a squeeze bottle or a Ziploc bag with the corner snipped off. Drizzle it over the whole tray. It looks professional and ensures even distribution.
- Guacamole: Dollop this strategically around the tray so people can scoop it.
- Pico de Gallo: Fresh tomatoes, onions, and cilantro add the acid needed to cut the fat.
- Pickled Jalapeños: I prefer pickled over fresh because the vinegar adds a necessary zing.
- Green Onions: Slice the green parts for a pop of color.
- Radishes: Thinly sliced radishes add a peppery crunch that looks beautiful.
Troubleshooting Common Disasters
Even with a foolproof plan, things can go wrong. Let’s troubleshoot.
The Soggy Chip Syndrome
Did your nachos turn into a wet mush? You probably used toppings that were too wet.
- Drain your salsa: If your pico de gallo is swimming in juice, use a slotted spoon.
- Drain the meat: Don’t pour the grease from the ground beef onto the chips.
- Eat fast: Nachos have a shelf life of about 15 minutes. They are not leftovers. You must consume them immediately.
The Burnt Cheese
Did the cheese separate and turn oily? You likely baked it too long or used a low-quality cheddar. High heat for a short time is the secret. If it separates, cover it with more sour cream. No one will know. 🙂
The Uneven Distribution
Did Uncle Bob eat all the meat in the first three bites? This is why we spread the chips out on a sheet pan rather than stacking them. It democratizes the toppings. Everyone gets a fair shot at the good stuff.
Variations to Try
Once you master the classic, you can get weird with it.
BBQ Chicken Nachos
Swap the taco meat for shredded chicken tossed in BBQ sauce. Use red onions instead of white, and swap the cheddar for a mix of mozzarella and Gouda. Top with cilantro.
Breakfast Nachos
Who says this is only for dinner? Use sausage crumbles, bacon, and scramble some eggs. Pour a cheese sauce over the top. It beats a boring bowl of oatmeal any day.
Dessert Nachos
Okay, stick with me. Cinnamon sugar tortilla chips. Drizzle with chocolate sauce and caramel. Top with strawberries and whipped cream. It captures the same joy as a classic cheesecake recipe but in a shareable, finger-food format.
Serving: The Party Centerpiece
When you pull that sizzling tray out of the oven, don’t bother transferring it to a serving platter. Just place the hot sheet pan on a trivet in the middle of the table. It looks rustic and inviting.
Encourage your guests to dig in from all sides. There is something primal and bonding about eating from a communal pile of food. It breaks down barriers. You can’t be formal when you have cheese stretching from the pan to your mouth.
Why This Meal Wins
I love Loaded Nachos because they are infinitely customizable. You can clean out your fridge. Have half a bell pepper? Dice it up. A leftover grilled steak? Slice it thin. It is the ultimate “I don’t want to cook but I want to eat like a king” meal.
Plus, it satisfies every craving at once. You get salty, savory, spicy, creamy, crunchy, and fresh all in one bite. Very few dishes can claim that level of complexity with such simple preparation.
A Final Plea for Quality
Please, for the love of food, skip the neon orange “nacho cheese” sauce from a jar. You know the one I’m talking about. It has the consistency of paint and glows in the dark. Real cheese offers flavor nuances that the jarred stuff simply cannot match. If you really want a liquid cheese (queso), make a béchamel sauce and melt real cheese into it. According to the experts at Serious Eats, making your own dips and sauces elevates the entire snacking experience, and nachos are no exception.
So, go grab a block of Monterey Jack. Find the biggest baking sheet you own. Invite a few friends over (or don’t, I won’t judge if you eat the whole tray). Build your layers with care, bake until bubbly, and enjoy the best nachos of your life. IMO, you’ve earned it.
Now, excuse me while I go check my own oven. I think I smell the cheese bubbling.We need to have a serious talk about the state of nachos in this world. How many times have you ordered a plate at a bar, only to receive a mountain of dry chips hiding a sad, lonely puddle of cheese in the center? It breaks my heart every single time. That is not a meal; that is a betrayal. When I say Loaded Nachos, I mean it. I want every single chip to carry its own weight. I want a perfect ratio of crunch, gooey cheese, savory meat, and bright toppings in every bite.
If you think making nachos just involves throwing a bag of chips in the microwave with some cheddar, we need to intervene immediately. A great tray of nachos requires architecture. It requires strategy. We are going to build a masterpiece that will ruin you for all other appetizers. Put on your apron, grab a sheet pan, and let’s fix this culinary injustice together.
The Foundation: It All Starts With the Chip
You cannot build a skyscraper on a swamp, and you cannot build Loaded Nachos on flimsy chips. If you use those paper-thin, restaurant-style chips that shatter if you look at them wrong, you will fail. They simply cannot handle the weight of the glory we are about to pile on top.
Choose the Right Vessel
Go for a thick, sturdy corn tortilla chip. You want something with structural integrity. I personally love the “cantina style” chips or the ones labeled “thick cut.” They have a robust corn flavor that stands up to spicy meat and rich cheese.
Salt Matters
Have you ever tasted a chip before adding it to the pile? Some brands go overboard with the salt. Since we are adding salty cheese, salty meat, and salty pickled jalapeños, you might want to look for a lightly salted chip. It balances the final flavor profile so you don’t feel like you just swallowed a mouthful of seawater.
The Cheese Strategy: Shred It Yourself
I will say this until I am blue in the face: Do not use pre-shredded cheese.
I know, I know. It’s convenient. It comes in a bag. But manufacturers coat that cheese in anti-caking agents like potato starch and cellulose to keep the strands from sticking together. Do you know what else those agents do? They prevent the cheese from melting into that luxurious, gooey blanket we crave. Pre-shredded cheese sweats grease and keeps its shape. It looks sad. :/
The Best Cheese Blend
Grab a block and a grater. It takes three minutes, and the result changes the game. I recommend a blend for the best flavor and meltability:
- Monterey Jack: This is the melting king. It turns into liquid gold.
- Sharp Cheddar: This adds the flavor punch that Jack lacks.
- Asiago or Cotija: sprinkle a little of this on at the end for a salty finish.
If you usually make sausage balls recipe for your parties, you already know the power of freshly grated cheddar. Apply that same logic here. The difference in texture will blow your mind.
The Protein: Seasoning is Key
While you can technically make vegetarian nachos, I believe a seasoned protein anchors the dish. Ground beef is the classic choice, but you can’t just brown it and dump it on. You need to season it aggressively.
The Taco Meat Upgrade
Cook your ground beef (or turkey) with plenty of chili powder, cumin, garlic powder, and onion powder. Add a splash of water or tomato sauce to create a loose, saucy consistency. You don’t want dry crumbles of meat rolling off the chips; you want a saucy mixture that clings to them.
Other Protein Options
- Shredded Chicken: Use a rotisserie chicken tossed in salsa verde.
- Chorizo: This adds a smoky, spicy kick that cuts through the rich cheese.
- Beans: Whether you use black beans or refried beans, rinse them well (if using whole) or thin them out (if using refried).
Imagine the protein you serve in a fancy shrimp cocktail. You treat that shrimp with respect, right? You poach it perfectly. Treat your nacho meat with the same respect. Don’t let it be an afterthought.
The Architecture: The Layering Method
This is where amateurs mess up. They pile the chips into a mountain, dump everything on top, and call it a day. That results in the “Nacho Lottery,” where one person gets the bite with all the cheese and everyone else gets dry chips. We hate that.
Wide, Not High
Use your biggest rimmed baking sheet (a half-sheet pan is perfect). Line it with parchment paper or foil for easy cleanup. Spread the chips out in a single, overlapping layer. You want maximum surface area.
The Lasagna Technique
If you must build vertically, you have to layer.
- Layer 1: Chips.
- Layer 2: Half the cheese and half the meat.
- Layer 3: More chips.
- Layer 4: The remaining cheese and meat.
This ensures that even the chips at the bottom get some love. No chip left behind!
Baking: The Meltdown
Preheat your oven to 400°F (200°C). We want a blast of high heat to melt the cheese quickly without burning the chips.
Pop the tray in for about 5 to 10 minutes. You don’t need a timer so much as you need eyeballs. Look for the cheese to bubble aggressively. You want the edges of the chips to just start turning golden brown.
Pro Tip: If you added beans, check them to ensure they aren’t drying out. If you used scoops, make sure the cheese pools inside them rather than running off onto the parchment paper.
The Toppings: Hot vs. Cold
Here lies the most critical rule of Loaded Nachos: Know the difference between hot and cold toppings.
You should never, ever bake your guacamole. Warm avocado tastes like disappointment. You bake the chips, cheese, and meat. Everything else goes on fresh after you pull the tray from the oven. This temperature contrast makes the dish dynamic. The hot, salty cheese hits the cold, creamy sour cream, and magic happens.
The Cold Topping Roster
- Sour Cream: Put it in a squeeze bottle or a Ziploc bag with the corner snipped off. Drizzle it over the whole tray. It looks professional and ensures even distribution.
- Guacamole: Dollop this strategically around the tray so people can scoop it.
- Pico de Gallo: Fresh tomatoes, onions, and cilantro add the acid needed to cut the fat.
- Pickled Jalapeños: I prefer pickled over fresh because the vinegar adds a necessary zing.
- Green Onions: Slice the green parts for a pop of color.
- Radishes: Thinly sliced radishes add a peppery crunch that looks beautiful.
Troubleshooting Common Disasters
Even with a foolproof plan, things can go wrong. Let’s troubleshoot.
The Soggy Chip Syndrome
Did your nachos turn into a wet mush? You probably used toppings that were too wet.
- Drain your salsa: If your pico de gallo is swimming in juice, use a slotted spoon.
- Drain the meat: Don’t pour the grease from the ground beef onto the chips.
- Eat fast: Nachos have a shelf life of about 15 minutes. They are not leftovers. You must consume them immediately.
The Burnt Cheese
Did the cheese separate and turn oily? You likely baked it too long or used a low-quality cheddar. High heat for a short time is the secret. If it separates, cover it with more sour cream. No one will know. 🙂
The Uneven Distribution
Did Uncle Bob eat all the meat in the first three bites? This is why we spread the chips out on a sheet pan rather than stacking them. It democratizes the toppings. Everyone gets a fair shot at the good stuff.
Variations to Try
Once you master the classic, you can get weird with it.
BBQ Chicken Nachos
Swap the taco meat for shredded chicken tossed in BBQ sauce. Use red onions instead of white, and swap the cheddar for a mix of mozzarella and Gouda. Top with cilantro.
Breakfast Nachos
Who says this is only for dinner? Use sausage crumbles, bacon, and scramble some eggs. Pour a cheese sauce over the top. It beats a boring bowl of oatmeal any day.
Dessert Nachos
Okay, stick with me. Cinnamon sugar tortilla chips. Drizzle with chocolate sauce and caramel. Top with strawberries and whipped cream. It captures the same joy as a classic cheesecake recipe but in a shareable, finger-food format.
Serving: The Party Centerpiece
When you pull that sizzling tray out of the oven, don’t bother transferring it to a serving platter. Just place the hot sheet pan on a trivet in the middle of the table. It looks rustic and inviting.
Encourage your guests to dig in from all sides. There is something primal and bonding about eating from a communal pile of food. It breaks down barriers. You can’t be formal when you have cheese stretching from the pan to your mouth.
Why This Meal Wins
I love Loaded Nachos because they are infinitely customizable. You can clean out your fridge. Have half a bell pepper? Dice it up. A leftover grilled steak? Slice it thin. It is the ultimate “I don’t want to cook but I want to eat like a king” meal.
Plus, it satisfies every craving at once. You get salty, savory, spicy, creamy, crunchy, and fresh all in one bite. Very few dishes can claim that level of complexity with such simple preparation.
A Final Plea for Quality
Please, for the love of food, skip the neon orange “nacho cheese” sauce from a jar. You know the one I’m talking about. It has the consistency of paint and glows in the dark. Real cheese offers flavor nuances that the jarred stuff simply cannot match. If you really want a liquid cheese (queso), make a béchamel sauce and melt real cheese into it. According to the experts at Serious Eats, making your own dips and sauces elevates the entire snacking experience, and nachos are no exception.
So, go grab a block of Monterey Jack. Find the biggest baking sheet you own. Invite a few friends over (or don’t, I won’t judge if you eat the whole tray). Build your layers with care, bake until bubbly, and enjoy the best nachos of your life. IMO, you’ve earned it.
Now, excuse me while I go check my own oven. I think I smell the cheese bubbling.
The Ultimate Sheet Pan Loaded Nachos
Author: Prep: 20 minutes Cook: 10 minutes Total: 30 minutesEquipment
- Large Rimmed Baking Sheet (Half Sheet Pan)
- Box Grater (for cheese)
- Large Skillet (for cooking meat)
- Parchment paper
Ingredients
The Base & Protein:
- 1 large bag Sturdy Corn Tortilla Chips look for “thick cut” or “cantina style”
- 1 lb Ground Beef or ground turkey
- 1 packet Taco Seasoning or homemade mix: chili powder, cumin, garlic powder
- ¼ cup Water or Tomato Sauce for saucy meat
The Cheese (Grate it yourself!):
- 8 oz Sharp Cheddar Cheese block shredded
- 8 oz Monterey Jack Cheese block shredded
- ¼ cup Cotija cheese or Asiago optional, for finishing
The Fresh Toppings (Add AFTER baking):
- 1 cup Pico de Gallo drained of excess liquid
- ½ cup Pickled Jalapeños
- ½ cup Sour Cream
- 1 large Avocado cubed or Guacamole
- ¼ cup Green Onions sliced
- 3-4 Radishes thinly sliced
- Fresh Cilantro chopped
Instructions
- Preheat: Preheat your oven to 400°F (200°C). Line a large rimmed baking sheet with parchment paper for easy cleanup.
- Cook the Meat: In a large skillet over medium-high heat, brown the ground beef until fully cooked. Drain excess grease. Add the taco seasoning and water (or tomato sauce). Simmer for 2-3 minutes until the meat is saucy but not watery.
- Shred the Cheese: While the meat simmers, grate your Cheddar and Monterey Jack cheeses. Do not use pre-shredded bagged cheese—it won’t melt properly!
- Layer 1 (The Foundation): Spread half of the tortilla chips in an even layer across the baking sheet. Top with half of the beef mixture and half of the shredded cheese.
- Layer 2 (The Architecture): Add the remaining chips on top, followed by the rest of the beef and the rest of the cheese. This “lasagna method” ensures the bottom chips aren’t dry and sad.
- Bake: Pop the tray into the oven for 5–10 minutes. Watch closely! You want the cheese bubbling and the edges of the chips turning slightly golden.
- Top & Serve: Remove from the oven. Immediately top with the cold toppings: dollops of guacamole/avocado, sour cream, pico de gallo, jalapeños, green onions, radishes, and cilantro.
- Enjoy: Serve the baking sheet directly on the table (on a trivet) and dig in while they are hot!
Notes
- Chip Choice: Use thick, sturdy corn chips. Thin restaurant-style chips will get soggy and break under the weight of these loaded nachos.
- The Cheese Rule: Pre-shredded cheese contains anti-caking agents that prevent a smooth melt. Always grate your own block cheese for that gooey stretch.
- Avoid Sogginess: Make sure to drain your pico de gallo or salsa with a slotted spoon before adding it. Wet toppings = soggy nachos.
- Temperature Contrast: Never bake your guacamole or sour cream! The magic lies in the contrast between the hot, salty cheese and the cool, fresh toppings.
- Variations: Feel free to swap the beef for shredded rotisserie chicken, chorizo, or black beans for a vegetarian option.
Nutrition


